Advertisement
Table of Contents
- 1 Table of Contents
- 2 Fill out Program Schedule Sheet
- 3 Select Watering Schedule
- 4 Set the Current Time
- 5 Set the Current Day
- 6 Select the Program (a or B)
- 7 Set Station Watering Days
- 8 (Custom Schedule Only)
- 9 Set Station Run Times
- 10 Set Watering Start Times
- 11 Set Controller to Automatic Operation
- Download this manual
INTRODUCTION
Congratulations on purchasing a Rain Bird ESP solid state controller. This manual describes how to in-
stall, operate, and maintain your controller. Please read these instructions carefully. For your conve-
nience, we have included a Quick Reference Guide below, so you can quickly find instructions for com-
mon tasks.
Quick Reference Guide
If you want to:
¨
Change the time of day............................
¨
Turn the controller off and on
(for example, because of rain)..................
¨
Adjust watering times for all stations
(for example, during a hot or cool period)...
¨
Start the sprinkler system manually..........
¨
Run the test program...............................
¨
Install a new battery................................
¨
Troubleshoot a controller problem.............
Technical Support: 1-800-RAIN BIRD
R R
AIN
AIN
PREFERRED BY PROFESSIONALS WORLDWIDE
page 4
page 8
page 9
page 9
page 10
page 14
page 14
1
B B
IRD
IRD
®
Installation,
Programming,
& Operation
ESP-4
ESP-6
ESP-8
Advertisement
Table of Contents

Related Manuals for Rain Bird ESP-4


Summary of Contents for Rain Bird ESP-4
- Page 1 ESP-8 INTRODUCTION Congratulations on purchasing a Rain Bird ESP solid state controller. This manual describes how to in- stall, operate, and maintain your controller. Please read these instructions carefully. For your conve- nience, we have included a Quick Reference Guide below, so you can quickly find instructions for com- mon tasks.
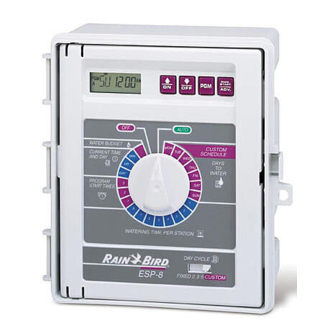
- Page 2 • Programming Dial — used to turn controller off and on, and for programming. ‘ Schedule Slide Switch — used to select one of the fixed-interval watering schedules or a custom watering schedule. Technical Support: 1-800-RAIN BIRD...
-
Page 3: Table Of Contents
A. Enter “0” for stations that are not used in Pro- gram A. • Repeat steps 2 - 4 for Program B. If you are using a fixed schedule, Program B will have the same water- ing days as Program A. Technical Support: 1-800-RAIN BIRD... -
Page 4: Select Watering Schedule
AM or PM. Ž Press ñ or ò to set the current hour. • Turn the dial to “MIN.” • The display shows the minute currently set. ‘ Press ñ or ò to set the current minute. Technical Support: 1-800-RAIN BIRD... -
Page 5: Set The Current Day
For example, if you’re using a two-day schedule and you want to start watering tomorrow, set the current day to “2.” If you’re using a three-day schedule and you want to start tomorrow, set the current day to “3.” Technical Support: 1-800-RAIN BIRD... -
Page 6: Select The Program (A Or B)
• Turn the dial to the next day of the week. Repeat steps 2 and 3 until you have set each day of the week either on or off. Technical Support: 1-800-RAIN BIRD... -
Page 7: Set Station Run Times
• Turn the dial to 1 in the “Watering Start Times” WATERING TIME PER STATION section. Ž The display shows the start time currently set for SCHEDULE this program. FIXED CUSTOM ESP-6 2 3 5 C Technical Support: 1-800-RAIN BIRD... -
Page 8: Set Controller To Automatic Operation
F R I CUSTOM WATERING SCHEDULE START TIMES The OFF setting can be used during rainy weather, seasonal shutdown, or system mainte- nance. WATERING TIME PER STATION SCHEDULE FIXED CUSTOM ESP-6 2 3 5 C Technical Support: 1-800-RAIN BIRD... - Page 9 • Press the MAN START / ADV. button to begin the pro- gram with the first assigned station. To advance through the stations in the program, press MAN START / ADV. repeatedly until the station you want is displayed. Technical Support: 1-800-RAIN BIRD...
- Page 10 Then insert the battery into the bat- tery holder. CAUTION: DO NOT use 9-Volt alkaline batteries. They may burst or leak when subjected to the con- tinuous charging circuit of the ESP. Use NiCad bat- teries only. Technical Support: 1-800-RAIN BIRD...
- Page 11 • Hang the controller on the upper keyhole slots. Make sure the shafts of the fasteners are in the upper, narrow portion of the slots. Then drive a fastener through lower mounting hole D. The controller should now be se- cure. Technical Support: 1-800-RAIN BIRD...
- Page 12 24-Volt pump start relay. Connect the master valve / pump start relay wiring to the MV terminal and COM terminal as shown in the illustration. Technical Support: 1-800-RAIN BIRD...
- Page 13 Make sure all connec- tions are made with code-approved insulated con- nectors. Ž In the same way, make the black-to-black and green-to-green wire connections. • Close up the weatherproof junction box after all connections are complete. Technical Support: 1-800-RAIN BIRD...
- Page 14 The recharging circuit will charge the battery in about 12 to 14 hours. Display shows Same as Cause #3 See correction for Cause #3 numbers and letters, but Is not moving or advancing Technical Support: 1-800-RAIN BIRD...
- Page 15 PREFERRED BY PROFESSIONALS WORLDWIDE Rain Bird Sales, Inc. Customer Support Center 6640 S. Bonney Ave. Tucson, AZ 85706 1-800-RAIN BIRD (520) 434-6289 FAX © 1995 Rain Bird Sprinkler Mfg. Corp. ® Registered trademark of Rain Bird Sprinkler Mfg. Corp. Technical Support: 1-800-RAIN BIRD...
Need help?
Do you have a question about the ESP-4 and is the answer not in the manual?
Questions and answers
how many zones?
The Rain Bird ESP-4 controller has four zones (stations), as indicated by its model name "ESP-4."
This answer is automatically generated