Table of Contents
Advertisement
Advertisement
Table of Contents

Related Manuals for HoverCam Pilot 3


Summary of Contents for HoverCam Pilot 3
- Page 1 Pilot 3 User’s Manual...
- Page 2 Notices Warranty Pilots have a standard 1-year warranty. This warranty can be upgraded to 3-year or 5-year. To purchase an extended warranty, please contact your authorized HoverCam reseller. Designed by HoverCam in San Diego, California...
-
Page 3: Table Of Contents
Content Welcome Diagram Getting Started Connecting to Power Imaging Powering-On Built-In PC Power Save Modes Activating Windows 10 Setting-Up Adjusting the Pilot Installing the Side Tray Operating the Pilot Built-In Touchscreen Digital Keyboard and Trackpad Digital Keyboard and Trackpad Third Party Accessories Connecting to a Display Wireless via HoverCast Wired via HDMI... -
Page 4: Welcome
HoverCast transceiver • HoverCast AC power supply (9V 2A), HDMI cable, USB cable. • USB flash-drive with Pilot drivers Have any questions, feedback or issues? Contact HoverCam Support (866)-201-2056 | support@hovercam.com 9985 Pacific Heights Blvd, #100 San Diego, California 92121 www.hovercam.com... - Page 5 PAGE INTENTIONALLY LEFT BLANK...
-
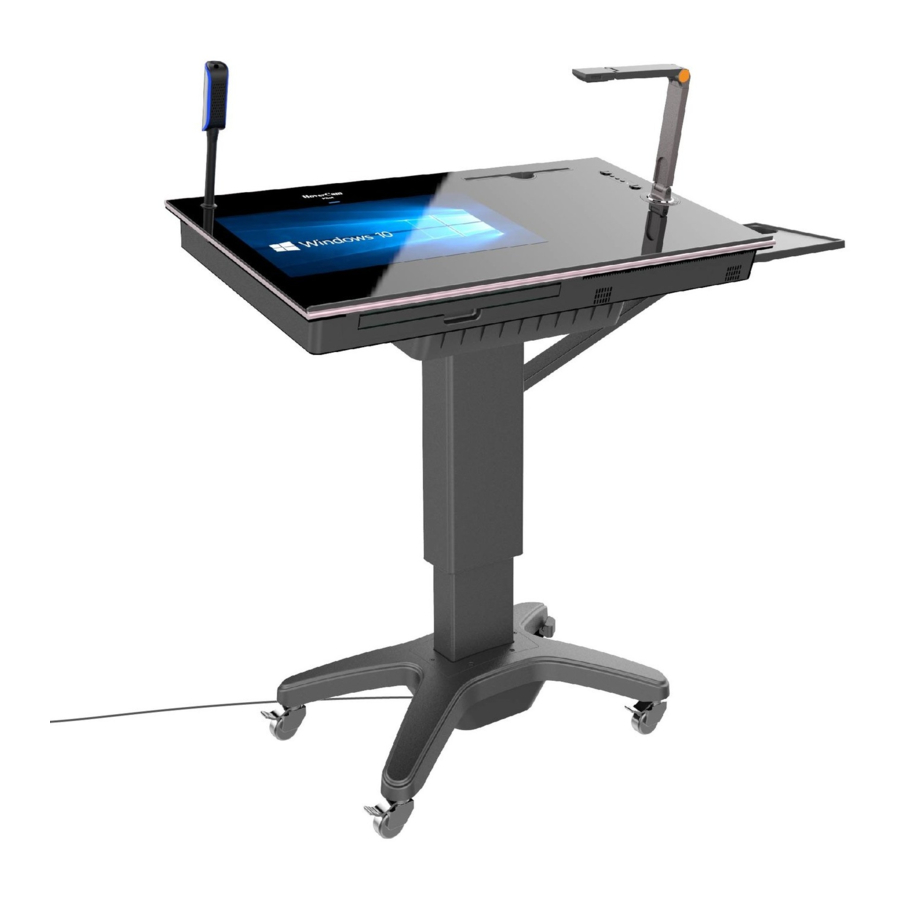
Page 6: Diagram
Diagram 40” Glass Surface iOS Lightning Port Podium Controls 21” Multitouch Display Document HoverCast Positioning Wireless Solo 8Plus Transceiver Document Camera Pull-Out Multiple Ports Keyboard and Available on Trackpad Sides and Back Tilt- Adjustable Height- Surface Adjustable Pillar Base with Retractable Power Wheels with... - Page 7 Diagram Tilt Controls Interface Switch Controls Sound and Audio Indicator Lights Height Controls Zoom-In AutoFocus Zoom-Out Focus Lock Rotate Image Audio HDMI Reset Button HDMI Audio USB 3.0 Power (Type A) Button RJ45 Ethernet Port...
-
Page 8: Getting Started
Getting Started Connecting to Power To get started, find the retractable power cable (AC100-240V 50/60Hz) on the right side of the base and plug it into an available AC Power Outlet with ground. If you’d like to retract the power cable, carefully extend it to its maximum length (16 feet) and release it. - Page 9 Getting Started Imaging The Pilot includes a RJ45 ethernet port to simplify imaging and facilitate wired networking. For detailed instructions as well as the necessary drivers, please support@thehovercam.com email us at: For convenience, the Pilot’s required drivers are RJ45 Ethernet Port saved on an included flash-drive for reinstallation after imaging.
-
Page 10: Setting-Up
Setting-Up Adjusting the Pilot Tilt The Pilot is easily height and tilt adjustable via the podium Up/Down control panel (located on the upper-right corner of the podium surface). The podium can go from a minimum height of 28in to a maximum height of 40in. The surface can tilt from 0º... -
Page 11: Operating The Pilot
Operating the Pilot Built-In Touchscreen The Pilot’s primary means of operation is the built-in touchscreen. The touchscreen can accommodate up to 10 points of simultaneous touch, as well as two-finger scroll, pitch and rotation gestures. To access the “left-click” feature, simply press and hold on the item, object or area. 21”... -
Page 12: Digital Keyboard And Trackpad
Operating the Pilot Digital Keyboard and Trackpad The latest version of Windows features a digital keyboard and trackpad that can be used with the Pilot's built-in touchscreen. For detailed information on how to access these features, visit the Windows 10 guide at www.windows10-guide.com Third Party Accessories Most USB third party accessories that work with standard PC’s will work with the Pilot. -
Page 13: Connecting To A Display
Connecting to a Display Reciever Wireless via HoverCast The Pilot comes equipped with a wireless HDMI transceiver set called HoverCast. Using HoverCast, the Pilot casts wirelessly to any interactive flat panel, projector or other output display with an HDMI input. When used with a HDMI Touch Touch-USB enabled display (most interactive flat... - Page 14 Connecting to a Display HoverCast Reciever Diagram (Optional) Touch-USB HDMI enabled Display Power (Optional) Touch USB 5) Turn-On the Reciever. With the paired Pilot powered-on and within range, press the power button on the back of the HoverCast receiver. While connecting, the receiver’s status indicator light will flash blue behind the corresponding connection.
- Page 15 Windows display settings menu. For detailed instructions on switching display modes, consult the Windows 10 manual: www.windows10-guide.com Extended: Mirrored: Image on the Image on the Image on the Image on the Pilot 3 Pilot 3 External Display External Display...
-
Page 16: Audio
Audio Audio-Out Set-Up There are several options available for outputting audio from the Pilot: 1. Built-In Speakers By default, the Pilot outputs audio through its internal speakers. In the Windows playback device list, the Pilot’s internal speakers should be listed as “Realtek High Definition Audio.”... - Page 17 Audio 4. Auxiliary Audio-Out 3.5mm (wired) The Pilot features a 3.5mm audio-out that can be found on the right side of the podium. Simply connect the Pilot to an external audio system with a 3.5mm auxiliary cable or adapter. 5. Bluetooth The Pilot’s internal PC contains a Bluetooth module that can output wirelessly to a wide variety of Bluetooth audio devices.
-
Page 18: Interfacing With Other Devices
Interfacing with other Devices The Pilot can easily act as an output display and annotation tool for external devices such as laptops, tablets, phones and other devices with HDMI-output or internet access. There are two primary interfacing methods that are preloaded on the Pilot: 1. - Page 19 HDMI Viewer program. From the factory, HDMI Viewer can be found on the desktop. If the Pilot does not have HDMI Viewer installed, it can be downloaded for free on the HoverCam website: http://www.thehovercam.com/download/hdmi-viewer/ With HDMI Viewer, users can mirror, annotate and record live content from their connected device(s).
-
Page 20: Adjusting The Camera
Using the Document Camera The Pilot includes one of the most powerful document cameras, the HoverCam Solo 8Plus. The document camera is useful for showing live imaging, recording lessons, scanning documents, video chatting, live digital annotations, and much more. The document camera can be used with nearly any USB camera software, but it is recommended to use the HoverCam Flex 11 software (included). -
Page 21: Software
The Pilot comes standard with the KnoteSter software preinstalled. The software can also be downloaded from the HoverCam website for free: FLEX 11 https://www.thehovercam.com/software-downloads/ KnoteSter Classroom Management Software... -
Page 22: Troubleshooting
Pilot Drivers If the internal computer becomes corrupted, or when the device is imaged, the necessary drivers will need to be reinstalled. The included USB drive contains the necessary drivers. Alternatively, you can request the drivers from HoverCam support: support@thehovercam.com... - Page 23 NOTE: The wireless HDMI transceiver is specifically paired with its corresponding Pilot unit. Loss or damage of the receiver will impair one-to-one connectivity. Pilot units with lost or broken receivers will need a new receiver to be paired and programmed before continuing use. If your receiver is lost or broken, please contact HoverCam Support.
-
Page 24: Service And Support
Cleaning and Care When cleaning the HoverCam Pilot, extra care should be taken in consideration to the touch screen and external components. The best and safest cleaning method is to use a dry microfiber cloth and gently wipe the touch screen while the unit is powered off. Glass cleaners are not advised as the moisture may damage or adversely affect touch sensitivity or component functionality.
Need help?
Do you have a question about the Pilot 3 and is the answer not in the manual?
Questions and answers