Table of Contents
Advertisement
Quick Links
Download this manual
See also:
User Manual
Advertisement
Table of Contents

Related Manuals for Marcum Technologies LX-9


Summary of Contents for Marcum Technologies LX-9
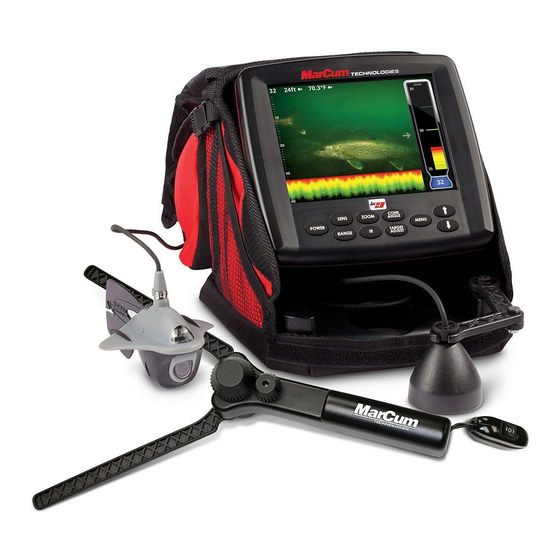
- Page 1 LX-9 Digital Sonar & Under Water Viewing System User Manual www.MarCumtech.com...
- Page 2 Versa Electronics www.MarCumtech.com Introduction pg. 3 Getting Started pg. 3 & 4 Battery Charging pg. 4 & 5 To charge your battery pg. 5 Setting the Transducer pg. 5 Moving the Transducer pg. 6 Fishing in Shallow Water pg. 6 Reading through Ice pg.
-
Page 3: Getting Started
“flow” of the menu and the various functions. While one of the best features of the LX-9 is the ability to display a sonar overlay on top of your video, or play video and sonar side by side, let’s start out by learning how to use the sonar. -
Page 4: Battery Charging
To charge the battery, see below (pg. 3). The MarCum LX-9 will operate for 8 hours or more on a fully charged battery. If you are going to be in a situation where you will want to use your system for more than one day without recharging, having a second, fully charged battery with you is cheap insurance that will allow you to get full use out of your system for the duration of your trip. -
Page 5: To Charge Your Battery
We recommend setting your stopper to have the transducer down the least amount possible. The LX-9 puts out enough power that in most cases it is not necessary to have your transducer down more than a few inches below the water line to get a good reading. -
Page 6: Reading Through Ice
FISHING IN SHALLOW WATER The LX-9 is designed to be an effective fishing tool in a wide variety of environments. Most of the time, simply turning on the unit at factory default settings is all that is necessary. Shallow water [10 feet or less] can be problematic without making a few adjustments. - Page 7 MENU, and the LX-9 will automatically lock into the appropriate depth range. For instance, in 32 feet of water, the LX-9 will lock into the 40 foot range. In 45 feet of water the LX-9 will automatically lock into the 60 foot range.
- Page 8 When other sonar units are causing interference to the display of the LX-9, activate the IR feature by depressing the IR button located on the control panel of the LX-9. Interference is indicated by unusual signals flashing or scrolling across your display.
- Page 9 “LIVE” mode by pressing the “HOT KEY” which is the down arrow SIMULATOR— The LX-9 has a simulator mode that will portray a variety of different depths and signal returns. Activating this feature enables the user to experiment with the various settings without actually being on the water.
-
Page 10: Sonar Settings
LX-9— When you want to use the LX-9 without an external monitor External— This allows the video feed to be sent out to an external monitor. Video and sonar will only be visible on the external monitor and the screen on the LX-9 will go dark when this function is selected. - Page 11 VIDEO OUT— This allows the video feed to be sent out to an external monitor. The screen on the LX-9 will go dark when this function is selected, all displays will now be on your external monitor. If you select this when there is no external monitor hooked up, you will have to turn the unit off and then back on again, as you will not be able to view the monitor.
- Page 12 VOLTAGE— This gauge indicates the voltage currently being produced by your battery. The LX-9 needs at least 11 volts to properly operate. If the voltage drops below 11 volts, you may see a decrease in performance SONAR FOOTPRINT—...
-
Page 13: Cone Angle Info
Chart Zoom display open. CONE ANGLE INFO A feature unique to the LX-9 is the “Sonar Footprint” that displays the actual area being covered by your transducer while you are fishing. This data is displayed below the Cone Angle Icon, and represents the diameter of the base of the transducer cone. -
Page 14: Interpreting Signals
INTERPRETING SIGNALS DIGITAL DEPTH The digital depth display on the LX-9 provides a quick and easy way to determine depth. Digital Depth is displayed in the center of the circular display, and on the bottom of the vertical displays. It will also show in the upper left corner of the graph in some configurations. This display can be used as a quick reference when setting your zoom or checking depths through the ice. -
Page 15: How To Decide Which Configuration To Use
LX-9, at least for starters. We get endless feedback on how well the scrolling graph display works for ice fishing, so be sure to give it a try. Be sure to experiment with different color palettes and backgrounds, too. -
Page 16: On-Screen Display (Osd) Functions
LX-9 to your big TV by simply running an RCA cable from the LX-9 to your TV. Be sure to select “Video Out” in the System Settings part of the menu first. -
Page 17: Open Water Application
Ice Fishing Application The camera of your LX-9 can be used to search for that perfect weed line or locate the crib or rock pile where fish will generally school, entertain the kids, or as the perfect tool to enhance your ice fishing experience. -
Page 18: Software Updates
SOFTWARE UPDATES Your MarCum LX-9 has the ability to have the software updated. We may come out with new software versions to add features or to improve performance. To see which version you have, press the MENU button, then select SYSTEM SETTINGS. The version will be displayed at the top of the menu window as a number with a “v”... - Page 19 MarCum Technologies. It is the customer’s full responsibility to track their products sent out in the mail or other forms of delivery service. MarCum Technologies will not be liable for packages lost in route to us. Unless specified otherwise, do not include batteries or other accessories when returning the product for repair.
- Page 20 Versa Electronics www.MarCumtech.com www.MarCumtech.com MarCum Technologies 3943 Quebec Ave N Minneapolis, MN 55427 MarCum User Manuals are available for downloads from www.MarCumtech.com 2018-0318...
Need help?
Do you have a question about the LX-9 and is the answer not in the manual?
Questions and answers
Where is the SD card located
The SD card slot on the MarCum Technologies LX-9 is located on the unit and is used for recording or downloading new software.
This answer is automatically generated