Table of Contents
Advertisement
Advertisement
Table of Contents

Related Manuals for Marcum Technologies LX-6s


Summary of Contents for Marcum Technologies LX-6s
- Page 1 LX-6s/LX-7 Digital Sonar User Manual Marcum LX-7 Marcum LX-6s...
- Page 2 Versa Electronics INTRODUCTION Congratulations on purchasing the Marcum Digital Sonar—the most advanced ice sonar system available. When Marcum was founded over a decade ago, we all knew that our original flashers were just the beginning. Every step of the way, we have been designing, improving, building momentum.
-
Page 3: Getting Started
Versa Electronics GETTING STARTED Ice System Set-Up Your Digital Sonar comes virtually ready to fish. Open the top cover of the soft pack, loosen the knobs and the monitor can now be positioned how you want it. Once the monitor is positioned, tighten the knobs again to hold the monitor in place. - Page 4 Versa Electronics of time. When you get home from a trip, put your battery on charge right away and leave it there overnight, or for around 8-12 hours. Likewise, on the night before an ice fishing trip, put it on the charger again, just to make sure. Again, there is no danger of overcharging your battery.
-
Page 5: Reading Through Ice
Versa Electronics water line to get a good reading. When the ice thickness is over two feet, it may be necessary to have your transducer set somewhat farther down. Remember--the less transducer cable you have out, the easier it is to pull it out of the water when bringing in a fish, or to move to a new location. -
Page 6: Operation
Versa Electronics necessary if the surface of the ice is very rough, or if the ice is filled with air bubbles. OPERATION The Marcum Digital Sonar has many functions and settings that are selected or changed by buttons on the Control Panel. Learning what each of the buttons (POWER, SENS, RANGE, ZOOM, IR, CONE ANGLE, TARGET ADJUST, MENU/ENTER, UP, DOWN) does will enable you to get the most out of your Digital Sonar. - Page 7 Versa Electronics DYNAMIC – This Marcum exclusive feature functions similarly to the “Auto Range”, but fine tunes your range setting even farther. The Dynamic Depth will maximize the space on your display by utilizing a variable range that will always be just slightly deeper than the actual depth.
- Page 8 Versa Electronics anglers experiencing interference can also try having their transducers set at different levels, going to narrow cone angles, and reducing gain or sensitivity settings. CONE ANGLE – All transducers send down a signal that is shaped somewhat like a cone. Your Digital Sonar easily switches from a 20 degree cone angle (good for general use) to a narrow 8 degree cone angle (good for water over 40’, or any time you need a more precise view of what is below you).
- Page 9 Versa Electronics is the first sub-menu, and it has the following SONAR SETTINGS features that may be adjusted: SENSITIVITY This adjusts the sensitivity. This is described in the Control Panel section above RANGE Select range in the same manner as described above ZOOM DEPTH Here is where you set the upper range of the zoom window.
- Page 10 Versa Electronics GAUGE DISPLAY Your 5 gauges, as well as your Sonar footprint may be turned on or off here TEMPERATURE Your water temperature display may be turned on or off here. You may also select between Fahrenheit and Celsius here. This feature will only work if you are using your unit with the optional “Universal Sonar”, designed for open water use.
- Page 11 Versa Electronics SAVE This is where you can save your favorite screen configuration. When you turn the Digital Sonar on, it will power up to your last screen displayed. You can now change it to the original factory settings by highlighting “Restore Factory”. While out fishing, you may find a particular screen configuration that you like.
- Page 12 Versa Electronics you to have a magnified view of a selected portion of the water column. Note that when the ZOOM window is open, you can still view the entire water column on one of the other windows. Imagine that you are fishing for walleyes in 30 feet of water, and you are zoomed in on the bottom 5 feet.
-
Page 13: Cone Angle Info
Versa Electronics select 10 feet. The 20 to 30 foot portion of the water column is now displayed on the Zoom display, and the entire water column is viewable on the flasher window. The Marcum Digital Sonar also features “Chart Zoom” which enables you use a scrolling graph in Zoom mode. - Page 14 Versa Electronics your Sonar in conjunction with an underwater viewing system is a great way to learn how to interpret your sonar signals. READING FISH— Fish will generally appear as separate targets from the bottom. Depending on the size of the fish and the location within the transmit beam they can show as any of the colors in the palette you are using.
- Page 15 Versa Electronics on your jig, or if you have to reel up and re-bait based upon how the signal appears. Dead Zone – All sonar units will have a dead zone in certain circumstances. This occurs on sharp drop-offs where the transmit beam (cone) hits the shallower edge of the drop-off and returns before the deeper edge returns.
-
Page 16: Battery Charger Troubleshooting
Versa Electronics displayed as various colored lines on the column, and the different colors represent different signal strengths. SCROLLING GRAPH (CHART) DISPLAYS— These windows will show not only what is happening below you in real time, but will also enable the user to have a “history”... -
Page 17: Software Updates
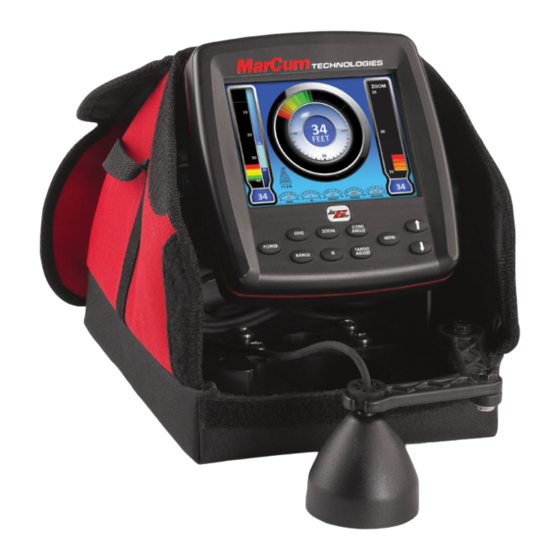
Versa Electronics Sonar has a built-in voltmeter; it shows as one of the gauges. How different batteries will react with a charger isn’t 100% possible to predict, but after 24 hours your battery should be charged to around 13 volts. If your unit turns on and has a voltage level over 12 volts, there is no need for concern, you should go fishing! If it is not at or above 12 volts after charging you should consider replacing the battery. - Page 18 Versa Electronics ACCESSORIES Soft pack - This is the red pack that protects your Digital Sonar from the elements. Shuttle - This is the plastic base that your Digital Sonar is mounted to. Transducer Arm - This is what holds your ducer cable. Having an extra one on hand is not a bad idea, clumsy friends have been known to break these.
Need help?
Do you have a question about the LX-6s and is the answer not in the manual?
Questions and answers