
Related Manuals for Motorola PMPN4286


Summary of Contents for Motorola PMPN4286
- Page 1 MULTI-UNIT CHARGER KITS PMPN4283 PMPN4286 PMPN4288 PMPN4370 PMPN4380 USER GUIDE en-US fr-CA es-LA pt-BR zh-CN zh-TW ja-JP ko-KR de-DE fr-FR it-IT nl-NL ru-RU uk-UA...
-
Page 3: Table Of Contents
Entry Time Menu............... 40 Language Menu ................ 41 Analyzer Mode ................41 IMPRES 2 Battery................42 IMPRES Battery ................ 43 Other Motorola Solutions Battery ..........44 Unknown Battery............... 45 Empty Pocket ................45 Charger Reprogramming ..............45 Charger Troubleshooting ..............46... - Page 4 IMPRES Battery Fleet Management System........48 Charging Pocket Installation ............. 52 Removing Charging Pocket from Multi-Unit Charger ....52 Securing Charging Pocket to Multi-Unit Charger ...... 53 Programming a Radio with iTM Proxy (PMPN4286_)....... 55 Optional Equipment ................56 Mounting Multi-Unit Charger to Wall Bracket........57...
-
Page 5: Important Safety Instructions
5. To reduce risk of electric shock, unplug the charger power supply from the AC outlet before attempting any maintenance or cleaning. 6. To reduce risk of injury, charge only the rechargeable Motorola Solutions Authorized Batteries listed in Table 5. Other batteries may explode, causing personal injury and damage. -
Page 6: Operational Safety Guidelines
Operational Safety Guidelines • This equipment is not suitable for outdoor use. Use only in dry locations and conditions. • Maximum ambient temperature around the charger must not exceed 40 °C (104 °F). • The radio can be in ON only when the radio is transmitting data wirelessly, such as using Wi-Fi. -
Page 7: Supported Models
Supported Models Table 1: Multi-Unit Charger Charging Communication Kit Number Description Type Display Pockets Interface MOTOTRBO Professional Charger Digital Radios Reprogramming PMPN4283_ Series and Fleet ™ IMPRES Management Multi-Unit Charger Charger TPG2200 Devices Reprogramming IMPRES and/or and Fleet PMPN4286_ Multi-Unit Batteries Management Charger... - Page 8 PMPN4288_ HW001385A01 Tri-Unit Charger Pocket for Radio and Battery, with iTM PMPN4286_ HW001386A01 Programming PMPN4380_ AS000063A01 Tri-Unit Charger Pocket for Radio and Battery Table 3: Motorola Solutions Authorized Power Supply Part Number Description PS000242A01 External 90 W Power Supply Table 4: Motorola Solutions Authorized Power Cords...
- Page 9 Table 5: Motorola Solutions Authorized Batteries Multi-Unit Part Number Description charger NNTN7789_ IMPRES IECEx IP67 Li-Ion Battery NNTN8128_ IMPRES Li-Ion Battery NNTN8129_ High-Capacity IMPRES IP67 Li-Ion FM Battery NNTN8287_ IMPRES CSA 157 IP67 Li-Ion Battery NNTN8305_ IMPRES Li-Ion Battery NNTN8359_...
- Page 10 Table 5: Motorola Solutions Authorized Batteries (Cont.) Multi-Unit Part Number Description charger PMNN4435_ IP68 Li-Ion Battery PMNN4448_ High-Capacity IMPRES IP67 Li-Ion Battery PMNN4463_ IP68 Li-Ion Battery IMPRES IP68 HE DENS Li-Ion Battery for Vibrating Belt PMNN4488_ Clip PMNN4489_ IMPRES IP68 TIA4950 HE DENS Li-Ion Battery...
- Page 11 Table 5: Motorola Solutions Authorized Batteries (Cont.) Multi-Unit Part Number Description charger PMNN4074_ IP67 Li-Ion Battery PMNN4094_ IP67 Li-Ion Battery PMNN4097_ High-Capacity Ni-MH Battery with Belt Clip PMNN4151_ Ni-MH Battery PMNN4154_ High-Capacity Ni-MH Battery PMNN4156_ IMPRES Ni-MH Battery PMNN4157_ IMPRES Ni-MH FM Battery...
-
Page 12: Charger, Pocket, And Communications Interface
Charger, Pocket, and Communications Interface The Standard Multi-Unit Charger System charges a wide variety of battery types for Motorola Solutions batteries. It has pockets that accommodate either a radio with attached battery or a stand-alone battery. The IMPRES 2 Adaptive Charger System is a fully automated IMPRES 2 battery care system that is equipped with additional features: •... -
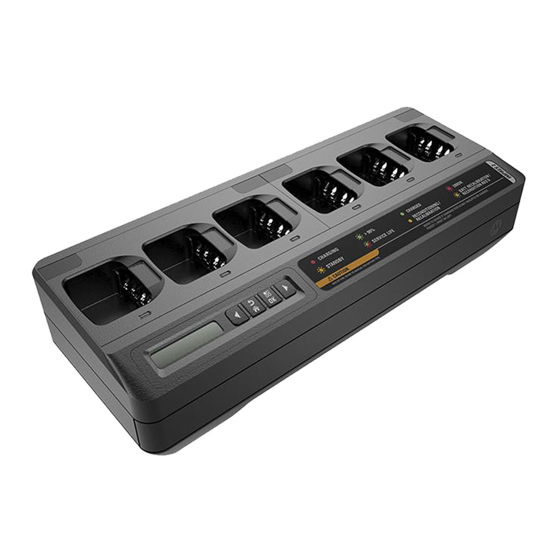
Page 13: Charger Overview
During Calibration/Reconditioning, the battery is fully discharged before being fully charged. As a result, the radio may shut down during the discharge phase. Charger Overview Figure 1: Charger Overview Table 6: Charger Overview and Description Number Description 1–6 Charging Pockets – To charge batteries attached to a radio or stand-alone. Display –... -
Page 14: Impres 2 And Impres Batteries And Chargers
IMPRES 2 and IMPRES Batteries and Chargers Features and Benefits The IMPRES energy solution is an advanced Tri-Chemistry energy system developed by Motorola Solutions. This system includes: 1. IMPRES Batteries 2. IMPRES Adaptive Charger 3. IMPRES Radios Charging IMPRES batteries using an IMPRES Adaptive Charger, with... -
Page 15: Impres Battery Initialization
IMPRES Battery Initialization For full IMPRES functionality, a new IMPRES battery or IMPRES 2 battery must be initialized by the charger. The charger automatically detects the new IMPRES or IMPRES 2 battery, and automatically starts Initialization. Initialization is the first IMPRES battery Calibration/ Reconditioning. -
Page 16: Manually Terminating Calibration/Reconditioning
Manually Terminating Calibration/Reconditioning At any time during IMPRES or IMPRES 2 battery discharge (Steady Amber), Calibration/Reconditioning may be terminated. Perform the following steps: 1. Remove the battery from the charger pocket. 2. Within five seconds, reinsert the battery into the charger pocket. Battery discharge immediately terminates, and Normal battery charging starts. -
Page 17: Charging Procedure
Charging Procedure Batteries charge best at room temperature. Batteries to be attached to a radio or stand-alone. Figure 2: PMPN4283_/PMPN4286_/PMPN4288_ Charging Procedure Figure 3: PMPN4370_ Charging Procedure... - Page 18 Figure 4: PMPN4380_ Charging Procedure 1. Place the Multi-Unit Charger (MUC) on a flat surface. 2. Firmly insert the power supply into the charger DC Inlet Socket at the back of the charger. 3. Plug the power supply power cord into a matching power outlet. 4.
-
Page 19: Display Messages And Led Indications
Note: Grip the radio body when inserting, or removing the radio from the charger. Avoid pulling the radio antenna when removing the radio. Display Messages and LED Indications Messages and LED indications are associated with charger software version 1.05. IMPRES 2 Battery or IMPRES Battery Charging an IMPRES 2 or IMPRES battery uses the display messages and LED indications summarized in Table 7 and Table 9. - Page 20 Table 7: Charging IMPRES 2 or IMPRES Batteries - Calibration Not Required (Cont.) Status Pocket Display LED Indicator Warning: HOT BATTERY WAITING TO CHRGE Standby (Battery is Flashing Amber COLD BATTERY waiting to rapid charge) WAITING TO CHRGE VERY LOW BATTERY WAITING TO CHRGE Table 8: Charging IMPRES 2 or IMPRES Batteries - Calibration Required, but Not Enabled...
- Page 21 Table 8: Charging IMPRES 2 or IMPRES Batteries - Calibration Required, but Not Enabled (Cont.) Status Charger Display LED Indicator Battery requires Calibration, but Calibration is disabled in charger: Charged to 95% or more CHARGE COMPLETE Alternating Amber/ Green Warning: Flashing Red Fault NOT CHARGEABLE...
- Page 22 Table 9: Calibrating/Reconditioning IMPRES 2 or IMPRES Batteries - Calibration Enabled (Cont.) Status Pocket Display LED Indicator CAL RAPID CHARGE Steady Red Rapid Charging xxxx0mAh yyy% CAL TRICKLE CHRGE Flashing Green Charged to 90% or more xxxx0mAh yyy% Battery Calibration successful: Steady Green CHARGE COMPLETE Battery Calibration successful, but...
- Page 23 Table 10: Calibrating/Reconditioning IMPRES 2 or IMPRES Batteries - Calibration Initially Disabled, then Enabled (Cont.) Status Charger Display LED Indicator Warning: ENABLE BATTERY Requesting IMPRES CALIBRATION? Battery Calibration • Press OK to • Calibration is disabled in enable Calibration. Steady Red charger.
- Page 24 WAITING TO CAL Regardless of Calibration Enabled/ Disabled: VERY LOW BATTERY WAITING TO CHRGE Other Motorola Solutions Batteries Table 11: Charging Other Motorola Solutions Batteries Status Charger Display LED Indicator Green for approximately IMPRES 2 Charger Powers On one second...
- Page 25 Table 11: Charging Other Motorola Solutions Batteries (Cont.) Status Charger Display LED Indicator Warning: Flashing Red Fault NOT CHARGEABLE REMOVE & REINSERT Warning: HOT BATTERY WAITING TO CHRGE Standby • Battery is waiting to rapid Flashing Amber charge. COLD BATTERY •...
-
Page 26: Impres Battery Long-Term Storage
VERY LOW BATTERY WAITING TO CHRGE IMPRES Battery Long-Term Storage You can prepare authentic Motorola Solutions IMPRES 2 or IMPRES Lithium-Ion or Nickel batteries for Long-Term Storage. Selection of Long-Term Storage supersedes Calibration/Reconditioning. Lithium batteries prepared for Long-Term Storage may not meet regulations for shipment by air cargo. - Page 27 Table 13: Preparing IMPRES 2 or IMPRES Batteries for Long-Term Storage - Calibration Not Required (Cont.) Status Charger Display LED Indicator Battery does not require Calibration: Steady Green • Discharge or Charge LONGTERM STORAGE Complete xx% Rated Cap Battery requires Calibration, but •...
- Page 28 Table 14: Preparing New (Never Calibrated) IMPRES 2 or IMPRES Batteries for Long-Term Storage - Calibration Required (Cont.) Status Charger Display LED Indicator Battery Discharging STORAGE DISCHRGE Steady Amber (Discharging to find 0% Rated Capacity) Rapid Charging (Charging STORAGE CHARGE Steady Red to selection) xx% Rated Cap...
-
Page 29: Lithium-Ion Battery Preparation For Shipment
VERY LOW BATTERY WAITING TO CHRGE Lithium-Ion Battery Preparation for Shipment You can prepare IMPRES 2, IMPRES, or other authentic Motorola Solutions Lithium-Ion batteries for shipment by air cargo. Selection of Lithium Shipment supersedes Calibration/Reconditioning. Table 16: Preparing IMPRES 2 or IMPRES Lithium-Ion Batteries for... - Page 30 Table 16: Preparing IMPRES 2 or IMPRES Lithium-Ion Batteries for Shipment - Calibration Not Required (Cont.) Status Charger Display LED Indicator Battery Discharging SHIP LI DISCHRG Steady Amber (Discharging to selection) xx% Rated Cap Rapid Charging (Charging SHIP LI CHARGE Steady Red to selection) xx% Rated Cap...
- Page 31 Table 17: Preparing New (Never Calibrated) IMPRES 2 or IMPRES Lithium-Ion Batteries for Shipment - Calibration Required Status Charger Display LED Indicator Green for approximately one IMPRES 2 Charger Powers On second CHARGER Battery requires Calibration, but IMPRES 2 BATTERY Calibration is disabled by Ship Lithium: Battery Detected...
- Page 32 COLD BATTERY • Battery may be too hot, WAITING TO CHRGE too cold, or low voltage. VERY LOW BATTERY WAITING TO CHRGE Table 18: Preparing Other Motorola Solutions Lithium-Ion Batteries for Shipment Status Charger Display LED Indicator Green for approximately one...
-
Page 33: Charger Setup
Table 19: Preparing Other Motorola Solutions Nickel Batteries or Unknown Batteries for Shipment Status Charger Display LED Indicator Green for approximately one IMPRES 2 Charger Powers On second CHARGER Battery Detected • Other Motorola Solutions WRONG BATT TYPE Flashing Red... -
Page 34: Main Menu
Main Menu 1. To enter Charger Setup Menu, simultaneously press and hold the Left Arrow and Right Arrow buttons for at least three seconds. The hold time is adjustable. The display shows: Press OK to entr SETUP MENU 2. Pressing OK prompts display of available Charger Setup Menu. Figure 6: Charger Setup Menu •... -
Page 35: Charger Setup Menu Selection
• Press OK to enter the Charger Setup Menu for the selection currently displayed. Within the Setup Menu: • Press Back to Exit from Charger Setup Menu. Press OK to confirm exit. If no Keypad button is pressed for 10 minutes, then the charger exits Charger Setup and returns to normal message displays. -
Page 36: Ship/Storage Menu
Ship Lithium-Ion, Long-Term Storage, and Long-Term Storage 75% selections supersede the Calibration setting. Ship Lithium Ship Lithium sets the State of Charge (SoC) of a Motorola Solutions Lithium-Ion battery to a low value (typically, approximately 25% of Rated Capacity) permitted for bulk air cargo shipment. This feature... - Page 37 IMPRES 2, IMPRES, or other authentic Motorola Solutions Lithium-Ion batteries. The charger may fully-discharge some Motorola Solutions batteries before charging to the Ship Lithium limit. Such batteries include IMPRES 2 or IMPRES batteries that were never calibrated or need a new calibration.
-
Page 38: Calibration Menu
Calibration Menu Figure 8: Calibration Menu The Calibration setup selections enables or disables the Discharge phase of Calibration/Reconditioning. The Discharge phase precedes the full charge required for successful Calibration/Reconditioning. This feature is useful when the charger is deployed to a location requiring the battery to be at a charged state of readiness as quickly as possible. -
Page 39: End-Of-Service Life Indication Menu
End-of-Service Life Indication Menu Figure 9: End-of-Service Life Indication Menu Even though the IMPRES 2 or IMPRES battery may be nearing its End of Service, the battery capacity may be more than adequate given how it is used. As a result, it may be desirable to disable the End of Service Life Indication (alternating Red/Green) that the charger indicates at the end of battery charge. -
Page 40: Display Format Menu
Display Format Menu Figure 10: Display Format Menu There are four Display Format options: 1. Normal orientation (charger sitting on a desktop). 2. Inverted orientation (charger hanging on a wall). 3. Warning messages only. Other messages are not displayed. This applies to Normal and Inverted orientations. -
Page 41: Capacity Format Menu
Capacity Format Menu Figure 11: Capacity Format Menu Battery Capacity display options include: Table 20: Battery Capacity Display Options Representation Description Present Charge (State of Charge) in milliamp-hours. xxx0mAh Present Charge relative to the Potential Capacity (when fully yyy% charged), in percent. The maximum value is 100%. The equivalent of yyy% represented in an eight-segment bar. -
Page 42: Power Saver Menu
Power Saver Menu Figure 12: Power Saver Menu To meet certain government low standby power limits, Power Saver mode enables the charger to turn off Pocket 2 through Pocket 6 when there is no activity in those pockets for a period of time. Examples of activity include the following: •... -
Page 43: Entry Time Menu
Entry Time Menu Figure 13: Entry Time Menu Entry Time is the hold time required to simultaneously press the Left Arrow and Right Arrow buttons to enter Charger Setup mode or Charger Analyzer mode. -
Page 44: Language Menu
Language Menu Figure 14: Language Menu The charger display supports North American English only. Analyzer Mode You can enter Analyzer Mode by firmly pressing the OK button from more than 3 seconds (the hold time is adjustable.) The Analyzer Mode features described are associated with charger software version 1.05. -
Page 45: Impres 2 Battery
IMPRES 2 Battery P r e s s e n t A N A L Y Z E R M O D E Okay I M P R E S B A T T E R Y Right Arrow B A T T E R Y C A P A C I T Y P o t e n t y y y y y m A h... -
Page 46: Impres Battery
IMPRES Battery P r e s s e n t A N A L Y Z E R M O D E Okay I M P R E S B A T T E R Y Right Arrow B A T T E R Y C A P A C I T Y P o t e n t y y y y y m A h... -
Page 47: Other Motorola Solutions Battery
S O F T W A R E V E R c y y y y Right Arrow P r e s s A N A L Y Z E R M O D E Figure 17: Other Motorola Solutions Battery Menu... -
Page 48: Unknown Battery
Unknown Battery P r e s s e n t A N A L Y Z E R M O D E Okay U N K N O W N B A T T E R Y Back Right Arrow C H A R G E R S O F T W A R E V E R... -
Page 49: Charger Troubleshooting
Table 21: Charger Reprogramming Display Options Charger Display Description Remove batteries from the charger pockets before REPROGRAMMING reprogramming. REMOVE BATTERIES REPROGRAMMING All charger pockets are empty. WAITING FOR DATA Reprogramming data is downloading. For chargers with a display associated with each pocket, the percentage value is the percentage of data successfully downloaded into the pocket REPROGRAMMING associated with the display. - Page 50 Check for contact contamination or corrosion: • Remove the radio or stand-alone battery from the charger. • Verify that the battery is an authorized Motorola Solutions battery listed in Table 5. Other batteries may not charge. • Inspect the charging contacts on the battery for contamination or corrosion.
-
Page 51: Impres Battery Fleet Management System
IMPRES Battery Fleet Management System IMPRES Battery Fleet Management software automatically collects critical data from IMPRES or IMPRES 2 batteries that are inserted into an IMPRES charger. The critical data include battery age, capacity, charge and Calibration/Recondition history, date when manufactured, and date when put into service. - Page 52 Multi-Unit Charger with CIU Single-Unit Charger with CIU Battery Data Reader Up to 25 Devices per Remote Client Remote Client Location 1 Remote Client Location 2 CUSTOMER’S COMPUTER NETWORK Fleet management software is Fleet Management installed on each computer within System Administrator the network Figure 20: IMPRES Battery Management via Network Chargers...
- Page 53 • Obtain lost battery report. • Optimize charger utilization. • Monitor all devices in the system. Figure 21: Active Battery Report Figure 22: Batteries in Use by Radio Family...
- Page 54 Figure 23: Lost Battery by Location Figure 24: Charger Pocket Utilization...
-
Page 55: Charging Pocket Installation
Charging Pocket Installation Removing Charging Pocket from Multi-Unit Charger Cover Label HW001384A01/ HW001385A01/ Screw HW001386A01/ AS000063A01 Charging Pocket Figure 25: Installing and Removing HW001384A01/HW001385A01/ HW001386A01/AS000063A01 Charging Pocket AS000111A01 Charging Pocket Cover Label Screw Figure 26: Installing and Removing AS000111A01 Charging Pocket 1. -
Page 56: Securing Charging Pocket To Multi-Unit Charger
2. Remove the screw that secures the Charging Pocket to the base. 3. Lift the Charging Pocket a few inches away from the base. 4. Remove the Pocket Harness by pulling straight up on the connector (Refer to Figure 25 and Figure 26). Securing Charging Pocket to Multi-Unit Charger HW001384A01/HW0001385A01/ HW001386A01... - Page 57 AS000111A01 AS000111A01 USB Receptacle Harness Receptacle Figure 28: Securing AS000111A01 Charging Pockets to Multi-Unit Charger Base 1. Plug in the USB connector and harness connector to the receptacles on the base. Note: USB or harness connector may not be available on some of the Charger Pocket.
-
Page 58: Programming A Radio With Itm Proxy (Pmpn4286_)
Programming a Radio with iTM Proxy (PMPN4286_) Note: Contact your local dealer to order the programming cable (Part Number: CB000521A01). Proxy with the USB port To the Proxy USB port USB Cable(s) iTM enabled charging pocket Figure 29: Connecting Radios to iTM Proxy Using Multi-Unit Charger 1. -
Page 59: Optional Equipment
Optional Equipment A wall mount bracket (Part Number: BR000271A01) is available for the Multi-Unit Charger. Contact your local dealer to order this item. Installation is shown below. • This wall mount bracket should be installed by a trained and experienced technician. Having the product installed by a non-specialized technician is very dangerous, and can cause damage or injury. -
Page 60: Mounting Multi-Unit Charger To Wall Bracket
4. Hang the Multi-Unit Charger on wall bracket as show in Figure 30. MOTOROLA, MOTO, MOTOROLA SOLUTIONS and the Stylized M logo are trademarks or registered trademarks of Motorola Trademark Holdings, LLC and are used under license. All other trademarks are the property of their respective owners.