
Related Manuals for SMART Podium 624


Summary of Contents for SMART Podium 624
- Page 1 Was this document helpful? smarttech.com/docfeedback/171254 SMART Podium™ 624 and 624 Pro interactive pen displays USER'S GUIDE...
- Page 2 © 2018 SMART Technologies ULC. All rights reserved. No part of this publication may be reproduced, transmitted, transcribed, stored in a retrieval system or translated into any language in any form by any means without the prior written consent of SMART Technologies ULC. Information in this manual is subject to change without notice and does not represent a commitment on the part of SMART.
-
Page 3: Important Information
IMPORTANT INFORMATION Important information Before you install and use the interactive pen display, read and understand the safety warnings and precautions in this user's guide. These safety warnings and precautions describe the safe and correct operation of the interactive pen display and its accessories, helping you to prevent injuries and equipment damage. - Page 4 Where use is prohibited, turn off the interactive pen display to prevent the possibility of it interfering with or causing other electronic devices to malfunction. SMART does not accept any liability for direct or consequential damages.
- Page 5 IMPORTANT INFORMATION Cordless pen The cordless pen is a sealed unit that contains electronics but no batteries. Opening the cordless pen will damage these electronics, making the cordless pen unusable and voiding the warranty. Do not touch the screen with any instrument other than a compatible projected capacitive (PCAP) stylus pen, or the supplied cordless pen.
-
Page 6: Federal Communication Commission Interference Statement
Disconnect the interactive pen display if you will not use it for an extended period. If the interactive pen display requires replacement parts, use parts that are specified by SMART Technologies. Do not expose the interactive pen display to rain or moisture. -
Page 7: Eu Declaration Of Conformity
EU declaration of Conformity Hereby, SMART Technologies ULC declares that the radio equipment type LCD Monitor, SP624 is in compliance with Directive 2014/53/EU. The full text of the EU declaration of conformity is available at the following Internet address: smarttech.com/compliance... -
Page 9: Table Of Contents
Getting ready to install the interactive pen display Connecting the interactive pen display to your computer Orienting the interactive pen display Connecting the interactive pen display to other devices Chapter 3: Installing SMART software About SMART software Installing SMART Learning Suite Installing SMART Meeting Pro software... - Page 10 CONTENTS Resolving issues with the cordless pen and touch Resolving issues with the image Resolving Mac-specific issues Appendix A: Adjusting video settings with the on-screen display (OSD) menu Changing settings in the OSD menu OSD menu settings Appendix B: Hardware environmental compliance Waste Electrical and Electronic Equipment (WEEE) More information viii...
-
Page 11: Chapter 1: Welcome
(support.smarttech.com). Features The SMART Podium 624 interactive pen display enables a presenter to face an audience and mirror a connected computer to a large format display. The interactive pen display facilitates interactivity in meeting rooms, lecture halls and auditoriums. It also enables you to do everything you can do at your computer—write and erase ink, open and close applications, conference with... - Page 12 As others view your interactions with your digital materials, you can write confidently and smoothly with SMART Ink®. You can save your work directly into the SMART software application included with the interactive pen display and other commonly used software applications, such as Microsoft®...
- Page 13 The interactive pen display features a Kensington security slot. Lock the interactive pen display with a security cable (not included) to help safeguard it from theft. HDCP The SMART Podium 624 interactive pen display is HDCP 1.4 compliant. Optional accessories For more information on optional accessories, contact your authorized SMART reseller.
-
Page 14: Components
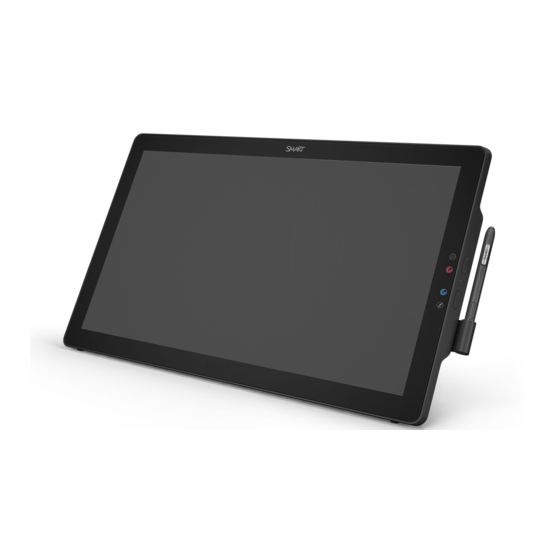
CHAPTER 1 WELCOME Components This illustration shows you the components of the interactive pen display. Component Description Status and Power Indicates the power and communication status of the LEDs interactive pen display. See Chapter 6: Troubleshooting the interactive pen display on page 39 for more information. Display screen Displays your content on a 20.7/8"... -
Page 15: Side Buttons
Press this button to: Black ink Write in black ink. Red ink Write in red ink. OSD menu Open the on-screen display (OSD) menu. Blue ink Write in blue ink. SMART Ink tool bar Show or hide the SMART Ink tool bar. smarttech.com/kb/171254... -
Page 16: Cordless Pen And Holder
See Using the cordless pen on page 23. Pen holder Insert the pen holder into the slots on either side of the display and use it to store your pen. Refer to the SMART Podium quick connect guide (smarttech.com/kb/171255) for information about installing the pen holder and tether. -
Page 17: Connection Panel
CHAPTER 1 WELCOME Connection panel This illustration shows the connectors on the side of the interactive pen display. No. Connector Description USB A Connects peripheral devices, such as a USB drive. USB B receptacle Connects the USB cable from the interactive pen display to your computer or laptop. -
Page 19: Chapter 2: Installing The Interactive Pen Display
Connecting the interactive pen display to other devices This chapter describes the installation of the interactive pen display. System requirements Before installing the SMART Podium 624 interactive pen display and SMART software, make sure your computer meets the following requirements. Operating system requirements for SMART Learning Suite... -
Page 20: Os X Operating System Software
Intel Core 2 Duo 2 GB minimum RAM NOTE For more information on the operating system requirements for SMART Learning Suite, see the latest SMART Notebook software release notes (support.smarttech.com/docs/redirect/?product=notebook&context=relnotes). Operating systems and other third-party software released after this SMART software might not be supported. -
Page 21: Available Receptacles
Other requirements: Microsoft .NET, Framework 4.5.1, Microsoft Visual Studio®, Tools for Office, Adobe® Reader® 11.0.10 or later (for SMART Ink plugin) NOTE For more information on the operating system requirements for SMART Meeting Pro software, see the SMART Meeting Pro software release notes (smarttech.com/SMARTMeetingProReleaseNotes). -
Page 22: Getting Ready To Install The Interactive Pen Display
CHAPTER 2 INSTALLING THE INTERACTIVE PEN DISPLAY NOTES Ensure your computer's video card is capable of providing a resolution setting of 1920 × 1080. Display of HDCP content requires a video card that is HDCP 1.4 compliant. The interactive pen display passes the video signal through as it is received. Digital In provides Digital Out, and analog provides Analog Out. -
Page 23: Setting Up Your Work Area
CHAPTER 2 INSTALLING THE INTERACTIVE PEN DISPLAY You must install SMART Product Drivers on the computer connected to the interactive pen display to enable the display's surface to respond to the touch by the cordless pen or your finger. Use your computer's mouse and keyboard to install SMART Product Drivers before you install the interactive pen display. -
Page 24: Removing And Installing The Smooth Tilt Stand
CHAPTER 2 INSTALLING THE INTERACTIVE PEN DISPLAY Removing and installing the Smooth Tilt Stand You can remove the interactive pen display from its stand. CAUTION Before beginning, set down the interactive pen display carefully to ensure you do not damage the buttons. Use a soft cloth or similar item to protect the display's interactive surface. -
Page 25: Connecting The Interactive Pen Display To Your Computer
To connect the interactive pen display to your computer, refer to the Quick Connect guide that came with the product. You can also find this document on the SMART Support website at smarttech.com/kb/171255. Orient the interactive pen display after you connect it to your computer. See Orienting the interactive pen display on the next page for more information. -
Page 26: Orienting The Interactive Pen Display
(ink appears a distance from the actual pen contact). To orient the interactive pen display 1. In Windows operating systems, tap the SMART Board icon ( ) in the notification area, and then select Orient. - Page 27 CHAPTER 2 INSTALLING THE INTERACTIVE PEN DISPLAY 2. Use the cordless pen to press the center of the target. TIPS To accurately orient the screen, press the cordless pen to the screen near the first target. The color of the target turns to green. Slide the cordless pen to the center of the target.
-
Page 28: Connecting The Interactive Pen Display To Other Devices
If you use a video cable longer than 23' (7 m), you must boost the video signal with a video distribution amplifier. See the SMART Installation Standards (smarttech.com/kb/171035) for tips on extending video cables. If you want to show HDCP content, use a video distribution amplifier that is HDCP 1.4 compliant. -
Page 29: Chapter 3: Installing Smart Software
About SMART software The interactive pen display includes a subscription to SMART Learning Suite or a license for SMART Meeting Pro software. Download and install the software on the computer connected to the interactive pen display to enable its interactive features. -
Page 30: Installing Smart Meeting Pro Software
Suite. See Operating system requirements for SMART Learning Suite on page 9. Installing SMART Meeting Pro software The SMART Podium SP624P model comes with one room license and ten personal licenses for SMART Meeting Pro software. You can download SMART Meeting Pro software from smarttech.com/downloads,... -
Page 31: Chapter 4: Using The Interactive Pen Display
Writing or drawing in PDF files Other SMART Ink resources This chapter explains the SMART Podium interactive pen display's basic operation, including how to write and erase digital notes and how to work with SMART Ink and Ink Aware applications. smarttech.com/kb/171254... -
Page 32: Turning The Interactive Pen Display On And Off
CHAPTER 4 USING THE INTERACTIVE PEN DISPLAY Turning the interactive pen display on and off This picture and table describe the SMART Podium display's power controls and status LEDs. Component Description Power button Turns the interactive pen display on or off... -
Page 33: Using The Cordless Pen
You can write notes over applications and your desktop only if SMART Product Drivers is running on your computer. If the SMART Board icon in the Windows notification area or Mac Dock has a small red x in the lower right corner , SMART Product Drivers is not running on your... -
Page 34: Cordless Pen Components
CHAPTER 4 USING THE INTERACTIVE PEN DISPLAY Cordless pen components This illustration shows the cordless pen's components. Component Description Pen nib Press a Pen Color button, and then touch the pen nib to the screen surface to write with digital ink. CAUTION Replace a cordless pen nib when the nib wears down. -
Page 35: Pen Color Buttons
Write in blue ink. Customizing button actions on the cordless pen Use SMART Settings to assign and change actions to the buttons on the cordless pen. The assigned action is performed when you press the button on the pen. Available pen button actions This table lists the actions you can assign to the buttons on the cordless pen. -
Page 36: Assigning Button Actions On The Cordless Pen
Assigning button actions on the cordless pen below. Disabled No action is assigned to the button Assigning button actions on the cordless pen Use the following procedure to access SMART Hardware Settings and assign actions to the cordless pen's buttons. smarttech.com/kb/171254... -
Page 37: Writing Or Drawing Digital Ink
NOTES By default, SMART Ink starts when you first log on to your computer. If SMART Ink isn't running, you can start it manually. To learn more, see Working with SMART Ink on page 31. The interactive pen display ignores a palm resting on the screen. -
Page 38: Erasing Digital Ink
Turn the pen around and move the eraser over the area you want to erase. NOTE You can also use the pen nib as a customizable eraser by using SMART Settings to assign an eraser action to one of the pen buttons. See Customizing button actions on the cordless pen on page 25. -
Page 39: Using Gestures
This gesture starts applications if your computer's operating system is set to start applications with single click. Displaying Tap and hold the screen with your finger. In menu options SMART Notebook software, Windows and (right-clicking) Microsoft Office programs, the right-click menu appears. smarttech.com/kb/171254... -
Page 40: Using Multi-Finger Gestures
CHAPTER 4 USING THE INTERACTIVE PEN DISPLAY Double-clicking Quickly Tap the interactive surface twice in the same spot. This performs a standard double- click. Dragging an Tap and hold an object or scroll bar on the object or scroll screen. Slowly move your finger on the screen to move the object or scroll bar. -
Page 41: Working With Smart Ink
See Starting SMART Ink manually on the next page. After SMART Ink starts, you can open the SMART Ink dynamic toolbar and use it to write and draw, convert handwriting to text, take screen captures and use favorites. -
Page 42: Starting Smart Ink Manually
Although the dynamic toolbar works with the desktop and all applications, some of its options vary from application to application. Starting SMART Ink manually If SMART Ink isn't set up to start automatically, you can use the following procedure start it manually. To start SMART Ink manually in Windows In Windows 7, select Start >... - Page 43 CHAPTER 4 USING THE INTERACTIVE PEN DISPLAY If the dynamic toolbar is covering something you want to see, drag it to a different part of the screen. To open the dynamic toolbar in full mode Tap the dynamic toolbar to open it in full mode. NOTE The toolbar minimizes after 10 seconds of non-use.
-
Page 44: About Smart Ink Settings
CHAPTER 4 USING THE INTERACTIVE PEN DISPLAY About SMART Ink settings You can use the SMART Ink Settings window to change a number of settings for SMART Ink, including: General settings Dynamic toolbar settings Microsoft Office settings NOTE If you're using SMART Ink on Windows, you can also use the SMART Ink Settings window to troubleshoot common issues. -
Page 45: Writing Or Drawing In Pdf Files
SMART Ink plugin for Adobe Acrobat® Reader (Windows only) SMART Ink Document Viewer With Adobe Acrobat Reader and the SMART Ink plugin, you can write, draw and erase digital ink in PDF files. The SMART Ink plugin inserts digital ink in the PDF file as Adobe Acrobat Reader comments. - Page 46 CHAPTER 4 USING THE INTERACTIVE PEN DISPLAY smarttech.com/kb/171254...
-
Page 47: Chapter 5: Maintaining The Interactive Pen Display
Chapter 5 Maintaining the interactive pen display Cleaning the screen and cordless pen Maintaining ventilation Preventing condensation This chapter provides care and maintenance information you can use to ensure the interactive pen display's best possible performance. Cleaning the screen and cordless pen Follow these instructions to clean the interactive pen display screen and cordless pen without damaging them or other product components. - Page 48 CHAPTER 5 MAINTAINING THE INTERACTIVE PEN DISPLAY To clean the screen 1. Turn off the interactive pen display and shut down your computer. 2. Disconnect the power sources for your computer and the interactive pen display. 3. Wipe the screen with a lint-free, non-abrasive, anti-static cloth. Maintaining ventilation The interactive pen display requires ventilation to enable the fans to cool the unit.
-
Page 49: Chapter 6: Troubleshooting The Interactive Pen Display
Chapter 6 Troubleshooting the interactive pen display Resolving issues with power and video Resolving issues with the cordless pen and touch Resolving issues with the image VGA display issues Resolving Mac-specific issues This chapter explains how to troubleshoot issues with the interactive pen display. Resolving issues with power and video Refer to the following table for information on resolving issues with power and video. -
Page 50: Resolving Issues With The Cordless Pen And Touch
If the interactive pen display still doesn't turn on, contact SMART Support (smarttech.com/contactsupport). Resolving issues with the cordless pen and touch Refer to the following table for information about resolving issues with the cordless pen and touch interactivity. - Page 51 Product Support > Tools > Diagnostics. button. b. If the Status field contains a “SMART Board service is not running” message, click the Service menu, and then select Start. Run the Connection Wizard in SMART Settings to ensure SMART Board Services are running.
- Page 52 SPACEBAR on the keyboard until the orientation screen appears on the interactive pen display. The display doesn't Make sure the latest version of SMART Product Drivers is respond to touch or writing installed on your computer. See smarttech.com/downloads. with a pen.
-
Page 53: Resolving Issues With The Image
Make sure Microsoft Office 2013 or later is installed. Microsoft Office. Make sure the Microsoft Word, Excel and PowerPoint ink tools are enabled in SMART Ink Settings. For more information about enabling these settings, refer to the Changing SMART Ink 5 Settings support site page at support.smarttech.com/docs/software/ink/ink-5/en/installing-... - Page 54 VGA cable When an image appears for Use a screen saver or other power management feature. See the a long time without Image persistence or burn in on LCD displays SMART Communities refreshing the screen, an article at community.smarttech.com/s/article/Image-Persistence-or- after image remains.
- Page 55 Take a photograph of the screen and send it to SMART support. If SMART support determines that the issue is with the screen and the interactive pen display is under warranty, you may be eligible for a replacement.
-
Page 56: Vga Display Issues
CHAPTER 6 TROUBLESHOOTING THE INTERACTIVE PEN DISPLAY Symptoms Solution You're experiencing other Contact SMART Support (smarttech.com/contactsupport).. issues with image quality, or the previous solutions don't resolve the issue. VGA display issues If you encounter image issues with the interactive pen display with a VGA connection, refer to the following table. -
Page 57: Resolving Mac-Specific Issues
Select Finder > Utilities. c. Start the Disk Utility program, and then d. Run Repair Disk Permissions from the First Aid tab. If this doesn't resolve the problem, contact SMART Support. Handwriting Recognition Ink preference files may be damaged. Remove the damaged doesn't work correctly. - Page 58 CHAPTER 6 TROUBLESHOOTING THE INTERACTIVE PEN DISPLAY 4. Select Apple menu > System Preferences > Ink, and then enable handwriting recognition. Contact Apple Support if the handwriting recognition and digital ink issues persist. smarttech.com/kb/171254...
-
Page 59: Appendix A: Adjusting Video Settings With The On-Screen Display (Osd) Menu
Appendix A Adjusting video settings with the on-screen display (OSD) menu Changing settings in the OSD menu OSD menu settings Brightness/Contrast Custom RGB Color Presets Display Settings VGA Settings Other Settings If you're using a VGA video input, the screen settings adjust automatically when you turn on the interactive pen display. - Page 60 APPENDIX A ADJUSTING VIDEO SETTINGS WITH THE ON-SCREEN DISPLAY (OSD) MENU Changing settings in the OSD menu OSD control Select item Up arrow OSD menu button Down arrow Previous menu item To change settings in the OSD menu 1. Press the OSD menu button on the side control panel. The OSD menu appears.
-
Page 61: Brightness/Contrast
APPENDIX A ADJUSTING VIDEO SETTINGS WITH THE ON-SCREEN DISPLAY (OSD) MENU 4. Press to browse to the setting you want to change. 5. Press to select the setting, and then press to change the setting. The changes you make are applied immediately. 6. -
Page 62: Display Settings
APPENDIX A ADJUSTING VIDEO SETTINGS WITH THE ON-SCREEN DISPLAY (OSD) MENU Menu item Function 6500K Sets the color temperature to 6500K 9300K Sets the color temperature to 9300K Direct Displays colors directly from the video card without any adjustment Display Settings Menu item Function Scaling... -
Page 63: Appendix B: Hardware Environmental Compliance
Appendix B Hardware environmental compliance SMART Technologies supports global efforts to ensure that electronic equipment is manufactured, sold and disposed of in a safe and environmentally friendly manner. Waste Electrical and Electronic Equipment (WEEE) Electrical and electronic equipment and batteries contain substances that can be harmful to the environment and to human health. - Page 66 SMART TECHNOLOGIES smarttech.com/support smarttech.com/contactsupport smarttech.com/kb/171254...
Need help?
Do you have a question about the Podium 624 and is the answer not in the manual?
Questions and answers