Table of Contents
Advertisement
Quick Links
Advertisement
Table of Contents

Related Manuals for Trust SpaceC@m 300


Summary of Contents for Trust SpaceC@m 300
- Page 1 Trust SpaceC@m 300 TRUST SPACEC@M 300 Instruction Manual Version 3.0...
- Page 2 Trust SpaceC@m 300 Thank you Thank you very much for purchasing this product from the Trust range. We wish you hours of fun with it. Please read this manual carefully before using the product. Registration Register your purchase now at the Trust Internet site, www.trust.com, so that you are able to receive optimal guarantee and service support.
-
Page 3: Table Of Contents
Contents of the package ......................2 Minimum system requirements ....................2 Safety ............................... 3 General............................3 Functions of the ‘Trust SpaceC@m 300’..................3 Installation ............................4 Installing the ‘Trust SpaceC@m 300’ driver................4 Installing Ulead Photo Express 3.0 SE .................. 5 Installing Acer EasyXpress VideoMail 2.2 ................ -
Page 4: Introduction
Additional information will be shown as follows: Note: If you connect the Trust Spacec@m 300 to a USB HUB, then the USB HUB should have its own power supply. The examples assume that the letter “D” has been assigned to your CD-ROM drive. If your system uses a different drive letter for your CD-ROM drive, for example “E”, you should replace “D”... -
Page 5: Safety
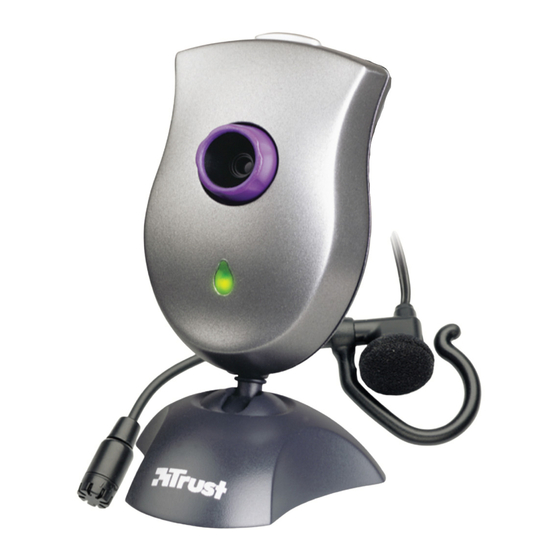
Position the device so that the cables cannot be damaged. 3. Functions of the ‘Trust SpaceC@m 300’ Figure 1: Functions of the ‘Trust SpaceC@m 300’ Snapshot button; Takes a picture when this button is pressed. Lens; turn the lens to make the image sharp. -
Page 6: Installation
‘Setup.exe’ in the CD. Figure 2 will appear. Figure 2: Installating the driver 2. Click on ‘TRUST SPACEC@M 300’ to install the driver. Figure 3 will appear. Figure 3: Installation of driver 3. Click on ‘Next’ to start the installation. Figure 4 will appear. -
Page 7: Installing Ulead Photo Express 3.0 Se
Ulead Photo Express 3.0 SE is an image editor which you can use to load and edit the images on your computer that you have taken using the SpaceC@m 300. Follow the instructions below to install Ulead Photo Express 3.0 SE. - Page 8 Trust SpaceC@m 300 Figure 6: Installing Ulead Photo Express 3.0 SE Click on 'Install'. Figure 7 will appear. Figure 7: Installing Ulead Photo Express 3.0 SE Click on 'Next'. Figure 8 will appear. Figure 8: Installing Ulead Photo Express 3.0 SE...
- Page 9 Trust SpaceC@m 300 Figure 9: Installing Ulead Photo Express 3.0 SE Click on 'Next'. A screen similar to figure 10 will appear. Figure 10: Installing Ulead Photo Express 3.0 SE...
- Page 10 Trust SpaceC@m 300 Click on ‘Typical’. Figure 11 will appear. Figure 11: Installing Ulead Photo Express 3.0 SE Click on 'Next'. Figure 12 will appear. Figure 12: Installing Ulead Photo Express 3.0 SE Click on 'Next'. Ulead Photo Express 3.0 SE will now be installed. Figure 13 will appear after the...
-
Page 11: Installing Acer Easyxpress Videomail 2.2
Trust SpaceC@m 300 Figure 13: Installing Ulead Photo Express 3.0 SE Disable the option for 'online' registration and click on 'Finish'. Figure 14 will appear. Figure 14: Installing Ulead Photo Express 3.0 SE 10. Click on 'Finish' to restart your computer. - Page 12 Trust SpaceC@m 300 Figure 15: Selecting the language Select the language you wish to use for the installation of Acer EasyXpress VideoMail 2.2 and click on 'OK'. Figure 16 will appear. Figure 16: Installing Acer EasyXpress VideoMail 2.2 Click on 'Next'. Figure 17 will appear.
- Page 13 Trust SpaceC@m 300 Figure 18: Installing Acer EasyXpress VideoMail 2.2 Click on 'Next'. Figure 19 will appear. Figure 19: Installing Acer EasyXpress VideoMail 2.2 Click on 'Next'. Figure 20 will appear. Figure 20: Installing Acer EasyXpress VideoMail 2.2 Click on 'Next'. EasyXpress VideoMail will now be installed.
-
Page 14: Installation Microsoft ® Netmeeting (Windows 98 / Me / 2000)
Installation Microsoft ® NetMeeting (Windows 98 / Me / 2000) NetMeeting is a program which is included in Windows 98 / Me / 2000. The program makes it possible to use your Trust SpaceC@M as webcam. To install NetMeeting you have to follow the next steps: Figure A: Installation Microsoft ®... - Page 15 Trust SpaceC@m 300 3. Click “Next” to continue. Figure C appears. Figuur C: Installation Microsoft ® NetMeeting 4. Enter the information about yourself like Fill in your surname, family name, e-mail address place or country and a greeting text. Then click op “Next”. Figure D appears.
- Page 16 Trust SpaceC@m 300 Figure F: Installation Microsoft ® NetMeeting 7. Select the camera you want to use for NetMeeting and click “Next” to continue. Figure G appears. Figure G: Installation Microsoft ® NetMeeting 8. Select “Put a shortcut to NetMeeting on my desktop” if you like to have a shortcut of NetMeeting on your desktop of Windows.
- Page 17 Trust SpaceC@m 300 Figure I: Installation Microsoft ® NetMeeting 11. Click the “Test” button to test your connected speakers. The“Test” button will change into a “Stop” button”. You will hear sound of your speakers now. 12. You can set the volume by using the slide button. If there is no sound, your soundcard probably is not installed correctly.
-
Page 18: Using The Camera And The Applications
Trust SpaceC@m 300 5. Using the camera and the applications Trust SpaceC@m 300 Software The 'Trust SpaceC@m 300' program is installed during the installation of the camera. Follow the instructions below for the use of this program. 5.1.1 Description of the functions Go to ‘Start - Programs - Trust - SpaceC@m 300' and click on ‘Trust SpaceC@m 300’. -
Page 19: Advanced Image Settings
Trust SpaceC@m 300 Function Description Thumbnails' (small example of the image) of the snapshots are placed here. Click on the 'Thumbnails' to view the snapshot in the screen (G). See chapter 4.2. for the use of this program. Table 2: Functions of the driver program 5.1.2... -
Page 20: Taking A Snapshot
Trust SpaceC@m 300 Function Description Adjusts the image brightness Adjusts the image contrast Adjust the image colour depth Adjusts the sharpness of the image Adjusts the hue Adjusts the background Adjusts the exposure Colour or Black / White Screen position... -
Page 21: Zoom In & Zoom Out
Start Photo Express 3.0 SE. Figure 25 will appear. Figure 25: Selecting the camera Select ‘Digital camera’. 'Trust SpaceC@m 300' is shown in the window. Click on 'OK'. In the main menu for Photo Express, select 'Get' (A) and then 'Import' (B). The 'Import Module' screen (C) will appear next to the photo album window. - Page 22 Trust SpaceC@m 300 Give the type of file (e.g. JPEG) in field (F). Click on 'Import' (G). Figure 27 will appear. See the table below for this screen's diverse functions. Figure 27: Editing the camera image in Photo Express Function Description The present camera image is shown in this screen.
-
Page 23: Using Acer Easyxpress Videomail 2.2
Trust SpaceC@m 300 Function Description There are various functions in this submenu of the 'Edit' screen that you can use to edit the image. ‘Print’ button: Prints the edited image on your printer. ‘Share’ button: Saves the edited image to your hard disk, sends the edited image by e-mail or fax, or saves it as a HTML document (Internet). - Page 24 Trust SpaceC@m 300 Function Description ‘Help’ button: Calls up the help function for this program. ‘Properties’ button: Changes the video mail message settings. You can change the image size, image quality and camera settings here. ‘Mail’ button: Sends the video mail message.
- Page 25 Trust SpaceC@m 300 Select the image size you wish to use and click on 'Next'. Figure 33 will appear. Select the image quality, better quality gives a large file size. Click on 'Next'. Figure 33: making a video mail message Select the image quality (better quality gives a large file size).
-
Page 26: Using Microsoft ® Netmeeting
Trust SpaceC@m 300 Using Microsoft ® NetMeeting 1. Before you start NetMeeting, an internet account need to be installed. Figure 41: Start NetMeeting 2. Start NetMeeting (Start -> Programs -> Accessories -> Internet Tools -> NetMeeting). See Figure 41. 3. Two windows will be opened now, NetMeeting and your Dial up Connection. See Figure 42. - Page 27 Trust SpaceC@m 300 Figure 43: Using Microsoft ® NetMeeting 6. Now you have to make the unique settings for NetMeeting. Go to Tools -> Options…. Figuur 44 verschijnt. Figure 44: Unique settings Microsoft ® NetMeeting 7. Click ‘Video’. Figure 45 appears...
- Page 28 Trust SpaceC@m 300 Figure 45: Unique settings Microsoft ® NetMeeting 8. To prevent your image is mirrored you have to switch the option ‘Show mirror image in preview video window’ off. You also can change the settings of your camera, for example screen size and quality.
- Page 29 Trust SpaceC@m 300 Figure 48: Using Microsoft ® NetMeeting 13. Double click on a person in the list. A NetMeeting connection will be made now. Sometimes it can happen the selected person refuse the connection because he or she already has a connection with somebody else.
-
Page 30: Troubleshooting
You will be automatically informed of developments to your product and of other Trust products. You will also have the chance to win some spectacular prizes. If you still have any problems after trying these solutions, please contact one of the Trust Customer Care Centres. -
Page 31: Specifications
Trust SpaceC@m 300 7. Specifications Sensor type: CMOS Recording element (CCD): 1/3” Focus: Manual focus Pixel resolution: 300K (640x480) Colour depth: 24 bits Distance: 5 cm to endless Exposure: 1/60 – 1/25,000 sec Minimum lighting: 50 Lux Image speed: 30 fps for an image size of 160 x... -
Page 32: Trust Customer Care Centres
Trust SpaceC@m 300 8. Trust Customer Care Centres www.trust.com Residents in the UK and Ireland should contact: From UK Office 8:00 - 16:00 Phone +44-(0)0845-6090036 +44-(0)1376-514633 I residenti in Italia possono contattare: Orario: Ufficio italiano 9:00 - 13:00 / Telefono...
Need help?
Do you have a question about the SpaceC@m 300 and is the answer not in the manual?
Questions and answers