
Related Manuals for Medline 100RA


Summary of Contents for Medline 100RA
- Page 1 BASIC STEEL ROLLATOR WITH 6" WHEELS KNOCKDOWN ROLLING WALKER USER INSTRUCTIONS & WARRANTY 100RA Product is not made with natural rubber latex.
- Page 2 100RA PIC-00311 Revised: 09/20/2016...
-
Page 3: Table Of Contents
Table of Contents Safety Instructions ...........4 Rollator Parts List ........... 6 Assembly Instructions ..........7 Operating Instructions ......... 12 Maintenance ............13 Warranty ..............16 For any and all questions regarding this product please call 800-289-9793. 100RA PIC-00311 Revised: 09/20/2016... -
Page 4: Safety Instructions
Safety Instructions To ensure your safety in using the Medline rollator, the following safety information and all instructions must be followed. GENERAL CAUTIONS: DO NOT use this product without first reading and understanding the instructions contained in this manual. If you are unable to understand the warnings, cautions, or instructions, contact a healthcare professional, dealer, or technical personnel before use. - Page 5 DO NOT push the rollator while brakes are enabled. Brakes are to be used to keep the wheels from rolling. However, it may not prevent the rollator from moving if it is pushed. Note: Only use accessories and spare parts authorized by Medline Industries 100RA PIC-00311 Revised: 09/20/2016...
-
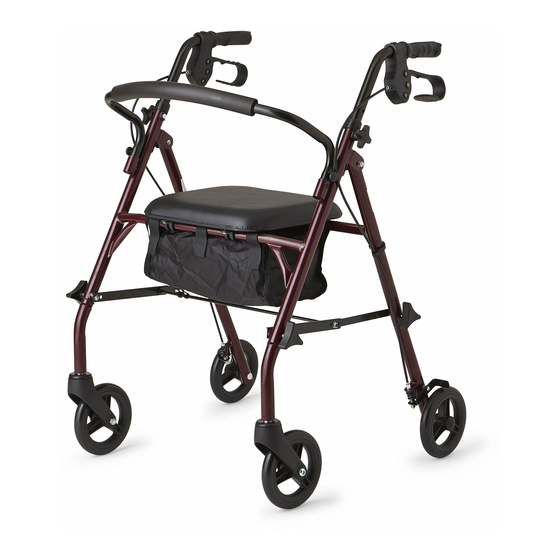
Page 6: Rollator Parts List
B. Adjustable Handlebars I. Folding Support Bracket C. Four Point Knobs J. 6" (15.2 cm) Front Wheels D. Backrest K. 6" (15.2 cm) Back Wheels E. Backrest Attachment L. Triangular Knobs F. Seat M. Brake Shoe 100RA PIC-00311 Revised: 09/20/2016... -
Page 7: Assembly Instructions
(other than the bag) are missing. If there are missing or damaged parts, please call Medline Customer Care toll free at 1-800-MEDLINE. 3. Remove plastic cover from wheels. Check all of the wheels to see that they are in good working order and roll freely. - Page 8 Make sure that the brake shoe (M) is toward the outside of the frame. Insert one triangular knob (L) (Figure 8). Figure 7 Figure 6 Figure 8 CAUTION: Wheels and Brake shoes MUST be on the outside of the rollator. 100RA PIC-00311 Revised: 09/20/2016...
- Page 9 Figure 10 a) Insert the bolt into the 6 sided hole in the frame (Figure 11). Make sure the bolt head recesses into the frame (Figure 12). Figure 11 Figure 12 100RA PIC-00311 Revised: 09/20/2016...
- Page 10 Make sure all 4 wheels are contacting the floor. 13. Insert the backrest (D) so that the curved portion faces the front of the unit. Make sure that the button snaps firmly into the hole so the back is secure (Figure 16). Figure 16 100RA PIC-00311 Revised: 09/20/2016...
- Page 11 Do one side at a time. Secure the handlebars at the closest hole to the desired height. Repeating Step 10, secure the four point knob (C) to the screw. (Important: Hand Tighten Only!) 100RA PIC-00311 Revised: 09/20/2016...
-
Page 12: Operating Instructions
DO NOT use the rollator. Please call our toll-free Customer Service number at. 1-800-MEDLINE for returns or repairs. • To release the brakes from the locked position, simply pull up on the brake handles (Figure 17). -
Page 13: Maintenance
(You may need pliers to get started). Then rotate both together clockwise until it is tight against the handle; this should loosen the brake. If there is no gap and it is already tight against the handle, no further adjustment can be made. 100RA PIC-00311 Revised: 09/20/2016... - Page 14 Adjust to correct tension. If there is no gap, no further adjustment can be made here. 100RA PIC-00311 Revised: 09/20/2016...
- Page 15 There will now be a gap between the thumb screw and the adjustment nut. Adjust to correct tension. Figure 20 100RA PIC-00311 Revised: 09/20/2016...
-
Page 16: Warranty
Lifetime Limited Warranty Your Medline walker frame is warranted to be free of defects in material and workmanship for a lifetime for the original consumer. This device was built to precise standards and carefully inspected prior to shipment. This Lifetime Limited Warranty is an expression of our confidence in the material and workmanship of our products and assures years of convenient, dependable service.
Need help?
Do you have a question about the 100RA and is the answer not in the manual?
Questions and answers