Advertisement
Table of Contents
- 1 Table of Contents
- 2 Ultra-Light Rollator Features
- 3 Rollator Components
- 4 Safety Instructions
- 5 Assembly Instructions
- 6 Rear Wheel Assembly
- 7 Front Wheel Assembly
- 8 Brake Handle Assembly
- 9 Backrest Assembly
- 10 Operating Instructions
- 11 Operating Instructions
- 12 Maintenance
- 13 Warranty
- Download this manual
Advertisement
Table of Contents

Related Manuals for Medline MDS86825SLR


Summary of Contents for Medline MDS86825SLR
- Page 1 Supplying Hospitals for Over 90 Years User Guide MDS86825SLR Ultra-Light Rollator Revised: July 1, 2008...
-
Page 2: Table Of Contents
Contents Ultra-Light Rollator Features ...................... 3 Rollator Components ........................4 Safety Instructions ........................5 Assembly Instructions ......................... 6 Rear Wheel Assembly ........................7 Front Wheel Assembly ........................8 Brake Handle Assembly ......................9 Backrest Assembly ........................10 Operating Instructions ......................11-12 Maintenance .......................... -
Page 3: Ultra-Light Rollator Features
Ultra-Light Rollator Features Congratulations on purchasing one of the most durable rollators made anywhere. With proper assembly the rollator will provide years of great performance. Hand brakes push to lock, pull to release. Includes high-end, water- proof nylon bag with snaps. Shoulder strap gives end- user more freedom. -
Page 4: Rollator Components
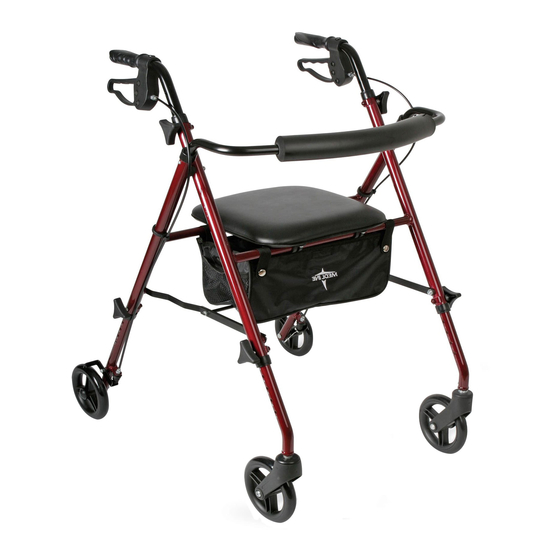
Rollator Components Figure 1 Assembled Ultra-Light Rollator A. Hand Grips B. Hand Brake Lock C. Padded Seat D. Padded Backrest E. Triangular Hand Screw F. 5.5” Front Wheels G. Folding Hinge H. 5.5” Rear Wheels I. Brake Cable Figure 2 Triangular Hand Screw Figure 3 Hand Brakes... -
Page 5: Safety Instructions
• All wheels must be in contact with the floor at ALL TIMES. This will ensure the rollator is properly balanced. • DO NOT hang anything from the rollator handles or frame (other than the Medline provided bag the position described). This may cause the rollator to tip, resulting in bodily injury or rollator damage. -
Page 6: Assembly Instructions
3. Check all of the wheels to see that they are in good working order and roll freely. Remove plastic cover from the wheels before use. 4. Unfold the Medline Rollator by pushing down on the Folding Hinge (G) until the frame is in full extension. -
Page 7: Rear Wheel Assembly
Rear Wheel Assembly 1. Turn wheel so that it is facing outside of rollator (see Figure A). 2. Insert wheel to desired height depicted by numeric holes (see Figure B) and use chart below for recommended height settings). 3. Insert triangular hand screw into hole on same side of wheel so that the triangular hand screw stays outside of rollator frame. -
Page 8: Front Wheel Assembly
Front Wheel Assembly 1. When inserting front wheel make sure FRONT sticker is pointed toward the front and away from rollator (see Figure A). 2. Insert wheel to desired height depicted by numbered holes (set to the same number as rear wheels). 3. -
Page 9: Brake Handle Assembly
Brake Handle Assembly 1. Insert hand grip into appropriate hole (see Figure A and chart below). Note: Keep brake cable on outside of rollator. 2. Insert triangular hand screw into hole on outside of rollator frame (see Figure B). (Important: Insert hand screw into one of the 4 holes provided. DO NOT put hand screw in open slot at end of hand grip!) 3. -
Page 10: Backrest Assembly
Backrest Assembly 1. Insert backrest into designated slot so that push-buttons are facing outward (see Figure A). 2. Push buttons in and continue to insert backrest until buttons securely lock into holes (see Figure B). Notes: Make sure the brakes are locked before you lean against backrest. Make sure push-buttons are firmly protruding before leaning against backrest. -
Page 11: Operating Instructions
Operating Instructions Opening the Rollator Push down on the seat (C) until all four wheels are extended out and the seat is completely flat. Before using the rollator make sure that all four wheels make contact with the floor and the rollator is stable in the open position. -
Page 12: Operating Instructions
If the brakes have been adjusted but the rear wheels on the rollator move while the brakes are in the locked position, DO NOT use the rollator. Please call our toll-free customer service number at 1-800-MEDLINE for returns or repairs. -
Page 13: Maintenance
If the brakes do not lock the wheels, the brakes need to be adjusted. If adjustment does not tighten the brakes, DO NOT use the rollator. Keep your receipt! Contact us at 1-800-MEDLINE, Monday – Friday 8am to 5pm CST if you encounter any problems or for information regarding repairs or maintenance. -
Page 14: Warranty
Lifetime Limited Warranty Your Medline rollator frame is warranted to be free of defects in material and workmanship for a lifetime for the original consumer. This device was built to precise standards and carefully inspected prior to shipment. This Lifetime...
Need help?
Do you have a question about the MDS86825SLR and is the answer not in the manual?
Questions and answers