Table of Contents
Advertisement
Quick Links
Advertisement
Table of Contents

Related Manuals for Logik LCDBOOM14


Summary of Contents for Logik LCDBOOM14
- Page 1 Instruction Manual Portable CD Stereo LCDBOOM14...
-
Page 3: Table Of Contents
Contents Safety Warnings ..........................4 Unpacking ............................6 Product Overview ..........................7 Front View .................................. 7 Top View ..................................7 Rear View ................................... 7 Power Source ..........................8 Mains Power ................................8 Battery Power ................................8 Handling the Batteries ............................8 Using Earphones ..........................9 Radio Operation ..........................9 General Operation .............................. -
Page 4: Safety Warnings
Safety Warnings • Read all the instructions carefully before using • Do not install or place this unit in a bookcase, the unit and keep them for future reference. built-in cabinet or in another confined space. • Retain the manual. If you pass the unit onto a Ensure the unit is well ventilated. - Page 5 Supervision • Children should be supervised to ensure that they do not play with the unit. • Never let anyone especially children push anything into the holes, slots or any other openings in the case - this could result in a fatal electric shock.
-
Page 6: Unpacking
Thank you for purchasing your new Logik Portable CD Stereo.. We recommend that you spend some time reading this instruction manual in order that you fully understand all the operational features it offers. You will also find some hints and tips to help you resolve any issues. -
Page 7: Product Overview
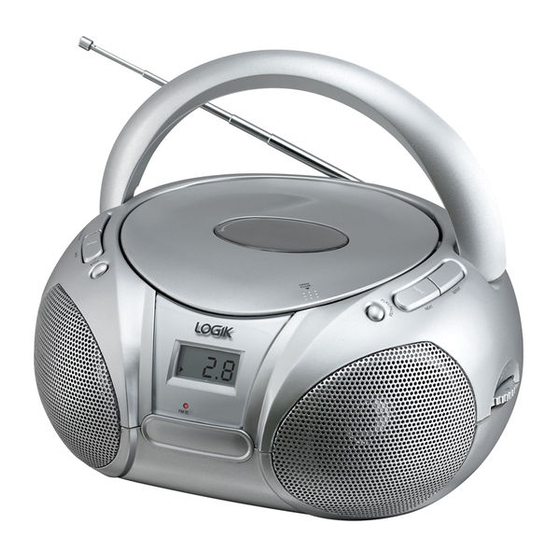
Product Overview Front View 1. LCD Display 2. FM Stereo Indicator 3. Speakers FM ST. Top View 4. FM Aerial 5. Handle 6. FUNCTION Selector 7. CD Door 8. VOLUME Control 9. PROG./RESTART Button 10. BACK Button 11. STOP Button 12. -
Page 8: Power Source
Power Source To the mains socket Insert 8 x C size batteries Bottom view into the battery compartment Mains Power Check that the voltage marked on the rating label matches your mains voltage. Connect the mains cable to the back of the unit then plug into a mains socket. Battery Power Alternatively, insert 8 x C size batteries (not included) correctly by following the polarity (+ and –) indications in the battery compartment. -
Page 9: Using Earphones
Using Earphones Turn down the volume before connecting the earphones. Slowly raise the volume with the earphones on until you reach your desired volume. When earphones are connected, the speaker is automatically disabled. Long-term exposure to loud music may cause hearing damage. It is best to avoid extreme volume when using earphones, especially for extended periods. -
Page 10: Cd Operation
CD Operation Compatible Disc Types Disc Types Disc Logo Recorded Content CD-R (CD Recordable) AUDIO CD-RW (CD-Rewritable) AUDIO AUDIO-CD (Compact Disc Digital Audio) AUDIO Playback 1. Set the FUNCTION selector to CD mode. 2. Open the CD door by pressing the bottom right area of the door marked “OPEN/CLOSE”... -
Page 11: Play / Pause
PLAY / PAUSE • Press to start playing CD. • Press again to stop playing CD temporarily. • Press again to resume playback. NEXT and BACK • Press to go to the next track or back to the previous track. •... -
Page 12: Erasing A Programme
Erasing a Programme In program mode (the “program” indicator is illuminated), you can erase the contents of the memory by pressing the STOP button (or pressing the STOP button twice during playback) or by opening the CD door. The “program”indicator will disappear. Stop the CD operation before opening the CD door. -
Page 13: Maintenance
Maintenance Cleaning the Unit Ensure the unit is fully unplugged from the mains socket before cleaning. • To clean the unit, wipe the case with a slightly moist, lint-free cloth. • Do not use any cleaning fluids containing alcohol, ammonia or abrasives. •... -
Page 14: Hints And Tips
Hints and Tips If a problem does occur, it may often be due to something very minor. The following table contains various tips. Problem Cause / Solution No power supply Check that the mains cable is correctly connected to the mains socket and the unit. -
Page 15: Specifications
Specifications Model LCDBOOM14 General Power Supply 230V ~ 50Hz (mains operated) DC 2 x 6V (8 x “C” size batteries) Power Consumption Output Power 2 x 1.2W Dimension Main unit - 231 (L) x 202 (W) x 113.6 (H) mm... - Page 16 For advice on where to purchase accessories, please contact the store where you purchased your equipment. All trademarks are the property of their respective owners and all rights are acknowledged. DSG Retail Ltd. (co. no. 504877) Maylands Avenue, Hemel Hempstead, Herts., HP2 7TG, UK IB-LCDBOOM14-140130V1...
Need help?
Do you have a question about the LCDBOOM14 and is the answer not in the manual?
Questions and answers