Panasonic CZ-RTC5A Installation Instructions Manual
High-spec wired remote controller
Hide thumbs
Also See for CZ-RTC5A:
- Operating instructions manual (54 pages) ,
- Quick reference (12 pages)
Table of Contents
Advertisement
English
Read through the Installation Instructions before you proceed
with the installation.
In particular, you will need to read under the "Safety
Precautions" on page 3.
Panasonic Corporation
1006 Kadoma, Kadoma City, Osaka, Japan
AMP Air Conditioning
Installation Instructions
High-spec Wired Remote Controller
Model No.
Contents
Part Names ....................................... 2
Supplied accessories ...................... 2
Safety Precautions ........................... 3
Specifi cations ................................... 4
Installation Precautions................... 5
Mounting ........................................... 7
Exposed type ................................ 7
Embedded type ............................ 8
Setting ............................................... 9
Language ..................................... 9
Clock ............................................ 9
Controller name ............................ 9
Service contact ........................... 10
RC. setting mode .........................11
Detailed settings ..........................11
Auto address .............................. 12
Set elec. consumption ................ 12
Confi rming Information ................. 13
Test Operation ................................ 14
Panasonic Corporation
http://www.panasonic.com
www.ampair.co.uk | sales@ampair.co.uk
CZ-RTC5A
CV6233312187
Advertisement
Table of Contents

Related Manuals for Panasonic CZ-RTC5A


Summary of Contents for Panasonic CZ-RTC5A
-
Page 1: Table Of Contents
Installation Instructions High-spec Wired Remote Controller CZ-RTC5A Model No. English Read through the Installation Instructions before you proceed with the installation. In particular, you will need to read under the “Safety Precautions” on page 3. Contents Part Names ........2 ... -
Page 2: Part Names
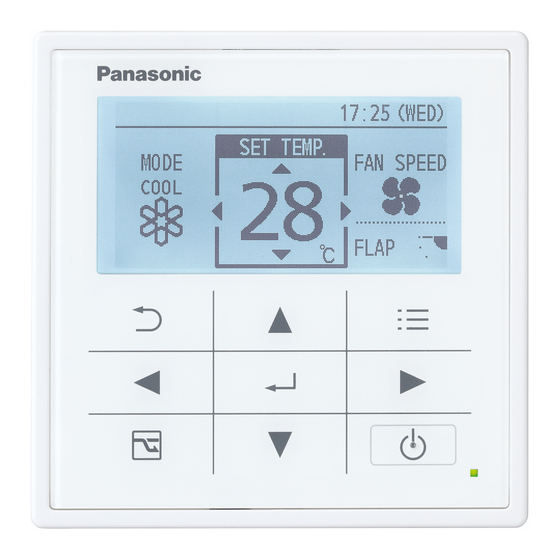
Part Names 5) Cursor buttons Selects an item. 1) LCD screen 2) Return button Left Right Returns to the previous screen. Down 3) Enter button 6) Menu button Fixes the selected Displays the menu content. screen. 4) Energy saving 7) Operation button indicator 8) Start/Stop button... -
Page 3: Safety Precautions
Safety Precautions • This controller shall be Read before installation Read the Installation Instructions installed in accordance with carefully to install the remote controller National Wiring Regulations. correctly and safely. • Connect and fi x the specifi ed Be sure to read the Safety Precautions cables for wiring securely. -
Page 4: Specifi Cations
Specifi cations Model No. CZ-RTC5A Dimensions (H) 120 mm x (W) 120 mm x (D) 16 mm Weight 180 g Temperature/ 0 ˚C to 40 ˚C / 20 % to 80 % (no condensation) Humidity range *Indoor use only. Power Source DC16 V (supplied with indoor unit) ±... -
Page 5: Installation Precautions
Installation Precautions Installation location Install at the height of 1 to 1.5 m from 5 mm or more the fl oor (Location where average room temperature can be detected). Install vertically against the fl oor. When installing more than 1 remote 50 mm or controller next to each other, keep more... - Page 6 *Wiring as shown below is prohibited. RC wiring R1 R2 R1 R2 R1 R2 Indoor unit Indoor unit Indoor unit When setting both the main and sub remote controllers After installation, set one remote controller to [Main] and the other to [Sub] for [Main/ sub] for “Setting”...
-
Page 7: Mounting
Mounting Remove the bottom case. Attention Mounting the bottom case Tighten the screws securely until the screw heads touch the bottom case. Insert the driver and (Otherwise, loose screw heads may slightly turn. hit the PCB and cause malfunction when mounting the top case.) Flat-blade Do not over-tighten the screws. -
Page 8: Embedded Type
Embedded type Preparation: Make 2 holes for screws using a driver. Mount the bottom case to the wall. Pass the wire through the hole in the centre of the bottom case. Mount the top case. Align the claws of the top case and then align the claws of the bottom case. -
Page 9: Setting
Setting Language Clock Controller name Controller name Press Select [Initial settings]. ▲ ▼ → Select the item to set. ▲ ▼ → Default setting : English Language Set. ▲ ▼ ◄ ► → Clock Set. ▲ ▼ → ► → (Repeat) Controller name Set. -
Page 10: Service Contact
Setting Service contact Press and hold the 3 buttons for 4 seconds or more simultaneously. , ► Select the item to set. ▲ ▼ → Service contact Select. Name ▲ ▼ → Name Contact number ▲ ▼ → ◄ ► → (Repeat the same procedure for all characters.) •... -
Page 11: Rc. Setting Mode
Setting RC. setting mode (Main/sub, Clock type, Password change) Detailed settings (Vent output setting, Temp sensor setting, Temp display setting) Press and hold the 3 buttons for 4 seconds or more simultaneously. , ► Select the item to set. ▲... -
Page 12: Auto Address
Setting Auto address Set elec. consumption Auto address Set. (Select the Code no. [A1] and O/D unit no.) ▲ ▼ → ► → (Repeat) Code no. O/D unit no. Code no. O/D unit no. Set the Auto address for each O/D unit no. •... -
Page 13: Confi Rming Information
Confi rming Information Sensor info. Service check Press and hold the 3 buttons for 4 seconds or more simultaneously. , ► Select the item to set. ▲ ▼ → Sensor info. This displays each sensor temperature of the remote controller, indoor units and outdoor units. -
Page 14: Test Operation
Test Operation Preparation: Turn on the circuit breaker of units and then turn the power on. The remote controller starts, and wait until the [Assigning] display disappears. (If [Assigning] continues to blink for 10 minutes or more, check the address setting of indoor units.) Press and hold the 3 buttons for 4 seconds or more simultaneously. - Page 15 © Panasonic Corporation 2016 AMP Air Conditioning www.ampair.co.uk | sales@ampair.co.uk...