Kyocera DuraForce PRO User Manual
Hide thumbs
Also See for DuraForce PRO:
- User manual (168 pages) ,
- User manual (178 pages) ,
- User manual (244 pages)
Table of Contents
Advertisement
Quick Links
Download this manual
See also:
User Manual
Advertisement
Table of Contents

Related Manuals for Kyocera DuraForce PRO


Summary of Contents for Kyocera DuraForce PRO
- Page 1 KYOCERA DuraForce PRO User Guide...
- Page 2 Table of Contents Get Started ............................ 1 Your Phone at a Glance ......................1 Set Up Your Phone ........................ 3 Charge the Battery ......................3 Your SIM Card ........................ 4 Charge the Battery Wirelessly ..................5 Turn Your Phone On and Off ....................6 Turn Your Screen On and Off ..................
- Page 3 Make Phone Calls ........................ 27 Call Using the Phone Dialpad ..................27 Call from Recents ......................28 Call from Contacts ......................28 Call Using a Speed Dial Number .................. 28 Call Emergency Numbers .................... 28 Call Numbers with Pauses ................... 29 Call Using the Plus (+) Code ..................
- Page 4 Fixed Dialing Numbers ....................40 TTY Mode ........................40 Hearing Aids ......................... 41 Call Timer ........................41 Contacts ............................42 Contacts List ........................42 Add a Contact ........................43 Save a Phone Number ......................44 Edit a Contact ........................44 Add a Group Contact ......................
- Page 5 Compose Text Messages ..................... 58 Send a Multimedia Message (MMS) ................59 Save and Resume a Draft Message ................60 New Messages Notification ..................60 Text and MMS Settings ....................61 Social Networking Accounts ....................63 Facebook ........................63 YouTube ........................63 Hangouts ........................
- Page 6 Connect to or Disconnect from a VPN ................. 76 Web Browser ........................77 Launch the Web Browser ..................... 77 Learn to Navigate the Browser ..................77 Browser Menu ......................78 Browser Settings ......................79 Select Text on a Web Page ..................79 Manage Bookmarks .....................
- Page 7 Share Videos on YouTube ................... 94 Tools and Calendar ........................95 Calendar ..........................95 Add an Event to the Calendar ..................95 Invite Guests to Your Calendar Event ................96 Calendar Event Alerts ....................97 View Calendar Events ....................98 Edit Calendar Events ....................
- Page 8 Turn NFC On or Off ....................113 Android Beam ......................113 microSD Card ........................114 Insert or Remove a microSD Card ................114 View the microSD Card Memory ................116 Format the microSD Card ..................116 Unmount the microSD Card ..................116 Use the Phone’s microSD Card as a Media Device ...........
- Page 9 Cast ..........................126 Display Battery Percentage ..................126 Display Quick Settings ....................126 Sound & notification Settings ..................... 126 Volumes ........................126 Also vibrate for calls ....................127 Do Not Disturb ......................127 Phone Ringtone ......................127 Vibration Pattern ......................127 Vibrate Intensity ......................
- Page 10 Screen Lock Time ...................... 136 Power Key Instantly Locks ..................136 Smart Lock ......................... 136 Lock Screen Message ....................137 Lock Screen Wallpaper ....................137 Show Instructions ....................... 137 Security Settings ........................ 137 Encryption ........................137 Set Up SIM Card Lock ....................139 Make Passwords Visible ....................
- Page 11 Cleaning the Phone ......................154 Cleaning Your Phone ....................154 Alternate Cleaning Procedure ..................158 Drying Your Phone ......................159 Kyocera Tested Products ....................161 Mild Dish Detergents ....................161 Alcohol ........................161 Sanitizer Wipes ......................161 Notes ............................162...
-
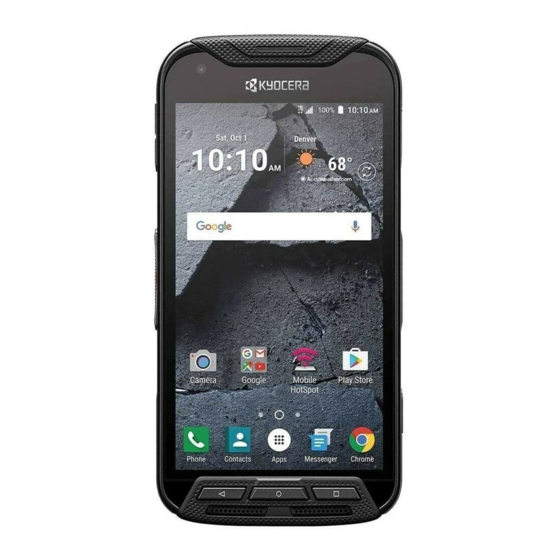
Page 12: Get Started
Get Started The following topics give you all the information you need to set up your phone and the service the first time. Your Phone at a Glance The following illustration outlines your phone’s primary external features and keys. Get Started... - Page 13 Key Functions ● LED indicator displays a phone notification, charging status, or alert. ● Proximity/Light sensor detects how close an object is to the surface of the screen. This is typically used to detect when your face is pressed up against the screen, such as during a phone call.
-
Page 14: Set Up Your Phone
● Volume key allows you to adjust the ringtone or media volume when you are not on a call, or adjust the voice volume during a call. ● Power key lets you turn the phone on or off or turn the screen on or off, restart the phone, switch your phone to Airplane mode, or capture screen shots. -
Page 15: Your Sim Card
4. When charging is complete, remove the cable from the port and close the cover. Press around the edges of the cover to ensure that it is securely closed. Your SIM Card Your phone comes with a preinstalled SIM card. If you need to reinstall your SIM card, follow the instructions below. -
Page 16: Charge The Battery Wirelessly
4. Carefully insert the new SIM card into the SIM card slot on the left, with the gold contacts facing down and the cut off corner on the top left. 5. Securely close the SIM/microSD slot cover. Press down the edges and center of the cover to make sure it is sealed properly. -
Page 17: Turn Your Phone On And Off
2. Place your phone in contact with the charger, ensuring that the charging area of your phone touches the charging area of your wireless charger. Before starting wireless charging, please note the following: ● If the charging areas are not touching, the charging results will be poor. ●... -
Page 18: Turn Your Screen On And Off
2. Tap Restart > OK to restart the phone. Hard Reset ► Press and hold the Power key for about ten seconds. The phone shuts down and automatically starts up. Turn Your Screen On and Off Your phone allows you to quickly turn the screen off when not in use and to turn it back on when you need it. -
Page 19: Setup Wizard
to access the Home screen or the screen displayed before it was turned off. to launch the Camera app. to launch the voice search function. Setup Wizard Your phone has a Setup Wizard to set up your phone quickly and easily. When you turn on your phone for the first time, the Setup Wizard starts automatically. - Page 20 Record your name announcement. Record your greeting. Voicemail Password – It is strongly recommended that you create a password Important: when setting up your voicemail to protect against unauthorized access. Without a password, anyone who has access to your phone is able to access your voicemail messages.
-
Page 21: Phone Basics
Phone Basics Your phone is packed with features that simplify your life and expand your ability to stay connected to the people and information that are important to you. The following topics will introduce the basic functions and features of your phone. Touchscreen Navigation Your phone’s touchscreen lets you control actions through a variety of tap gestures. - Page 22 Swipe or Slide Flick Pinch and Spread To swipe or slide means to Flicking the screen is similar Pinch the screen using your quickly drag your finger to swiping, except that you thumb and forefinger to zoom vertically or horizontally need to swipe your finger in out, or spread the screen to across the screen.
-
Page 23: Function Keys
Function Keys Just below the touchscreen, you will find a row of three buttons that let you perform specific functions. ● Back key ( ) - Tap to return to the previous screen, or close a dialog box, options menu, the Notifications panel, or onscreen keyboard. ●... -
Page 24: Home Screen Overview
Home Screen Overview The following illustration describes the basics of the Home screen. ● Status Bar: Displays the time, notification icons, and phone status icons. Slide down to display the Notifications panel. See Status Bar. ● Widget: Allows users to access various useful programs. ●... -
Page 25: Extended Home Screens
Extended Home Screens The Home screen extends beyond the initial screen. In addition to the main Home screen, your phone can have up to ten extended Home screens to provide more space for adding icons and widgets. ► On the Home screen, swipe across the screen to move from the main Home screen to an extended Home screen. - Page 26 5. When you find the position to place the item, release your finger. Tip: You can also select a Home screen thumbnail where you want to place the item and then simply tap the item. Move or Remove Items on the Home Screen ►...
-
Page 27: Weather
Change the Wallpaper 1. Touch and hold any empty area on the Home screen and then tap WALLPAPERS. – or – From the Home screen, tap Apps > Settings > Display > Wallpaper. 2. Tap Pick image to use your own image, or browse through the preset choices. 3. -
Page 28: Dura Grid
Temperature scale: Select Fahrenheit or Celsius. Refresh time: Select the frequency of auto update. When launching: Update the weather information when the application is opened. When the current location changes: Update the weather information when your current location changes. -
Page 29: Status Bar
Access the Launcher Screens 1. From the Home screen, tap Apps 2. Following options are available: > All (Customize) to customize the order of apps. See Rearrange Your Apps on the Launcher Screens to follow. > All (Alphabetical) to reset the order of apps to in alphabetical order. ... - Page 30 Icon Status Battery (full charge) Battery (charging) Battery (discharged) Battery (needs to be replaced) Notification Icons Icon Status Missed call New email New Gmail New message Event Music application is running in the background Alarm Downloading Note: Additional notification icons may appear. All icons are simulated. Actual images may vary.
-
Page 31: Notifications Panel
Notifications Panel You can open the Notifications panel to view the list of notifications you received, Wi-Fi connection status, and more. To open the Notifications panel: ► Slide the status bar down to the bottom of the touchscreen. ● When you are finished with a notification, swipe it away to the left or right. ●... -
Page 32: Enter Text
Note: You can only add up to 8 entries in Quick Settings panel. 1. Slide the status bar down to the bottom of the touchscreen. 2. Tap on a quick setting panel icon to enable or disable the feature: Wi-Fi to enable or disable the Wi-Fi function. - Page 33 Google Keyboard Overview Note: Key appearance may vary depending on the selected application or text field. Some of the keys on the Google Keyboard are given below: Description Shift: Tap to toggle between lower case and upper case. Caps lock: Double-tap the lower case or upper case shift key. Text mode: Tap to toggle between the Alphabet keyboard and Number &...
- Page 34 Description Alternate: Tap to toggle between the default Number & Symbol keyboard and additional Number & Symbol keyboard. Go: Tap to go to a Web address. Space: Tap to insert a space. Touch and hold to select the input method. Text Mode ABC mode is primarily used for entering letters while Number &...
-
Page 35: Gesture Typing
4. Type the word you want to add. 5. Type the shortcut to bring up the typed word, if you want. 6. Press . A list of words you have added to the dictionary is displayed. Tap a word to edit it. ... -
Page 36: Copy And Paste Text
1. From the Home screen, tap Apps > Settings > Language & input. 2. Tap Current Keyboard > CHOOSE KEYBOARDS. 3. Tap Google voice typing to on. To enter text by speaking: 1. Tap the microphone icon on the keyboard. 2. - Page 37 4. Open the application into which you want to paste the text. 5. Touch and hold the text box where you want to paste the text to, and tap PASTE. If you want to add the selected text to the current text, place a cursor to the position where you want to insert the selected words or characters.
-
Page 38: Phone Calls
Phone Calls With the network and your phone’s calling features, you can enjoy clear phone calls across the country. Make Phone Calls There are several convenient ways to place calls from your phone. Call Using the Phone Dialpad The most “traditional” way to place a call is by using the phone dialpad. 1. -
Page 39: Call From Recents
Call from Recents The Recent calls list lets you quickly place calls to recent incoming, outgoing, or missed numbers. 1. From the Home screen, tap Phone > RECENTS to display the recent calls list. 2. Tap the phone icon next to the number or contact to place a call. ... -
Page 40: Call Numbers With Pauses
To call the 911 or 112 emergency number when the screen is locked: 1. Tap EMERGENCY CALL on the screen. 2. Tap next to 911 or 112. Enhanced 911 (E911) Information This phone features an embedded Global Positioning System (GPS) chip necessary for utilizing E911 emergency location services where available. -
Page 41: Receive Phone Calls
3. Enter the country code and phone number, and then tap . The phone automatically prepends the access code for international dialing, followed by the country code and phone number. Receive Phone Calls The following information lets you know how to answer incoming calls, mute the ringtone on incoming calls, reject incoming calls, and more. -
Page 42: Voicemail (Traditional)
► When you receive a notification for a new voicemail, slide the Notifications panel down and tap the voicemail notification. – or – 1. From the Home screen, tap Apps > Visual Voicemail. 2. On the inbox screen, tap a voicemail message to play it. Voicemail (Traditional) In addition to Visual... -
Page 43: Phone Call Options
3. Enter your password. Phone Call Options Your phone application provides many useful features and options to help you make the most of your calling experience. In-call Options While you’re on a call, you will see a number of onscreen options. Tap an option to select it. ●... -
Page 44: Call Waiting
1. From the Home screen, tap Phone > > Call settings > Additional settings. 2. Tap Caller ID. 3. Select an option: Network default to follow the network default settings. Hide number to hide your number to the people you call. ... -
Page 45: Conference Calling
Conference Calling With conference calling, you can talk to two or more people at the same time. When using this feature, the normal airtime rates will be charged for each of the calls. 1. Enter a number on the dialpad and tap (or place a call from recent calls or contacts). -
Page 46: Set Up Speed Dialing
3. Tap Call Forwarding Settings You can configure the Call Forwarding settings on the settings menu of your Phone app. 1. From the Home screen, tap Phone > > Call settings > Call forwarding. 2. Select an option: Always forward to forward all calls. ... -
Page 47: Recent Calls
Recent Calls The Recent calls tab of the Phone application lists up to 500 recent incoming, outgoing, and missed calls. View Recent Calls ► From the Home screen, tap Phone > RECENTS. You can determine if an entry was an incoming, outgoing, or a missed call from the icons shown below. -
Page 48: Call Settings
2. Tap > Delete recent calls. 3. Tap the check box next to the calls you want to delete or tap SELECT ALL. 4. Tap OK > OK. Call Settings Your phone’s Call settings menu lets you configure your Voicemail options and a number of other settings for the phone application. -
Page 49: Quick Responses
1. From the Home screen, tap Phone > RECENTS. 2. Tap an entry to display the detailed screen. 3. Tap > Add to reject call list > Reject call. Quick Responses You can add, delete, or modify the preset text messages to send when you select to reject an incoming call and send a text message. -
Page 50: Phone Ringtone
3. Select from All outgoing calls, International calls, INT'L calls except home, All incoming calls, or Incoming when roaming. 4. Select Start regulation or Stop regulation. To check the current status, select Confirm the settings. 5. Enter your password, if prompted, and tap OK. Phone Ringtone Assign a ringtone to your incoming calls. -
Page 51: Fixed Dialing Numbers
Fixed Dialing Numbers This feature allows you to restrict your outgoing calls to the numbers included in the FDN list. Emergency calls will not be affected by this setting. To enable FDN mode: 1. From the Home screen, tap Phone > >... -
Page 52: Hearing Aids
1. From the Home screen, tap Phone > > Call settings > TTY mode. 2. Tap TTY Full, TTY HCO, or TTY VCO to turn TTY mode on. – or – Tap TTY Off to turn TTY mode off. Note: When enabled, TTY mode may impair the audio quality of non-TTY devices connected to the audio jack. -
Page 53: Contacts
Contacts The Contacts application lets you store and manage contacts from a variety of sources, including contacts you enter and save directly in your phone as well as contacts synchronized with your Google Account, your PC, and compatible email programs. Contacts List Scroll through the list to view all your contacts. -
Page 54: Add A Contact
Settings: Opens the display settings screen. You can select how your contacts are displayed. See Display Options to follow. Display Options Select which contacts to be displayed on Contacts. 1. From the Home screen, tap Apps > Contacts > >... -
Page 55: Save A Phone Number
ADD NEW ACCOUNT: Adds a new account. 3. Use the keyboard to enter as much information as you want. Tap the location/account above name and select an option to change where to save the contact to. Tap CHANGE to assign a picture to the contact. See Assign a Stored Picture to a Contact Assign a New Picture to a... - Page 56 1. From the Home screen, tap Apps > Contacts > CONTACTS. 2. Tap a contact to display it, and tap 3. Tap any field you want to change or add. See Add a Contact. 4. Add or edit the information, and then tap SAVE. Note: To select a type (label) for a phone number, email address, or postal address (such as Mobile, Home, Work, etc.), tap to the right of the field and select the appropriate...
- Page 57 You may be prompted to size the picture for use with contacts. Drag the square to frame the portion of the picture to use. Tap and drag the side of the square to resize the square and complete the action. 6.
- Page 58 3. Tap an available vibration. The phone vibrates when selected. 4. Tap OK to assign the vibration. Add a Contact to Favorites The Favorites tab of the Phone menu is a listing that can help you quickly access your most used or preferred contacts entries.
-
Page 59: Add A Group Contact
Merge Contacts You can merge two or more contact entries into one. 1. From the Home screen, tap Apps > Contacts > CONTACTS. 2. Select the contact you want to appear as the primary listing. 3. Tap > Merge. 4. Choose the contact you wish to merge with the primary listing. Copy/Move Contact You can copy or move contact entries between the phone and SIM card. -
Page 60: Ice (In Case Of Emergency)
3. The following options are available: Tap the group’s name to rename it. Tap Add/remove contacts to add or remove entries. 4. Tap SAVE. Assign a Ringtone to a Group Contact You can assign a specific ringtone to a group. 1. -
Page 61: Synchronize Contacts
1. From the Home screen, tap Apps > Contacts > CONTACTS. 2. Tap ICE- In Case of Emergency. 3. Tap Note: You will be prompted to enable the Location settings if they are disabled. Read the onscreen information and follow the instructions. 4. -
Page 62: Share A Contact
With syncing, any contacts (with phone numbers, email addresses, pictures, etc.) are updated and synced with your phone. 1. From the Home screen, tap Apps > Contacts. 2. Tap > Settings > Accounts. 3. Tap the account you want to sync your contacts with. 4. -
Page 63: Accounts And Messaging
Accounts and Messaging With the service and your phone’s messaging capabilities, you have the opportunity to share information through many different channels and accounts, including Gmail (Google), personal and corporate email, text and multimedia messaging, and social networking accounts. Gmail / Google You will need a Google Account to access several phone features such as Gmail, YouTube, and the Google Play Store applications. -
Page 64: Sign In To Your Google Account
encounter problems or forget your password. It is strongly encouraged for Android users so you can regain access to Google Mobile™ services and purchases on your phone. 7. Follow the onscreen prompts to create your free account. Sign In to Your Google Account If you have a Google Account but have not yet signed in with your phone, follow these instructions. -
Page 65: Read And Reply To Gmail Messages
3. Enter the message recipient’s email address in the To field. 4. If you want to send a carbon copy (CC) or a blind carbon copy (BCC) of the email to other recipients, tap on the right side of the To field. 5. -
Page 66: Delete A Gmail Account
Sender image: Check to display an image of the sender in conversation list. Reply all: Check to display the Reply all option as default. Auto-fit messages: Check to shrink the messages to fit the screen and allow zooming. -
Page 67: Add A Corporate Account
4. Enter any other necessary information and follow the onscreen instructions. Important: If the account type you want to set up is not in the phone database, you will be asked to enter more details. You should get all pertinent information for the email account, such as incoming and outgoing server settings, before you proceed. -
Page 68: View And Reply To Email
Tap the Subject field and enter the email subject. Tap the exclamation point to set a priority. Tap the text entry field and compose your email. To add an attachment, tap > Pictures, Take picture, Videos, Record video, Audio, Record audio, or Others. -
Page 69: General Email Settings
Delete Email Messages ► On the email account Inbox, swipe an email message left or right. – or – 1. On the email account Inbox, touch and hold the message you want to delete. 2. Tap > OK. General Email Settings You can edit the general settings of your email. -
Page 70: Send A Multimedia Message (Mms)
3. Fill in one or more recipients. You can enter phone numbers or email addresses in the To field. If you are sending the message to several recipients, separate the phone numbers or email addresses with a comma. You can type a name or email address saved in your Contacts to bring up the contact Tip: information, or tap to add recipients. -
Page 71: Save And Resume A Draft Message
6. When done, tap Save and Resume a Draft Message While composing a text or multimedia message, tap Back > YES to save your message as a draft. To resume composing the message: 1. On the Messaging screen, tap the message to resume editing it. “Draft” in red appears at the right of the message in the list. -
Page 72: Text And Mms Settings
3. Tap DELETE. 4. When prompted to confirm, tap DELETE. Delete All Message Threads 1. From the Home screen, tap Apps > Messaging. 2. On the Messaging screen, tap > Delete all threads. 3. When prompted to confirm, tap DELETE. Delete a Single Message 1. - Page 73 Multimedia message limit: Choose the maximum number of MMS messages to store in each conversation thread. Attachment storage: Select your desired storage for attachments. Preset message: Edit text that you frequently insert when composing messages. ● Text (SMS) messages ...
-
Page 74: Social Networking Accounts
Social Networking Accounts Stay in touch while on the go with all your social networking accounts. Facebook Post updates, read what your friends are up to, upload pictures and check-ins, and more with on-the-go Facebook access. Sign in to Your Facebook Account 1. - Page 75 1. From the Home screen, tap Apps > Google > Hangouts. 2. If you have already signed in to a Google account, the Hangouts screen is displayed. – or – Tap Or create a new account to create a new Google account, or sign in to an existing Google account.
-
Page 76: Apps And Entertainment
Apps and Entertainment All your phone’s features are accessible through the Apps list. Google Play Store App Google Play™ is your digital content destination to discover Android apps, books, movies, music and much more. Choose from a wide variety of free and paid content ranging from productivity apps and games to bestselling books and blockbuster movies and music. -
Page 77: Google Play Store Options
tap ACCEPT on this screen, you are responsible for the results of using this item on your phone. Google Play Store Options Some convenient options are available with the Google Play Store app. Available options may vary. ► In the Google Play Store app, tap on the top left of the screen to display the following options: You can also touch and hold the left end of the screen and slide it to the right to display... -
Page 78: Open An Installed App
2. Tap on the top left of the screen, or touch and hold the left end of the screen and slide it to the right, and tap My apps & games. 3. Tap the app to uninstall for a refund. The details screen for the app opens. 4. -
Page 79: Google Maps
2. Tap to display the drop-down list, and tap Downloaded. 3. Tap the app you want to uninstall, and tap UNINSTALL. 4. When prompted, tap OK to remove the app on your phone. Google Maps Use the Google Maps app to determine your location, find directions, browse local businesses and attractions, rate and review places, and more. - Page 80 Search Maps 1. On the Google Maps screen, tap inside the Search bar at the top of the screen.. 2. Type the place that you want to search. You can enter an address, a city, or type of establishment. Tip: to enter the location by speaking.
-
Page 81: Music
The starting point is set to your current location as default. To change it, tap Your location and type a new point in the Choose starting point field or select a point from the list. Tap Choose destination and type your destination or select a destination from the list. -
Page 82: Back Up Your Downloaded Music Files
Help & Feedback: Displays Play Music help page. The Listen Now Screen Learn the basics to use the Play Music application. ► Tap Shuffle all to play the music on your phone in shuffle mode. ► Tap an album image and then tap a song in the album to play it. ►... -
Page 83: Web And Data
Web and Data Your phone’s data capabilities let you wirelessly access the Internet or your corporate network through a variety of connections, including Wi-Fi, 4G LTE, EDGE, GPRS, and Virtual Private Networks (VPN). The following topics address your phone’s data connections and the built-in Web browser. Additional data-related features can be found in Accounts and Messaging,... -
Page 84: Check The Wireless Network Status
Note: Wi-Fi networks are self-discoverable, which means no additional steps are required for your phone to connect to a Wi-Fi network. It may be necessary to provide a user name and password for certain closed wireless networks. Check the Wireless Network Status Check the status of your current wireless network, including speed and signal strength, through the Wi-Fi settings menu. -
Page 85: Data Services
• Wi-Fi Direct to use a peer-to-peer Wi-Fi connection. The Wi-Fi client and the hotspot operation will be disabled while Wi-Fi direct is enabled. • Advanced to configure advanced Wi-Fi settings, which include: ▪ Network notification to notify whenever a public network is available. ▪... -
Page 86: Virtual Private Networks (Vpn)
Icon Description Your phone is connected to the 4G network. Your phone is connected to the EDGE network. Your phone is connected to the GPRS network. When the arrows are animated, your phone is transferring data (for example, when you are opening a Web page);... -
Page 87: Add A Vpn Connection
Add a VPN Connection Use the Wireless & networks settings menu to add a VPN connection to your phone. 1. From the Home screen, tap Apps > Settings > More > VPN > Basic VPN. Note: Tap Advanced IPsec VPN to access the KeyVPN app. 2. -
Page 88: Web Browser
Web Browser Your phone’s Web browser gives you full access to both mobile and traditional websites on the go, using 4G LTE, 4G, EDGE, GPRS, or Wi-Fi data connections. Launch the Web Browser Launching Browser is as easy as tapping an icon. ►... -
Page 89: Browser Menu
2. Bring them together (pinch) to zoom out. Go Back To go back one page: ► Press on your phone. Repeat this process to keep going back through your Web page history of recently visited pages. Go to a Specific Website 1. -
Page 90: Browser Settings
3. The following options are available: Stop to stop loading the current Web page. Refresh to reload the current Web page. Forward to return to a previously viewed page. Homepage to return to the home page. ... -
Page 91: Manage Bookmarks
3. Select an option: COPY to copy the selected text. SHARE to share the selected text via Bluetooth, Gmail, Messaging, etc. SELECT ALL to select all the text on the Web page. for the following options: ▪... - Page 92 Create Bookmarks 1. From the Home screen, tap Apps > Browser. 2. From any open Web page, tap > Save to Bookmarks. -or- From any open Web page, tap > Add bookmark. 3. Enter a descriptive name for the new bookmark. 4.
-
Page 93: Chrome Browser
2. Touch and hold an entry under the BOOKMARKS tab to display an onscreen popup menu. 3. Tap Delete bookmark and then tap OK. Chrome Browser In addition to the default "Internet" Web browser, your phone supports the Chrome mobile Web browser. - Page 94 You can also access this feature by tapping Apps > Mobile Hotspot from the Home Tip: screen. 2. Tap the ON/OFF switch next to Mobile Hotspot to turn it on. If your phone's mobile data access is not enabled, you will be prompted to turn it on. Follow the onscreen instructions.
-
Page 95: Tethering
2. Select a timer option. To limit maximum connections: 1. From the Home screen, tap Apps > Settings > More > Tethering & Mobile Hotspot > Mobile Hotspot settings > Maximum connections. 2. Select the number of devices you will allow to connect. To change the Mobile Hotspot network SSID or password: 1. -
Page 96: Usb Tethering
USB Tethering You can tether your phone to your computer with a USB cable and share your phone’s Internet connection with your computer. 1. From the Home screen, tap Apps > Settings > More > Tethering & Mobile Hotspot. 2. Tap the ON/OFF switch next to USB tethering to turn it on. Note: Use of this service requires a subscription. -
Page 97: Camera And Camcorder
Camera and Camcorder You can use the camera or camcorder to take and share pictures and videos. Your phone comes with an 13.0 megapixel back camera and 5.0 megapixel front camera with an autofocus feature that lets you take sharp pictures and videos. Use the Camera App The following topics teach you how to take pictures and record videos. -
Page 98: Take A Picture Or Record A Video
● Shutter Button: Takes a picture. ● Record Button: Records a video. ● MENU Button: Opens the camera and camcorder settings menu. For more information, Camera and Camcorder Settings. ● Flash Button: Helps illuminate subjects in low-light environments. ● Switch Button: Switches between the back camera and the front camera. ●... -
Page 99: Review Screen
5. Choose what you want to do with the image you’ve just taken or recorded. See Review Screen to follow. Review Screen After taking a picture or video, tap the thumbnail image to see the item in the review screen. From there, you can instantly edit your photos, replay videos, or share your photos or videos (see View Pictures and Videos Using Photos... -
Page 100: Underwater Mode
Underwater Mode You can take a picture or record video also in the water. Your phone is immersible in water for up to 30 minutes at a depth not exceeding two meters (about 6.56 f). Avoid using phone in saltwater. It is highly corrosive and can damage internal Warning: components and degrade the audio performance over time. -
Page 101: View Pictures And Videos Using Photos
Slow motion: Records a video or view in slow motion. Time Lapse: Selects the time lapse recording setting from Off, 1s, 2s, 3s, 5s, or 10s. Night: Takes a picture or records a video with the night effect. ... -
Page 102: Open Or Close Photos
Open or Close Photos Open the Photos App ► From the Home screen, tap Apps > Photos. To view pictures and videos organized by category (Albums, Favorites, etc.) or other applications, tap and select an item. When viewing pictures in Photos, scroll left or right to view more albums. Simply tap an album to view the pictures or videos in that album. -
Page 103: Work With Pictures
For playing the video, tap . Tapping the other areas of the screen will display the control options. Tap to pause the video, or drag the dot on the timeline to rewind or forward the video. Zoom In or Out on a Picture There are two ways you can zoom in or out on a picture. -
Page 104: Share Pictures And Videos
2. Tap a thumbnail for the labeled effect. • Auto: Optimizes the picture quality automatically. • Light: Displays the brightness slider. • Color: Displays the slider to adjust the saturation. • Pop: Displays the level correction slider. • Vignette: Displays the slider to adjust the vignette. 3. -
Page 105: Send Pictures Or Videos By Messaging
2. Tap > Gmail or Email. 3. Compose your message and send a message. Note: If you have multiple accounts, the default account will be used. For more information about sending email and Gmail, see Compose and Send Email Send a Gmail Message. -
Page 106: Tools And Calendar
Tools and Calendar Learn how to use many of your phone’s productivity-enhancing features. Calendar Use Calendar to create and manage events, meetings, and appointments. Your Calendar helps organize your time and reminds you of important events. Depending on your synchronization settings, your phone’s Calendar stays in sync with your Calendar on the Web, or the corporate calendar. -
Page 107: Invite Guests To Your Calendar Event
7. Enter email addresses to invite guests to your event and add the event descriptions. See Invite Guests to Your Calendar Event. 8. If the event occurs on a regular basis, tap the Repetition field and set the frequency. 9. Set the event reminder time and select how you are notified. ... -
Page 108: Calendar Event Alerts
1. Open Calendar and create a new event. Tap the Calendar field and then select your calendar. See Add an Event to the Calendar. 2. Add details about the event, such as date and time, location, and more. 3. In the Guests field, enter the email addresses of everyone you want to invite to the event. Separate multiple addresses with commas. -
Page 109: View Calendar Events
Press to keep the reminder pending in the notifications area of the status bar. To set reminder settings: ► On any Calendar view, tap > Settings > General settings, and set the items under Notifications & reminders. View Calendar Events You can display the Calendar in yearly, monthly, weekly, daily, agenda or task view. -
Page 110: Edit Calendar Events
Edit Calendar Events Edit your calendar events to keep your calendar up to date. 1. From the Home screen, tap Apps > Calendar. 2. Open the calendar event details: In Agenda, Day, and Week views, tap the calendar event you want to edit. ... -
Page 111: Show Or Hide Calendars
In Month view, tap the date where the calendar event occurs, and then tap the calendar event. 3. Tap 4. If the calendar event is recurring, select Only this event, This and future events, or All events in the series. 5. -
Page 112: Clock
Clock The Clock application functions as a world clock that shows the date and time. You can also use it to turn your phone into an alarm clock, a countdown timer, or a stopwatch. You can change the date & time settings by tapping >... - Page 113 – or – to add a new alarm. 4. Set the hours and minutes you want and tap OK. You will see the ON icon displayed next to the time you have set. 5. Select the Repeat check box and choose the days of the week you want the alarm to repeat.
-
Page 114: Timer
Key behavior: Select the behavior of the RECENT/HOME/BACK/CAMERA/Volume key when pressed while the alarm sounds. Choose from: Silence, Snooze, Dismiss, or Do nothing. Default alarm sound: Select the default alarm sounds. Start week on: Select the day that the week starts on the alarm. Timer You can use your phone as a countdown timer. -
Page 115: Calculator
LAP to record the lap time. to stop timing. to resume timing. SHARE to share the recorded time via Messaging, Bluetooth, etc. RESET to reset the stopwatch. Calculator Your phone has a convenient calculator that lets you perform basic mathematical equations. 1. - Page 116 Record Sound 1. From the Home screen, tap Apps > Sound Recorder. 2. Tap to configure the following options: File format: Select Normal or High quality. Storage: Select Phone or SD card. 3. Tap to start recording. to pause recording.
-
Page 117: Voice Services
• Delete to delete the file. • Edit file name to rename the file. • Details to display the information about the audio file. Voice Services Your phone’s voice services let you place calls using your voice, convert text into speech, and more. -
Page 118: Eco Mode
3. Tap a matching item from the onscreen list. Eco Mode The Eco Mode allows you to save battery life while using your phone. 1. From the Home screen, tap Apps > Eco Mode. 2. Tap an option to enable or disable the Eco Mode: ... -
Page 119: Bluetooth
Bluetooth Bluetooth is a short-range communications technology that allows you to connect wirelessly to a number of Bluetooth devices, such as headsets and hands-free car kits, and Bluetooth-enabled handhelds, computers, printers, and wireless phones. The Bluetooth communication range is usually approximately 30 feet. Turn Bluetooth On or Off Use the settings menu to enable or disable your phone’s Bluetooth capabilities. -
Page 120: Connect A Bluetooth Headset Or Car Kit
4. Enter the name for your phone in the dialog box, and then tap RENAME. Connect a Bluetooth Headset or Car Kit You can listen to music over a Bluetooth stereo headset, or have hands-free conversations using a compatible Bluetooth headset or car kit. It’s the same procedure to set up stereo audio and hands-free devices. -
Page 121: Reconnect A Headset Or Car Kit
Reconnect a Headset or Car Kit When you have paired a headset with your phone, you should be able to reconnect it automatically by turning on Bluetooth on your phone and then turning on the headset. However, sometimes you will need to reconnect manually, for example if you have been using your headset with another Bluetooth device. - Page 122 between your phone and another device, you need to enter or confirm a security passcode. After that, your phone and the other device are paired, and you will not need to exchange passcodes to transfer information in the future. Send Information from Your Phone to Another Device You can send the following types of information, depending on the device you are sending to: ●...
-
Page 123: Supported Bluetooth Profiles
4. On the sending device, send one or more files to your phone. Refer to the device’s documentation for instructions on sending information over Bluetooth. 5. If prompted, enter the same passcode on both your phone and the other device, or confirm the auto-generated passcode. -
Page 124: Near Field Communication (Nfc) Technology
Near Field Communication (NFC) Technology NFC (Near Field Communication) technology is a short-range, wireless technology that lets you quickly and wirelessly exchange information between your phone and other NFC-enabled smartphones, smart accessories, and NFC-enabled access points. You can also use NFC technology to save, view, create, or change smart tags. -
Page 125: Microsd Card
microSD Card A microSD™ card is an optional accessory that allows you to store images, videos, music, documents, and voice data on your phone. Your phone supports a microSD card up to 200 GB. Insert or Remove a microSD Card Inserting a compatible microSD card into your phone will increase the storage capacity. - Page 126 4. Securely close the SIM/microSD slot cover. Warning: Be sure the SIM/microSD slot cover is properly sealed to maintain the phone's waterproof capability. 5. Replace the back cover. Press around the edges and center to ensure a proper fit. To remove a microSD card: 1.
-
Page 127: View The Microsd Card Memory
6. Replace the back cover. Press around the edges and center to ensure a proper fit. Note: You can easily damage the microSD card by improper operation. Please be careful when inserting, removing, or handling the microSD card. Note: Make sure your battery is fully charged before using the microSD card. Your data may become damaged or unusable if the battery runs out while using the microSD card. -
Page 128: File Commander
3. Tap the USB connection notification > File transfers. 4. On your computer, the connected phone is recognized as a portable media device. Navigate to the device and select SD card. 5. Manage the data as you wish, unmount the phone as required by your computer's operating system to safely remove your phone, and disconnect the phone from the computer. -
Page 129: Outdoor Report
Image Video Audio • BMP • H.263 • AAC • MP3 • WBMP • H.264 • AAC+ • Volbis • GIF • H.265 • eAAC+ • PCM (WAVE) • JPEG • MPEG-4 • AMR-WB • Opus • PNG • VP8 •... -
Page 130: Settings
Settings The following topics provide an overview of items you can change using your phone’s Settings menus. Wi-Fi Settings The Wi-Fi settings menu lets you turn Wi-Fi on or off, set up and connect to available Wi-Fi networks, and configure advanced Wi-Fi options. For more information about the Wi-Fi settings, see Wi-Fi. -
Page 131: More Settings
3. Drag the red tab vertically to set the limit you want. – or – Tap the red line, select the limit by scrolling the value and then tap SET. When your data usage reaches the limit, mobile data will be turned off automatically. Alert About Data Usage Your phone will warn you with an alert when the mobile data usage reaches a set level. -
Page 132: Nfc Settings
To quickly turn Airplane Mode on or off: ► Press and hold the Power key, and then tap Airplane mode. While in Airplane Mode, the status bar will display To turn Airplane Mode on or off in Settings: 1. From the Home screen, tap Apps >... - Page 133 International Data Roaming You can set your phone to use the data services while you are outside the U.S., Puerto Rico and U.S.V.I. The international data roaming charges will apply. 1. From the Home screen, tap Apps > Settings > More > Cellular networks > International Data Roaming.
-
Page 134: Emergency Alerts
Network Operators You may select a network operator. 1. From the Home screen, tap Apps > Settings > More > Cellular networks > Network operators. 2. Select an option: SEARCH NETWORKS: Searches available networks. Select the network you want to use from the available network list. -
Page 135: Call Settings
Sound: Plays a sound when you receive an emergency alert. Vibrate: Vibrates your phone when you receive an emergency alert. Alert reminder: Sets how often your phone alerts you: Choose from Once, Every 2 minutes, Every 15 minutes, or Off. ... -
Page 136: Daydream
Daydream You can set a screen saver to your phone. 1. From the Home screen, tap Apps > Settings > Display > Daydream. 2. If Daydream is not switched on, tap the OFF icon to turn it on. 3. Tap one of the below options: ... -
Page 137: Cast
Cast You can connect your phone to the devices that support Miracast to share the displayed images via Wi-Fi connection. 1. From the Home screen, tap Apps > Settings > Display > Cast. 2. If Wireless display is not switched on, tap and select the Enable wireless display check box to turn it on. -
Page 138: Also Vibrate For Calls
Also vibrate for calls Set your phone to ring and vibrate simultaneously. 1. From the Home screen, tap Apps > Settings > Sound & notification. 2. Tap Also vibrate for calls to turn on. Do Not Disturb Set the notification function. 1. -
Page 139: Default Notification Ringtone
1. From the Home screen, tap Apps > Settings > Sound & notification > Vibrate intensity. 2. Tap a vibrate intensity from the list. 3. Tap OK. Default Notification Ringtone Select a sound for notifications. 1. From the Home screen, tap Apps >... -
Page 140: When Device Is Locked
Vibrate to vibrate when notification is on the notification bar. Blink LED to blink the LED indicator when notification is on the notification bar. Repeat interval to set the reminder interval. App notifications to modify the notification settings individually for apps. When Device is Locked Your phone is capable of showing the notifications on the screen when the phone is locked. -
Page 141: Apps
From the Home screen, tap Apps > Settings > Programmable key > Programmable key. 2. Tap Do nothing if you do not want to assign any function to the key. – or – Select a function you want to assign to the key. The assigned function works when you press and hold the key. -
Page 142: Usb Drive
USB Drive The USB drive options are available when your phone is connected to an external device using a USB cable. View the USB Storage Memory 1. From the Home screen, tap Apps > Settings. 2. Tap Storage & USB to see the information of the USB drive. Unmount the USB Storage Unmount the USB storage so that you can safely remove it. -
Page 143: Usage Manager
• Battery charging tone to sound a notification tone when the USB cable is plugged into the phone's USB data/port. • Battery charged tone to sound a notification tone when the battery is fully charged. • Display battery percentage to display the remaining battery level in percentage next to the battery icon on the status bar. -
Page 144: Location Settings
Tap & Pay When NFC is turned on, you can use the Tap & pay feature to pay for items just by touching your phone to a reader at a register. If your phone doesn’t have a default app, you can browse Google Play for payment apps. - Page 145 ● Password (High security): Enter four to sixteen letters, digits, or symbols to unlock. Important: Highest security level protection (password protection) and frequent change of password are recommended to protect your phone and data from unauthorized access. Use Swipe There is no security using the Swipe option. ►...
-
Page 146: Fingerprint
Note: When Secure start-up is set, you will be required to enter your PIN before the phone starts up. If you forget the PIN, you cannot start up the phone. 3. Enter a PIN, tap CONTINUE, re-enter your PIN, and tap OK to save the setting. To unlock the screen with PIN: ►... -
Page 147: Make Pattern Visible
From the Home screen, tap Apps > Settings > Lock screen > Fingerprint. 2. Read the message and tap CONTINUE. 3. Select your backup screen lock method. 4. Read the message and tap NEXT. 5. Touch the ball of your finger on the sensor and lift after you feel a vibration. Repeat it 20 times. -
Page 148: Lock Screen Message
Trusted places: Allows you to add a trusted place to keep this device unlocked when you stay in there. Trusted face: Allows you to set up Face matching as an option to unlock this device. Trusted voice: Allows you to have your phone unlock when you do a search with "Ok Google."... - Page 149 Refrain from using the phone, including removing the SD card, during the Warning: encryption and decryption processes as some or all of your data will be lost if the encryption and decryption processes are interrupted. Phone You can encrypt and decrypt the data in your phone, such as Contacts, Calendar, Email, settings values, personal data, etc.
-
Page 150: Set Up Sim Card Lock
Set Up SIM Card Lock You can configure your SIM card lock settings. To lock the SIM card with a PIN: 1. From the Home screen, tap Apps > Settings > Security > Set up SIM card lock. 2. Tap Lock SIM card to turn on. 3. -
Page 151: Unknown Sources
2. Tap an application you want to enable or disable the authority to be a device administrator and tap ACTIVATE or DEACTIVATE. Unknown Sources Follow the steps below to allow installation of non-Play Store applications. 1. From the Home screen, tap Apps >... -
Page 152: Accounts Settings
Trust agents Manage trust agents for features like Smart Lock. 1. From the Home screen, tap Apps > Settings > Security > Trust agents. 2. Tap the ON/OFF switch to turn on or off. Screen pinning Turn on to keep your current screen in view on your phone. 1. -
Page 153: Language & Input Settings
Depending on the account type, you may need to enter an email address or user address, password, domain name, or other information. For Corporate Sync accounts, contact your server administrator to determine what information you will need. Manage Existing Accounts 1. -
Page 154: Personal Dictionary
Personal Dictionary You can use the user dictionary option to add new words to the dictionary. See Add a Word to the User Dictionary. Current Keyboard You can select the default method you will use when accessing the keyboard. See Touchscreen Keyboards. - Page 155 Key long press delay: Set the delay time to change a word when a key is long pressed. Text correction Show correction suggestions: Tap to select when correction suggestions are displayed. Auto-correction: Tap to allow the space bar and punctuation to automatically correct mistyped words.
-
Page 156: Google Voice Typing Settings
Advanced Tap to open the settings for expert users. Google Voice Typing Settings You can customize the Google voice typing settings as you like. 1. From the Home screen, tap Apps > Settings > Language & input > Google voice typing. -
Page 157: Backup And Restore
● Your Google Account ● All other email and social networking accounts ● System and application data and settings ● Downloaded applications Backup and Restore Back up your phone's data and settings before resetting your phone. To set your backup and restore options: 1. -
Page 158: Factory Data Reset
Factory Data Reset All the data in your phone's internal storage will be reset to default. Tip: Before performing a factory data reset on your phone, you may want to unmount the microSD card to avoid losing any data you may have stored on it. From the Home screen, tap Apps >... -
Page 159: Services
Services This menu provides you with the list of accessibility-related applications. TalkBack TalkBack provides spoken feedback to help visually impaired users. 1. From the Home screen, tap Apps > Settings > Accessibility > TalkBack. 2. To turn it on, tap the OFF icon, read the confirmation message and tap OK. 3. -
Page 160: Display
1. From the Home screen, tap Apps > Settings > Accessibility. 2. Tap High contrast text to turn on. Auto-Rotate Screen 1. From the Home screen, tap Apps > Settings > Accessibility. 2. Tap Auto-rotate screen to turn on. Speak Passwords Let your phone speak the password you enter. -
Page 161: Mobility
2. Tap the ON/OFF switch to turn on. 3. Configure the following settings: Standard options: Set the standard option for caption, such as Language, Text size, and Caption style. Custom options: Set the custom option for texts, background color, or display. Mono Audio Set the Mono audio on or off. -
Page 162: Others
Vibrate: Select the check box to vibrate when notification is on the notification bar. Blink LED: Select the check box to blink the LED indicator when notification is on the notification bar. Repeat interval: Select to set the reminder interval. ... - Page 163 ► From the Home screen, tap Apps > Settings > About phone. Status: Battery level, My phone number, IMEI (International Mobile Equipment ID), Up time, etc. Network: Signal strength, Service state, IP address, etc. Hardware info: Model number, Bluetooth address, Serial number, etc. ...
-
Page 164: Cleaning And Drying Procedures
● Kyocera has tested cleaning products and determined they will not damage the surfaces of the phone when used properly. A table containing these products can be found at the end of this section. See Kyocera Tested Products. -
Page 165: Cleaning The Phone
Cleaning the Phone Cleaning Your Phone CAUTION! Be sure the headset jack cover, card slot cover, and charger/USB port cover are closed firmly to maintain the waterproof capability. 1. Turn off the phone. 2. Rinse the phone thoroughly under running water in order to remove dirt. 3. - Page 166 4. Rinse both sides of the phone and all physical keys until there are no more bubbles left. Note: Hold your phone below the faucet as shown below and rinse with low pressure tap water for more than 20 seconds for each part. Use only lukewarm water. CAUTION! If detergent is left inside the phone, the audio quality as well as waterproof capability may deteriorate.
- Page 167 6. Rinse both sides of the back cover until there are no bubbles left. 7. Rinse the physical keys, speakers, microphones (2), earpiece, and pressure adjustment hole under running water and make sure all bubbles are removed. Cleaning and Drying Procedures...
- Page 168 8. Put about 2 inches (5 cm) of water in a large bowl and gently rinse the phone by swirling it under water for about 10 seconds. 9. Dry your phone until you are sure there is no moisture left. See Drying Your Phone details.
-
Page 169: Alternate Cleaning Procedure
Alternate Cleaning Procedure 1. Gently wipe the front and back of the phone with a lint-free cloth moistened with alcohol* or a sanitizer wipe. Note: Do not open the back cover while cleaning. *Note: Use only ethanol or isopropyl alcohol. See table at end of this section. 2. -
Page 170: Drying Your Phone
Drying Your Phone CAUTION! If your phone has been submerged in water, for example to use the camera in Underwater Mode, be sure to remove the back cover and rinse all surfaces of the phone thoroughly with clean, fresh water before drying. 1. - Page 171 5. After removing all the water, leave back cover off to help with the drying process. Let the phone dry completely at room temperature. CAUTION! Excessive heat may damage your phone; never use a hair dryer, an oven or any other appliance to dry out your phone.
-
Page 172: Kyocera Tested Products
Kyocera Tested Products Mild Dish Detergents Manufacturer Brand Product name Seventh Generation Seventh Generation Dish Liquid, Free & Clear Dish Liquid Lemongrass & Clementine Zest P&G Dawn Ultra Antibacterial Hand Soap Dishwashing Liquid, Apple Blossom Scent Ultra Dishwashing Liquid, Original Scent... -
Page 173: Notes
All features, functionality and other specifications, as well as the information contained in this guide are based upon the latest available information and are believed to be accurate at the time of printing. Kyocera Communications, Inc. reserves the right to change or modify any information or specifications without notice or obligation. -
Page 174: Copyright & Trademarks
The Bluetooth word mark and logos are registered trademarks owned by Bluetooth SIG, Inc. and any use of such marks by Kyocera Corporation is under license. Other trademarks and trade names are those of their respective owners. Bluetooth QD ID (Qualified Design ID): XXXXX ®... - Page 175 Index Accessibility Calendar, 95 settings, 147 add a task, 96 Account add an event, 95 create, 141 edit events, 99 manage, 142 erase events, 99 Airplane Mode, 120 event alerts, 97 Alarm, 101 invite guests, 96 Android Beam, 113 show or hide, 100 Application synchronize, 100 settings, 130...
- Page 176 TTY mode, 40 group, 48 vibrate, 39 ICE (in case of emergency), 49 voicemail settings, 39 list, 42 Call Forwarding, 34 make call from, 28 Call Waiting, 33 merge, 48 Caller ID, 32 move, 48 Camera save a phone number, 44 back, 3 share, 51 flash, 3...
- Page 177 File Commander, 71, 117 new messages notification, 60 Flashlight, 104 save and resume draft, 60 Flick, 11 settings, 61 Gmail Microphone access, 53 primary, 2 account settings, 54 secondary, 2 read and reply, 54 microSD card, 114 send, 53 format, 116 send pictures or videos, 93 insert, 114 Google Account, 52...
- Page 178 Pinch, 11 touch dialpad, 39 Play Music vibrate for calls, 127 play, 71 when device is locked, 129 Plus (+) Code Dialing, 29 Sound Recorder, 104 Power key, 3 Speaker, 2 Print, 151 Speaker key, 2 Programmable key, 2, 129 Speed dialing, 28 Proximity sensor, 2 set up, 35...
- Page 179 view, 90 Volumes, 126 Virtual Private Networks (VPN), 75 Wallpaper, 16 add a connection, 76 Weather, 16 connect or disconnect, 76 Web Browser, 77 install security certificates, 75 Widget prepare for a connection, 75 add to the Home screen, 14 Visual Voicemail, 8, 30 Wi-Fi, 72 review, 30...