Table of Contents
Advertisement
Quick Links
QUICK CONSUMER BUSINESS
REFERENCE GUIDE
YOUR SYSTEM: ADT PM33 Commercial System
Starting to use the Alarm Panel and Keypad
PM33 Control Panel
Setting Your System
Step 1
When leaving your premises ensure that all protected doors/windows, including your
front door, are closed before setting your System.
As a security feature, the status of your System is hidden from view
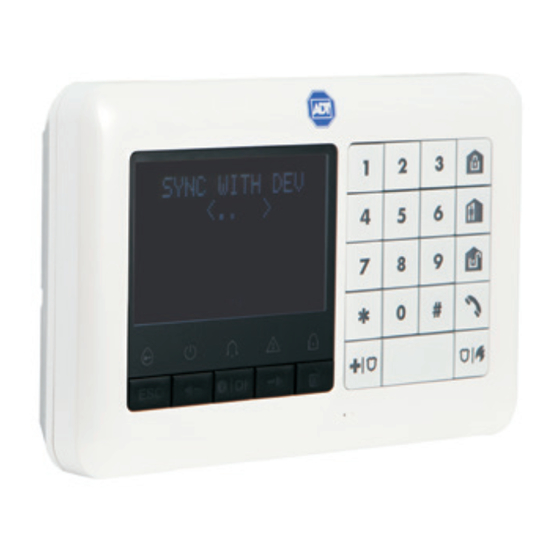
To start using your System, push the "unset" key
The Alarm Keypad is now lit and you are ready to start using your System, make sure
that READY is displayed on the Keypad.
Step 2
HH:MM READY
This indicates that all zones are secured and you may arm the System as desired.
Step 3
If at least one zone is open (disturbed) the display will read:
HH:MM
NOT READY
This indicates that the System is not ready for arming and in most cases that one or
more zones are not secured. However, it can also mean that an unresolved condition
exists such as certain trouble conditions, in this case call the customer service team
01–6205990.
KP-250 PG2 Keypad
on your Keypad.
1
Keyfob
Advertisement
Table of Contents

Summary of Contents for ADT PM33
- Page 1 QUICK CONSUMER BUSINESS REFERENCE GUIDE YOUR SYSTEM: ADT PM33 Commercial System Starting to use the Alarm Panel and Keypad Keyfob KP-250 PG2 Keypad PM33 Control Panel Setting Your System Step 1 When leaving your premises ensure that all protected doors/windows, including your front door, are closed before setting your System.
-
Page 2: Setting Your System
Setting Your System To review the open zones click on the Keypad. The details and location of the first open zone detector (usually an open door or window sensor) will be displayed. To fix the open zone, locate the sensor and secure it (close the door or window) –... -
Page 3: Disarming Your System
Setting Your System PRESS RESULTING DISPLAY Move to interior zone (ARM HOME) ARMING AWAY ARM indicator on both the Keypad and PowerMaster panel lights steadily during the armed state. Disarming Your System Enter the protected premises via a delayed zone. Upon detecting your entrance, the System will start sounding the entry delay beeps alerting you to disarm the System before the entry delay ends. -
Page 4: Select Partition
Setting Partitions Partition Selection Process Access to any desired partition is achieved through the use of an individual code or proximity tag. It is not possible to access the INSTALLER MENU if one or more partitions are in the AWAY modes. Before attempting to perform any operation on any given partition(s), it is necessary to perform the operations below which enable you to select the desired/allowed partition(s) using the individual code or proximity tag:... - Page 5 To Program A User Code Enter the [USER SETTINGS] menu, select the Step 1. RECALL BYPASS [USER CODES] option and press The first user code “User 01: 1111” is displayed. To recall the last used bypass scheme press . Step 2. User 01: 1111 At the blinking cursor position, key in the User Code you wish to program , for example, [06] for user code 6, or alternatively click the...
- Page 6 To Set Partitions Authorization* The display will now enable you to set the Step 6. User 06: 1234 partitions. Press the button and use the Keypad keys Step 7. User 06: 1234 to change the status of the partitions 1, 2 &...
- Page 7 Present the proximity tag to the Keypad within the Step 3. ENROLL NOW or timeout period. ENTR ID:xxx-xxxx If enrollment was successfully completed, a “Happy Step 4. DEVICE ENROLLED Tune” ☺ sounds and the display reads [DEVICE T01:Tag (Prox) ENROLLED] for a short duration and then changes to read the tag’s details.
-
Page 8: Bypass Zone
To Set Partitions Authorization* Use the Keypad keys to change the Step 1. T05:PARTITIONS status of the partitions 1, 2 & 3, respectively. When you are satisfied with the setting, for Step 2. T05:PARTITIONS example, User 5 is authorized with Partition 1 and 3 only, press to confirm. - Page 9 Clearing Bypass Zone Repeat steps 1 to 2 above. Step 5. Z04: BYPASSED Z04: P1 P2 P3 When the zone you wish to clear bypass appears Step 6. Office 2 on the display (for example, “Z04”), press to confirm. You can also identify the device by looking for the “it’s me”...
- Page 10 System. * Calls charged at the standard rate of a regular local or national landline number. Costs from mobiles may vary. ADT800IE PM33-PDF / Issue 1 / October 17...


Need help?
Do you have a question about the PM33 and is the answer not in the manual?
Questions and answers