Table of Contents
Advertisement
Advertisement
Table of Contents

Related Manuals for Reflecta Combo Album SCAN 64400


Summary of Contents for Reflecta Combo Album SCAN 64400
- Page 1 Combo Album Scanner User’s manual...
-
Page 2: Table Of Contents
Table of Contents Preparation ............ 2 Standard Accessories ........2 Part Names ............ 3 Installing the battery pack ....... 5 Charging the battery pack ......7 Preparing Your Combo Album Scanner ..9 Scanning Photo Albums/Magazines/Photos . 10 Scanning Film ..........12 Placing film/slide into the holder .... -
Page 3: Preparation
Preparation Standard Accessories Cleaning Combo Album Scanner Manual brush 135 negative holder 135 slide holder Lithium Adaptor USB cable battery... -
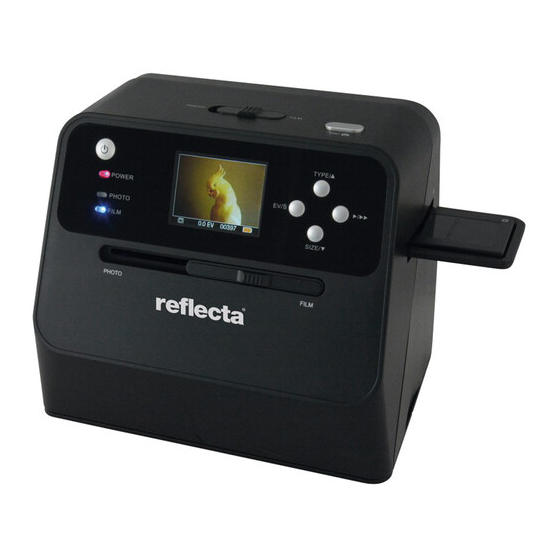
Page 4: Part Names
Part Names Photo/Film focus switch Photo/Film focus switch Power Button Power button Film Holder Slot Film holder slot Photo/Film Light Switch Photo/Film light switch Photo Tray Photo tray LCD Screen LCD screen OK Button OK button EV/delete EV/delete Film Type/Up Button Film type/up button Playback Button Playback button... - Page 5 Battery Charging LED Battery charging LED Photo Status LED Photo status LED Film Status LED Film status LED Micro USB Connector Micro USB connector SD Card slot SD card slot Battery Door Battery door Brush Brush...
-
Page 6: Installing The Battery Pack
135 Negative Holder 135 negative holder 135 Slide Holder 135 slide holder Note: We suggest using the bundled brush to clean the glass surface in the Combo Album Scanner periodically to produce clear images. Please make sure your film negatives/mounted slides and their holders are clean before inserting into the Combo Album Scanner. - Page 7 2. Insert the supplied battery. Make sure the (+ and -) ends of the battery match the polarities indicated in the battery compartment. 3. Snap the cover back and press the latch into place. Battery Door Battery door Battery power status Full Empty...
-
Page 8: Charging The Battery Pack
Charging the battery pack The battery pack will not be fully charged at the time of purchase and therefore needs to be charged before use. If the battery charge becomes low while you are using the scanner, it is recommended to recharge it as soon as possible. - Page 9 Micro USB connector of the scanner. The red LED will turn on during battery charging when the scanner is not in use, and will be off when it is fully charged. Please charge the battery for at least 3 hours Note: The scanner can also be operated without the battery when the power adaptor and USB cable is connected to...
-
Page 10: Preparing Your Combo Album Scanner
Preparing Your Combo Album Scanner 1. Insert and push an SD card into the SD card slot until the card locks in place. Push once again to release the card. Unit only accepts SD or SDHC card up to a maximum of 32GB. -
Page 11: Scanning Photo Albums/Magazines/Photos
photo/film light switch to its proper position. Scanning Photo Albums/Magazines/Photos NOTE: the film tray doubles as the base for this unit. You must detach it to scan photos. 1. Slide the photo/film focus switch to “PHOTO” 2. Slide the photo/film light switch to “PHOTO” 3. - Page 12 Note: 4 x 4”, 4.2 x 3.2” and 3.4 x 2.1” are the sizes of Poloroid and Fuji instant film photos. Note: You may scan your photo by placing it on the photo tray. You can also scan directly from your photo album without removing the pictures from their holder.
-
Page 13: Scanning Film
adjust the brightness (exposure) of your subject. Press the EV/delete button to adjust exposure value. Press the up or down button to adjust the exposure compensation between +2EV to -2EV in 0.5 increments. The amount of compensation is shown at the bottom of the LCD screen. -
Page 14: Scanning Film And Slide
2. Put a 135 positive slide/negative film into holder as shown. 3. Close the holder and make sure the holder is closed properly. Scanning Film and Slide 1. Slide the photo/film focus switch to “FILM” 2. Slide the photo/film light switch to “FILM” Insert the loaded film/slide holder properly into the slot according to the ▲... - Page 15 (▲ Insert through the right entrance) (● Insert through the left entrance) You can adjust the location of the film by moving the film holder; the film holder can be moved in both directions. Keep your picture in the rectangular white frame shown on the LCD screen.
- Page 16 backward to eliminate the black edge. Film Type Selection: To select film type, press the Film type button. 135 positive (slide) 135 negative 135 black & white -15-...
- Page 17 Note: Improper selection of film type may result in improper colour in your LCD screen and the scanned images. Press the OK button to convert the pictures to digital images. To get the best digitized images, wait for the image display on the LCD screen to adjust to the brightness and become stable.
- Page 18 Note: To save power, the scanner will automatically go into sleep mode if you do not use it for more than 3 minutes. You may wake up the scanner by pressing any button. It will turn off automatically if it has not been used for more than 6 minutes.
- Page 19 Brightness adjustment: the exposure of the scanner is set automatically. On some occasions you need to adjust the brightness (exposure) of your subject. Press the EV/delete button to adjust exposure value. Press the up or down button to adjust the exposure compensation between +2EV to -2EV in 0.5 increments.
-
Page 20: Playback Mode
Playback Mode 1. Press the playback button to playback the digital images saved on your card. You will see the playback icon in the lower left hand corner, as shown below. 2. Press the up button to review the next image. Press the down button to review the previous image. -
Page 21: Delete Mode
3. Press the playback button again for slideshow Icon shown as below: 4. Press the playback button again to go back to the original screen. Icon shown as below: Delete Mode 1. To delete an image: Under Playback Mode, press the delete button once and then the up button to select YES. -
Page 22: Linking The Card To Computer
2. To delete all images: Press the delete button twice and then the up button once to select YES. Press the OK button to delete. 3. To format the SD card: Press the delete button three times and then the up button and select YES. Press OK to begin formatting. - Page 23 1. Connect the scanner to the computer via the USB cable. 2. Turn on the power of the scanner. 3. Press the up button to select “SD to PC”, then select YES, then press the OK button for confirmation. To save power, the LCD screen will be turned off when connected to a computer.
-
Page 24: Appendix
Appendix Specifications Image Sensor 1/2.33” 14 Mega CMOS Sensor, Preview and Review 2.4” Colour LCD Display Lens Specification F/No = 3.4, f = 5.2 mm Colour Balance Automatic Exposure Control Automatic & Manual adjustment Supported photo size 4 X 6 inches. and 3.5 X 5 inches Supported photo Photo album/magazine/photo media... -
Page 25: Icons & Indicators
Specifications are subject to change without prior notice. Icons & Indicators Delete Battery Full Battery 2/3 Delete All Format SD Battery 1/3 Card Battery Empty 135 Slide 135 Negative Card Error Film B/W 135 Card Full Negative Film 110 Negative Card Lock Film 126 Negative... - Page 26 PC-SD-Card Slide Selection Show PC-SD Card Wait Link-connected Photo size selected 3.5 X 5/4 X 6 EV Compensation Indicator EV Compensation Available number take in SD card PC System Requirements ® Pentium P4 1.6GHz or equivalent AMD Athlon Free USB 2.0 port 512MB RAM 500MB free hard disk space 1024 x 768 pixel colour monitor...
- Page 27 Mac 10.5 ~ Up This symbol found on the product or in the instructions indicate that your electrical and electronic equipment should be disposed of separately from your household waste at the end of its life. There are separate collection systems for recycling in the EU.
- Page 28 GmbH Merkurstrasse 8 Fon +49 74 57/94 65 60 72184 Eutingen, Germany Fax +49 74 57/94 65 72 E-Mail: mail@reflecta.de Web: www.reflecta.de -27-...
Need help?
Do you have a question about the Combo Album SCAN 64400 and is the answer not in the manual?
Questions and answers