
Related Manuals for Move 'N See PIXIO

Summary of Contents for Move 'N See PIXIO
- Page 1 User Manual WWW.MOVENSEE.COM Y o u r p e r s o n a l r o b o t c a m e r a m a n version 2.8.0...
- Page 2 Congratulations ! Congratulations on purchasing your PIXIO, the very efficient and easy to use robotic camera. You are about to shoot quality videos of indoor and outdoor activities, at distances up to 330ft (100m). This User Manual lists the contents of the package, how to install and start your PIXIO, to set it up, and how to get the best of it. With PIXIO, film sport, trainings, lessons, conferences, ceremonies, Arts and entertainement, recreative activities... and much more!
-
Page 3: Table Of Contents
Technical informations � � � � � � � � � � � � � � � � � � � 31 Setting up the PIXIO ......11 Description of LEDs . -
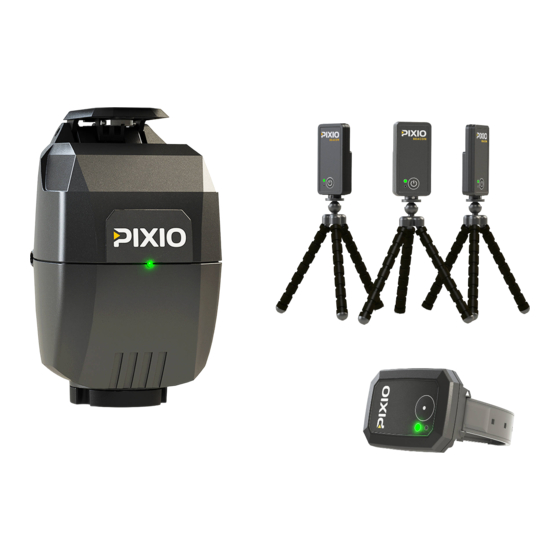
Page 4: Supplied Items
Supplied items Micro-breacons (x3 PIXIO Robot Mini tripods (x3) Watch & wristband PIXIO USB Charger & power cord Wireless charger and its cable for the USB cables (x4) MULTI cable watch... -
Page 5: Before Starting
Before starting... -
Page 6: Charging The Batteries
LED located near the plug lights up during the recharge, and turns off when the robot is charged. To avoid self-discharge of the robot, unplug the robot after the end of the robot charge, turn the robot ON for a few seconds and then turn it OFF before storing it. Recharge the PIXIO micro beacons. Plug USB cables in each one of the micro beacons plug located behind as shown. The red LED of the micro-beacon lights up during the recharge, and turns off when the micro-beacon is charged. Recharge the PIXIO watch. -
Page 7: Installing A New Firmware Version On Your Pixio
Installing a new firmware version on your PIXIO Firmware v2.8 is already installed on your PIXIO. To take advantage of the latest improvements, install any new firmware version available from: https://shop.movensee.com/ccc We recommend to upgrade all devices (the robot, the watch and the 3 beacons) at the same time. Make sure that all devices are fully charged before starting the procedure. Need some help to upgrade your PIXIO ? Have a look at the tutorial video: https://youtu�be/CxnVju8qysw... - Page 8 2� Start the UPGRADE mode 1. Press on hold turnRIGHT button Press and hold TurnRight button on the robot, then briefly press on power button. 3. Release turnRIGHT button when the red light starts to blink Release TurnRight button when the red light starts to blink. 4. Press turnLEFT button to upgrade 3� UPGRADE each device the robot 2. Briefly press POWER Next, you have to upgrade each element one after the other (not all at the same time): For the robot: Press briefly TurnLeft button. The green LED blinks rapidly during the upgrade, and stops when it is finished. For a watch or a beacon (switched OFF before the procedure): → Start the « upgrade » mode: press its started button during several seconds, until its green LED blinks → Release the button, and press it again briefly to launch the upgrade. The green LED blinks rapidly during the upgrade, and turns full green when it is finished. Is there a problem ? Don’t panic����...
-
Page 9: Camera
By default, your PIXIO is configured to work with a SONY HDR-CX450 camera. Follow these instructions to update the camera parameters kept in the memory of the robot. First, download the file corresponding to your camera model at https://shop.movensee.com/ccc The file is meant to be opened directly on and by PIXIO robot so do not open the file directly from your computer. Record the PIXCAM.cfg file on a micro-SD card formatted with the FAT32, FAT16 or FAT12 format (usually, micro-SD cards with a capacity lower than 32Gb are formatted with a correct format). The file must be saved in the root directory of the memory card, not in a sub-directory. This file is meant to be opened directly... -
Page 10: Getting Started
Getting started... -
Page 11: Setting Up The Pixio
Setting up the PIXIO Before using PIXIO for the first time, you must check that your device is up to date - refer page 7 - and check that the camera parameters kept in the memory of the robot matches your camera model - refer page 9. 1. Screw the robot on a tripod equipped with a standard 3/8’’ screw. 2. Screw your camera, DSLR, smartphone/tablet adaptor to the robot with the 1/4’’ screw of the PIXIO robot. 3. If you are using a supported model of camera, plug the camera and the robot with the correct cable. There are 3 cable models depending on the camera model: MULTI cable AV/R cable Jack Ø2.5mm cable... -
Page 12: Setting Up The Beacons
Place the beacon n°1 as far as possible from the robot (but not more than 330ft or 100m). It will improve the left-right accuracy of the tracking. Place the PIXIO robot and the 3 beacons around the area you want to film, in such a way that the beacon n°2 is on the left of the beacon n°1, as seen from the robot - beacon numbers are written at the back of each beacon. The beacon n°3 can be placed on the left or on the right of other beacons. - Page 13 The PIXIO robot can also be placed at the middle of the 3 beacons. The beacon n°1 is placed as far as possible from the robot The beacon n°2 is on the left of the beacon n°1, as seen from the robot The positions of the beacons are very flexible, but tracking and accuracy are better with proper configurations: • Check that there are direct lines of sight between the beacons, and between the robot and each beacon. Or at least check that any obstacle is small. Optimal Bad orientation • Keep the robot, the beacons, and the watch at more than 20-30 cm (10 inches) orientation from the walls or from massive metallic parts. Avoid operating near a big electrical transformer, powerful antenna, etc. • The best height for the beacons is 1 to 2m (3 to 6 ft) from the ground. The three beacons need to be on the same level and perpendicular to the ground. • The distance between the beacons, and the distance between the robot and the beacons, must be smaller than 330ft (100m).
-
Page 14: Start Tracking
Start tracking Switch ON the camera. Adjust the tripod horizontally and set the TILT angle of the camera by screwing more or less the screw at the rear of the robot. Check that the watch is OFF� Switch ON the PIXIO robot by pressing the power button at the rear of the robot until the green light starts unscrew to screw to increase decrease the TILT the TILT angle to flash. angle By rotating the tripod, or using robot buttons and , place the beacon n°1 at the center of the camera screen. What is important is the right-left position of the beacon. Use the manual ZOOM on the camera to improve the precision. A 50cm (20 inches) precision is enough. -
Page 15: Start / Stop Recording
Start / Stop Recording LED blinking slowly : recording command is OFF 1� If you are using a supported camera You can start/stop recording by pressing BRIEFLY the watch button . DO NOT press the REC button directly on the camera� When the camera is recording, the green LED of the watch turns ON. The watch will blink slowly when you stop recording. If the zoom is busy, some delay might occur when you start/stop recording. In this case, the green LED of the watch will blink quickly until your order is taken into account. 2� If you are using a non supported camera If you are using a camera model which is not supported by the robot, just press «record» directly on your camera. -
Page 16: Using Pixio App
Using PIXIO App... -
Page 17: Use Your Phone/Tablet To Control Your Pixio
Use your phone/tablet to control your PIXIO You can control your robot PIXIO with your smartphone using a bluetooth connection and the «Pixio_Remote» App. How to connect a phone or tablet to a PIXIO robot Turn ON the robot, then briefly press the button on the rear of the robot. A blue light starts blinking rapidly. During one minute, your robot is ready to be connected with your smartphone. > Activate bluetooth on your smartphone. > Launch the «Pixio_Remote» App. > Connect the bot 0 by pressing on the App. Follow the same procedure as above to connect the extra-robots to your phone. You can use as many extra-robots as you want with your App. 1. If you never have connected an extra-robot slave to your smartphone/tablet by pressing briefly the ON/ OFF button of the slave, this slave will appear in the App (thanks to informations given by the master robot), but the App will not be able to control this extra-robot. - Page 18 How to use the App as a remote control Record ON/OFF: when a remote control is paired, the REC orders sent by the watches are ignored and the light of the watch blinks as follows: Use the button on the App to start and stop the video recording for each camera. Auto Zoom: tap on to modify the frame of the automatic zoom. Manual Zoom: tap on to modify the frame of the camera. On manual zoom mode, the robot DOES NOT zoom IN and OUT automatically. Auto Track: the robot automatically turns right & left to follow the watch. Manual Track: use the slider to turn the robot on the right or on the left. Brightness: use the curser to increase or reduce the brightness of the lights of the watch and beacons. Selection of the tracked TAG: on each robot menu, tap on to select the watch tracked by the selected robot.
-
Page 19: Multi-User Mode
MULTI-USER Mode Connect one or more watches to one or more robots. (if you use a single robot and a single watch, you are not concerned by this chapter) MULTI-USER mode is available from the firmware v2.0. Make sure you have updated all your devices. Download the latest firmware available on our website : https://shop.movensee.com/ccc... -
Page 20: Pairing Procedure : Pair Your Devices (Robots, Watches And Beacons)
Pairing procedure : pair your devices (robots, watches and beacons) 1� Start the pairing - if you have a single robot and several watches, your robot will become the master. - if you have several robots, you have to choose one to become the master. While filming, the master robot should always be ON. - Page 21 2� Pair a device (robot, watch or beacon) to the master The master robot must be running in pairing mode to pair a new device (see the previous paragraph). To pair a new device (slave robot, watch or beacon), start the device closer than 1 meter (3 ft) from the master robot. The green light of the device blinks 4 times intermittently once the pairing is completed. You must restart all the devices before starting the tracking. The pairing is saved for future use. 3� How to recognize a slave robot and a master robot ? You must pair at least one watch and 3 beacons to the master before starting the tracking.
-
Page 22: Multi-User Operation
Once the tracking begins, turn ON the additional watches by pressing the button. The green light of each watch starts to blink. The blinking is slow if there is no remote control connected to the device. The robot will film the last watch turned on. You can switch from one watch to another using Pixio Remote Control app. on your phone while filming (see page 17). If there is no remote control connected, press the button of a watch to be tracked and filmed. The light is full green when the watch is filmed. Stop recording by pressing the... - Page 23 All devices must be paired together to be able to run into the MULTI-USER mode (see the «Pairing procedure : pair your devices (robots, watches and beacons)», page 20). Each robot must point at the beacon n°1 before turning ON the first watch and starting the tracking. Turn ON each beacon by pressing the button until the green light turns ON. Place the PIXIO robot and the 3 beacons around the area you want to film, in such a way that beacon n°2 is on the left of the beacon n°1, as seen from the master robot� The beacon n°3 can be placed on the left or on the right of other beacons. The distance between the beacons, and the distance between the robot and the beacons, must be smaller than 330ft (100m).
- Page 24 Turn ON your cameras. Check that all watches are OFF. Power ON PIXIO robots by pressing the button for 2 seconds. By rotating the tripod, or with the robot buttons a n d , place the beacon n°1 at the center of each camera screen. What is important is the right / left position of the beacon. Use the manual ZOOM on the camera to improve the precision. It’s OK with a precision of about 50cm (20 inches). Your PIXIO robots are ready ! Remain in the area and switch ON the watch by pressing about 2 or 3 seconds. The system initializes during about 10 to 30 seconds. When the watch LED is blinking regularly, the initialisation is finished and the...
-
Page 25: More Tricks On Your Pixio
More tricks on your PIXIO... -
Page 26: How To Increase The Autonomy
Use the mains outlets You can plug the PIXIO robot and the beacons to the sockets. This is useful to film longer, and to install your system in a fixed position. Power 5V DC, 700mA min > For the beacons, use 3 micro-USB (not provided) chargers 5V DC, 700 mA min. > For the PIXIO robot, use a micro- USB charger 5V DC, 2A min (or the Power 5V DC, one which is provided). 2A min (e.g. the one provided) -
Page 27: Camera Settings
Camera settings It is recommended to activate the «anti-vibration» features of the camera (called «steadyshot®» for Sony cameras), and to deactivate the digital zoom. Depending on what you prefer, check all parameters related to image quality and size: 16:9 is often prefered to 4:3; 50p or 60p is better for slow motion; biggest image size and best recording quality give better results. Be careful with the energy economy options that may switch off the camera when the REC is OFF during a long time. How to attach an heavy camera You can lock the TILT axis by tightening the 2 screws apart the rotation. You can use an hexagonal screwdriver with diameter 2.5mm. Do not exceed a torque of 2 Nm. Release the screws in order to release the TILT rotation. You can use a long quick release mounting plate to move forward the center of gravity of the camera to prevent it from tilting backwards. Tighten the 2 screws Use a long quick release apart the rotation to mounting plate to move lock the screws... -
Page 28: Film From An Elevated Location
Film from an elevated location PIXIO can be used to film from an elevated location. Just set the TILT axis with the screw at the rear of the TILT axis, and chose the distance between the camera and the area you want to film, as shown below. With appropriate settings, the auto-zoom will keep you in the frame. The best settings depend on the configuration of the premises, of the auto-zoom level, and of the kind of framing you prefer. So there is no hard and fast rule for those settings. -
Page 29: Conferences, Ceremonies, Classrooms Special
Conferences, ceremonies, classrooms special settings CONFERENCES CEREMONIES CLASSROOMS Special settings Refer to the latest version of the User Manual to set up your PIXIO, download and connect the app. to the robot(s). STEP 1. Press « Settings » STEP 2. Press « Stop Mode Enable »... -
Page 30: How To Restrict The Rotation Of The Robot
How to restrict the rotation of the robot (useful when an external device is plugged to the robot) ? You may need to connect an external equipment (streaming dongle, charger, etc.) to the robot or the camera during operation. To prevent the cables from wrapping around the robot, you can restrict the rotation of the robot to +/- 180° from to the beacon n°1 thanks to an adjustable option in the PIXIO_Remote application. -
Page 31: Technical Informations
Technical informations... -
Page 32: Description Of Leds
Description of LEDs start procedure LED status Description LEDs off The robot is off green LED blinking slowly The robot (master) is initializing green and red LEDs blinking alternatively The robot (slave) is initializing tracking LED status Description green LED blinking slowly the camera is on standby green LED blinking quickly the watch requests the start or stop of the REC green LED ON the camera is recording recharging LED status Description red power LED is ON The robot is recharging red power LED is blinking The recharge is ending red power LED is off The battery is full... - Page 33 LED status Description red LED blinking The robot is in upgrade mode The robot is in upgrade mode but the robot red LED ON cannot read the «update.mnp» file green LED blinking quickly The robot is upgrading red LED blinking slowly red LED blinking slowly (after the previous step) The upgrade has been done remote control LED status Description blue LED off Bluetooth is off blue LED blinking quickly The robot is ready to be paired with a remote The robot has already been paired with a remote, blue LED blinking slowly but the remote is not currently connected blue LED ON A remote is connected with PIXIO robot...
- Page 34 tracking LED status Description LEDs off The watch is off green LED blinking slowly The watch is ON but not filmed by the camera green LED blinking quickly The watch requests the start/stop of the REC green LED ON The watch is ON and filmed by the camera solid green with quick flashes A remote is connected with the robot recharging LED status Description red LED ON The watch is recharging red LED blinking The recharge is ending red LED is off The battery is full upgrade procedure LED status Description green LED blinking slowly The watch is in upgrade mode green LED blinking quickly The watch is upgrading green LED ON The upgrade is completed...
- Page 35 tracking LED status Description LEDs off The beacon is off green LED ON The beacon is ON recharging LED status Description red LED ON The beacon is recharging red LED blinking The recharge is ending red LED is off The battery is full upgrade procedure LED status Description green LED blinking slowly The beacon is in upgrade mode green LED blinking quickly The beacon is upgrading green LED ON The upgrade is completed...
-
Page 36: Specifications
USB standards for the robot and the micro- adjustment (vertical) beacons. The robot and the micro-beacons can be plugged to the Can support cameras mains. This allows to film longer or to install PIXIO at the up to 5lbs (2,5kg) same place for months. You may increase the autonomy of the robot or the Motor noise beacons by plugging an external ‘power bank’. For... -
Page 37: More Informations About Pixio Batteries
More informations about PIXIO batteries The robot, the watch and the three beacons include a Lithium-Ion battery you need to charge before starting to use PIXIO. The devices need about 2 hours to be fully charged if completely unloaded. Once charged, the robot is able to run for more than three hours. The watch and the beacons batteries can run between 2 and 3 hours and a half. 1. Battery charge capacity tends to decrease over time and use. 2. Lithium-ion batteries typically have a lifespan of between 300 to 500 charge cycles and are expected to retain around 80% of their original battery capacity after 300 charge cycles, or after about one year of use. 3. High or low ambient temperatures may negatively affect battery performance, resulting in a loss of up to 70% of charge capacity. The batteries should be stored at a temperature between 10° to 30°C. 4. If you do not use your PIXIO for an extended period, the batteries should be charged between 40% to 60% every two months. 5. To avoid self-discharge of the robot, unplug the robot after the end of the robot charge, turn the robot ON for a few seconds and then turn it OFF before storing it. Normal drop in battery capacity over time and use in not covered by the warranty... -
Page 38: F.a.q
With a tablet or smartphone, do I have the automatic zoom and the REC control from the watch ? Is it possible to live stream the video taken with PIXIO ? No. A tablet or smartphone does not have any plug for Yes, the HDMI plug of the camera can be used to have zoom and record remote control by PIXIO. - Page 39 Is it an issue if I go outside the area set-up by the beacons? No. You can go outside the area set up by the beacons and still be framed. And of course if you are going too far the camera will loose you, and it will find you again when you come back. Can I use PIXIO in a building with metallic walls? Yes. Just take care to have all the elements of PIXIO a few inches (a few centimeters) away from the metal. Can I use PIXIO robot without the three beacons ? The three easy to set up beacons included with the PIXIO...
-
Page 40: Troubleshooting
The robot is a slave (refer to page 21). robot during 13 seconds (until the green light blinking alternately. blinks alone). The beacon n°2 must be on the left of the The PIXIO robot rotations are always in the beacon n°1, as seen from the robot. Follow the The beacons are not placed correctly. wrong direction of rotation. instructions given page 12 «Micro beacons set- up» and start again the system. - Page 41 TRACKING PROBLEM CAUSE SOLUTION 1. Verify that the beacons are not placed on the ground. The beacons must be settled at 1m to 2m from the ground. The PIXIO works well at short range but The radio communication malfunctions malfunctions at long range 2. Place the robot and the beacons following the instructions page 12 «Micro-beacons location» and start again the system. 1. Re-start the system, checking that the beacon n°1 is well at the center (right-left) of The beacon n°1 was not well at the center...
- Page 42 ZOOM / REC PROBLEM CAUSE SOLUTION The PIXIO is not designed to operate by pressing on the REC button on the camera. You are asking for recording with the REC The REC stops automatically. To start and / or stop recording the video, use button on the camera. the button on the watch or use the PIXIO_ Remote application from a tablet or a phone. RECHARGE PROBLEM CAUSE SOLUTION 1. Check that the watch is not already charged. The watch battery is already charged 2. Check that the watch is positioned on the...
- Page 43 2. Check that the file is in the root directory of the micro-SD card and not in a sub-directory. 3. Check that the microSD card is inserted into I cannot upgrade my system (the red led the PIXIO robot slot (not in the camera). The PIXIO robot cannot read the file. remains ON) 4. Check that the name of the file does not include any ...(1) or ...(2) at the end of the name or does not include the file extension twice (eg update�mnp�mnp).
- Page 44 Remove the write-protection I cannot save the PIXCAM and/or update files from the microSD card The microSD card is write-protected on my microSD card by lowering the protective tab You did not updated all the devices (robot, Update all devices (robot, watch and the 3 After an update, the PIXIO malfunctions watch and the 3 beacons) beacons) BLUETOOTH PROBLEM CAUSE SOLUTION The blue LED «bluetooth» does not turn ON Update all devices (robot, watch and the 3 when briefly press on ON/OFF button.
-
Page 45: Customer Support
Customer support Our qualified team will guarantee you fast support in case of questions or problems with your equipment. Our objective is to have your product in a good working order. If you need help, please check carefully the manual, the FAQ, and if necessary contact MOVE ‘N SEE by phone, e-mail or mail. Phone (France) : +33 (0) 9 70 75 13 15 (no additional charge) E-mail (after-sales) : ccc@movensee.com Mail (after sales) : MOVE ‘N SEE - SAV, 38 rue Jim SEVELLEC, 29200 BREST MOVE ‘N SEE products have a 2 years legal warranty against hidden defects originating from a materials defect, or from a design or manufacturing defect affecting the products delivered and rendering these unfit for use. Opening the product or a part of the product voids the warranty. To return a product, you must first contact MOVE ‘N SEE to explain the problem. If the technical department at MOVE ‘N SEE decides that the product needs to be returned to them, you will be given a return code. You can then return the product along with the accessories in its original packaging. The return code must be clearly marked on the exterior of the packaging. As soon as we receive your package, our technicians will inspect and analyse the problem item. If the guarantee detailed in the conditions of sale are applicable, it will be repaired or replaced free of charge. In all other cases, you will be sent a free quote for repairs. You will then have the choice: -to refuse the quote, in which case the product will be returned to you at your own expense. -to accept the quote. In this case, repairs will begin on reception of your payment. The product will then be returned to you once the repairs have been completed. -
Page 46: Precautions And Safety
Precautions and safety Batteries : The PIXIO watch, wherever it is on the subject or a vehicle, If the internal batteries are mishandled, the batteries can is a prominence that may cause injury for the subject itself burst, cause a fire or even chemical burns. Observe the or other people around him. The armband can interact following cautions. Do not disassemble. Do not crush with other equipments. The user is fully responsible for the and do not expose the batteries to any shock or force use of the product and for security of its activities. The such as hammering, dropping or stepping on it. Do not... - Page 47 Disposal of Old Electrical & Electronic Equipment For customers in the USA RECYCLING LITHIUM-ION BATTERIES: This symbol on the product or on its packaging indicates Lithium-Ion batteries are recyclable. that this product shall not be treated as household You can help preserve our environment waste. Instead it shall be handed over to the applicable by returning your used rechargeable collection point for the recycling of electrical and batteries to the collection and recycling electronic equipment. By ensuring this product is disposed...
- Page 48 measures: —Reorient or relocate the receiving antenna. —Increase the separation between the equipment and receiver. —Connect the equipment into an outlet on a circuit different from that to which the receiver is connected. —Consult the dealer or an experienced radio/TV technician for help. The supplied interface cable must be used with the equipment in order to comply with the limits for a digital device pursuant to Subpart B of Part 15 of FCC Rules.
Need help?
Do you have a question about the PIXIO and is the answer not in the manual?
Questions and answers