Table of Contents
Advertisement
Advertisement
Table of Contents

Summary of Contents for RoboToolz RT-7690-2
- Page 1 RT-7690-2 Self-leveling, remote-controlled, simultaneous level and plumb rotational laser system User Guide Toolz 404 Villa Street Mountain View, CA 94041 (800) 984-0404 Domestic Revision 1 (650) 903-4944 International July, 2002 www.robotoolz.com 080-0020-01...
-
Page 2: Table Of Contents
FCC Statement .......................... 1 Overview ........................2 RT-7690-2 Features........................2 Accessories..........................2 RT-7690-2 Components....................3 Operation ........................4 RT-7690-2 Controls ........................4 Turning on the Laser System ....................6 Using the Lasers........................6 Operating Modes........................7 Out of Level ..........................8 Laser Detector ........................... 8 Using the Reflective Target..................... -
Page 3: User Safety
Repairs or service are to be done only by an authorized service center. Warning Labels The following labels are attached to every RT-7690-2 unit. They should not be removed or defaced. This Danger label is located on the front of the unit. It identifies the RT-... -
Page 4: Overview
RT-7690-2 User Guide Overview The RT-7690-2 is a two-beam, self-leveling, remote-controlled laser system. Its level and plumb laser beams can be independently controlled from the base unit or RF remote control. A remote control with built-in laser detector allows for laser beam detection under lighting conditions where beam visibility is poor. -
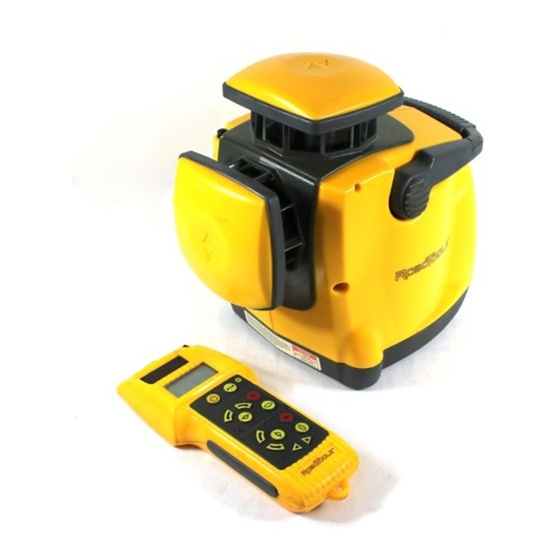
Page 5: Rt-7690-2 Components
RT-7690-2 User Guide RT-7690-2 Components The following illustrations show the main components of the RT-7960-2 laser system base unit and RF remote control/laser detector. Base Unit (front) Retractable Level Laser Antenna Aperture Helmet Level Laser Aperture Plumb Laser Aperture Helmet... -
Page 6: Operation
RT-7690-2 User Guide Operation This section describes the operation of the RT-7690-2 base unit and its operating modes, and explains how to use the laser detector. RT-7690-2 Controls Laser control functions are available from both the base unit and RF remote control/laser detector. - Page 7 RT-7690-2 User Guide RT-7690-2 RF Remote Control/ Laser Detector Controls RF Remote/Detector Power On/Off Detector Coarse/Fine Select Detector Beeper On/Off Detector Panel Level Laser On/Off Level Spin Mode/ Speed Select Level Display Clockwise/ Counterclockwise Line Dither/Scan Position RF Remote/Detector Level...
-
Page 8: Turning On The Laser System
RT-7690-2 User Guide Turning on the Laser System 1. Place the RT-7690-2 base unit on a relatively flat surface, or set it on a standard surveyor’s tripod, using the built-in 5/8" x 11" tripod mount on the bottom of the unit. -
Page 9: Operating Modes
Line Dither/Scan mode is normally used for indoor applications. Note: The RT-7690-2 base unit can be controlled by the laser controls on both the base unit and on the RF remote control. The RF remote control allows for non-directional, unobstructed operation of the base unit from up to 300 ft. -
Page 10: Out Of Level
RT-7690-2 User Guide The laser beam stops rotating (if in Spin mode) or dithering (if in Line Dither/Scan mode) and flashes a laser dot in sync with the base unit LED. The beeper on the base unit sounds in sync with the laser beam and base unit LED. - Page 11 RT-7690-2 User Guide To use the detector: 1. Activate the RF Remote/Detector with the keypad RF Remote/Detector Power On/Off button . You will hear a single beep, and icons in the lower portion of the LCD will be displayed, showing all available options. This confirms that the unit is activated, but the lasers and detector have not been turned on.
- Page 12 RT-7690-2 User Guide 3. To turn on the detector, press the Coarse/Fine select button . On startup, the laser detector resolution is coarse, with the beeper on. The coarse resolution and beeper icons are displayed on the LCD. Continue pressing the Coarse/Fine button...
-
Page 13: Using The Reflective Target
The red acrylic used in the targets enhances the laser, making the laser dot more visible. Using the Laser Enhancement Glasses The red plastic used in the glasses enhances the laser, making the laser dot more visible. These glasses are particularly useful when using the RT-7690-2 laser system outdoors or in brightly-lit environments. -
Page 14: Applications
RT-7690-2 User Guide Applications Level Level (Carpentry) Level (Drop Ceiling) Level (Framing) Level (Concrete) -
Page 15: Plumb
RT-7690-2 User Guide Plumb Plumb (Carpentry) Plumb (Framing) Plumb (Concrete) -
Page 16: Align
RT-7690-2 User Guide Align Align (Carpentry) Align (Framing) Align (Tiling) Align (Flooring) Align (HVAC) -
Page 17: Grade
RT-7690-2 User Guide Grade Grade (Concrete) -
Page 18: Power
Power Standby mode When no commands have been received for 25 minutes, the RT-7690-2 base unit automatically enters Power Standby mode to save battery life. The base unit LED flashes green once per second to indicate Power Standby mode. -
Page 19: Rf Remote/Laser Detector
9V battery, ensuring that the polarity is correct, as shown in the diagram. Caution: Remove all batteries from the RT-7690-2 base unit and RF remote control/laser detector whenever the units are being stored for an extended period of time. -
Page 20: Temperature Protection
The laser beam automatically shuts off when the temperature of the unit reaches 113°F (45°C). The laser comes back on once the unit cools below 104°F (40°C). Current operating settings are retained, and the RT-7690-2 base unit returns to the last functional mode selected. -
Page 21: Calibration
RT-7690-2 User Guide Calibration The RT-7690-2 laser system is calibrated before shipment to ensure that you receive a superior product conforming to the product specifications listed. Although it has been calibrated before leaving the factory, it contains many precision-machined parts that may be affected if the instrument is subject to abuse. - Page 22 RT-7690-2 User Guide 7. Turn off the laser beam and the power to the unit. Caution: The laser beam must be turned off and the power switch in the off position before proceeding to the next step. 8. Insert an Allen wrench into the side calibration port and locate the calibration screw. Rotate it clockwise to lower the beam or counterclockwise to raise the beam.
- Page 23 RT-7690-2 User Guide 50 ft. (15m) Caution: The Allen wrench must be removed from the calibration port before turning the power on. Calibration is complete. 17. Turn the power switch to the off position. Screw back the calibration port covers and resume normal operation.
-
Page 24: Care And Maintenance
Keep it and all its parts and accessories out of the reach of small children. Do not store it in dusty or dirty areas. Although the RT-7690-2 base unit is dust- and dirt- resistant, long-term exposure to these elements may damage internal moving parts. -
Page 25: Warranty Information
RT-7690-2 User Guide Limited Warranty Toolz warrants for a period of one (1) calendar year from the date of purchase that its products are free of defect in material and workmanship, and conform to Toolz’s published technical specifications under normal operating conditions. -
Page 26: Specifications
RT-7690-2 User Guide Specifications Accuracy: Level: ±1/8" (.3 mm ) @ 100 ft. (30m) Plumb: ±1/4" (.6 mm ) @ 100 ft. (30m) RF remote control/ laser detector range: 300 ft. (90m) Leveling mode: Level and plumb self-leveling Self-leveling range: ±6 degrees...
Need help?
Do you have a question about the RT-7690-2 and is the answer not in the manual?
Questions and answers
Receiver not showing levels
The RoboToolz RT-7690-2 receiver may not be showing levels because the RF Remote/Detector has been activated but the lasers have not been turned on. After activating the detector, you must turn on the level and/or plumb laser for the detector to display level information. If the lasers are off, the detector will not show level data.
This answer is automatically generated