Yale nexTouch Installation And Programming Instructions
Touchscreen and push button access cylindrical lock
Hide thumbs
Also See for nexTouch:
- Installation and programming instructions (28 pages) ,
- Installation and programming instructions (25 pages) ,
- Installation and programming instructions (24 pages)
Table of Contents
Advertisement
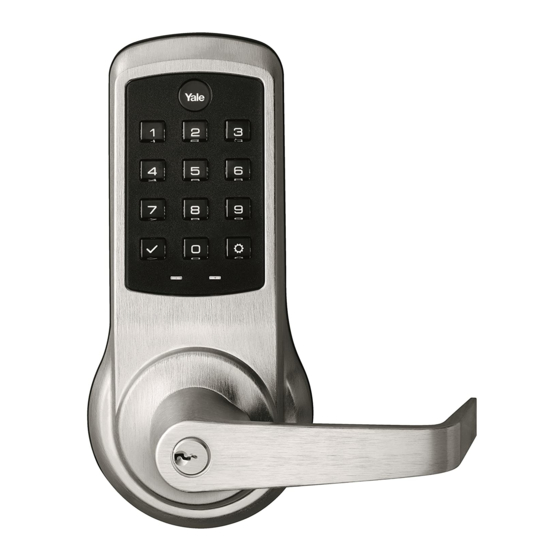
nexTouch
™
Touchscreen and Push Button Access Cylindrical Lock
Installation and Programming Instructions
3/32"
Optional
Optional
Retrofitting or modifying this product may impact fire rating, safety features and warranty.
Consult with code specifications to ensure compliance with all codes and ratings.
1
P/N 80-9150-0080-010 (10-17)
Advertisement
Table of Contents
Troubleshooting

Related Manuals for Yale nexTouch


Summary of Contents for Yale nexTouch
- Page 1 ™ Touchscreen and Push Button Access Cylindrical Lock Installation and Programming Instructions 3/32" Optional Optional Retrofitting or modifying this product may impact fire rating, safety features and warranty. Consult with code specifications to ensure compliance with all codes and ratings.
- Page 2 Determining Handing The hand of a door is determined from the secure side of the door. The term "secure" means the side from which you initially unlock and enter. Left Hand “ ”, Hinges Left. Left Hand Reverse " ", Hinges Left. Open Inward.
- Page 3 Copyright © 2017, Yale Security Inc., an ASSA ABLOY Group company. All rights reserved. An ASSA ABLOY Group brand Reproduction in whole or in part without the express written permission of Yale Security Inc., an ASSA ABLOY Group company is prohibited. 3/4" Dia. Thru to...
- Page 4 Preparing Frame 7-16 / 8-32 x 1" UNCWS DPS Option Frame Wood Frame: 3/8" Dia. x 1" *Metal Frame: 3/4" Dia. x 1" See Instruction A7983B Frame Inside 3-1/2" of Door 1" Dia. x 1/2" Deep *Metal Frame Installations Supplied plastic collar MUST installed for to function properly.
- Page 5 Preparing Inside Escutcheon Do not take apart the outside assembly. P/N 80-9150-0080-010 (10-17)
- Page 6 Installing Latchbolt 2-3/8" Latchbolt for thin doors sold separately. See Installation Options. 7-16 / 8-32 x 1" UNCWS Inside of Door Curved edge of latchbolt faces direction door closes. Removing Battery Cover P/N 80-9150-0080-010 (10-17)
- Page 7 Installing Outside Assembly Thin door gaskets sold separately. See Installation Options. Inside of Door Optional DPS Inside of Door Two moving "T" tabs must be fully captured in retractor pocket. Mounting Flanges must be in Mounting Flange Pockets. View from Outside of Door Mounting Flange Mounting Flange Pocket "T"...
- Page 8 Installing Inside Support Assembly 10-32 x 2-1/2" PFHMS Inside of Door Optional DPS Do Not Overtighten Screws P/N 80-9150-0080-010 (10-17)
- Page 9 Attaching Cables Touchpad Connection Motor Connection Optional Connection P/N 80-9150-0080-010 (10-17)
- Page 10 Installing Inside Escutcheon Thin door gaskets sold separately. See Installation Options. Avoid pinching cables Testing Inside Lever Operation P/N 80-9150-0080-010 (10-17)
- Page 11 Installing Batteries & Cover "Welcome to Yale." Optional Network or Yale Accentra Key module must be installed BEFORE batteries. See Installation Options. Congratulations, you've installed the Yale nexTouch Lock! ™ Continue on next page to customize your product. P/N 80-9150-0080-010 (10-17)
- Page 12 Order 1-3/8" Thin Door Kit: 14-4761-0106 2-3/8" Latchbolt Outside Gasket Inside Gasket Inside of Door Privacy Switch Door Position Switch Option enables Privacy feature Metal Frame/Door Installations Supplied plastic collars MUST installed for to function properly. Network or Yale Accentra Key Module P/N 80-9150-0080-010 (10-17)
- Page 13 Programming Instructions 9Volt Battery Override Terminal Low Battery Unlock Indicator Indicator Lockout Mode Indicator Privacy Button Speaker Exterior Escutcheon Interior Escutcheon Lock Activation Master Code must be created before any further programming. Max User Codes = 500 P/N 80-9150-0080-010 (10-17)
- Page 14 Creating Master Code Creating a Master Code must be performed upon installation or after resetting the lock to factory default. Programming and use of lock is not possible until this step has been successfully completed. "Register Master Code. Press the gear Press key to continue."...
- Page 15 Creating User Codes Master code must be created first. *Max User Codes = 500 "Menu Mode, enter number." Enter Master code Press "Register User code. "Register User code. Press the gear key Press the gear key to continue." to continue." Press Press Press...
- Page 16 Creating User Codes con't Enter 4-8 digit code followed by "Registered. Press the check key to complete. Press the gear key to continue." Adding more User Codes: To end programming: Press Press Enter 4-8 digit code "Completed." Press "Registered. Press the check key to complete.
- Page 17 Locking & Unlocking Door with Registered Master or User Code Enter Code Press P/N 80-9150-0080-010 (10-17)
- Page 18 Testing Outside Lever Operation Locking Door with Privacy Button P/N 80-9150-0080-010 (10-17)
- Page 19 4. Remove the interior escutcheon approximately 15 seconds. from the door to access the reset Speaker will announce "Welcome button on back of escutcheon. to Yale." Cables may stay connected. (See 10. Reassemble escutcheon by illustration at above for location of reversing steps 1-4.
- Page 20 Definitions All Code Lockout Mode: This feature is enabled by the Master code. When enabled, it restricts all user (except Master) code access. When attempting to enter a code while the unit is in Lockout, the locked padlock will appear on the screen. (Main Menu selection #6.) Automatic Re-lock Time: After a successful unlock, the unit will re-lock automatically after 5 seconds or for a duration selected in the Advanced Lock Settings...
- Page 21 Language Setting English Default settings Spanish in bold. French **This function appears only with Enable All Code Lockout Network or Yale Accentra Key module installed. Disable **Network Module Setting Join the network Exit the network **Set-up Digital Keys P/N 80-9150-0080-010 (10-17)
- Page 22 Programming Troubleshooting Symptom Suggested Action Touchscreen becomes active when pressed w/whole hand. • Lock does not respond – Use a larger area of the hand or fingers and verify contact with at least 3 areas. door is open and accessible. If touchscreen numbers are visible, check to see if they •...
- Page 23 Hardware Troubleshooting Cycle lock in both the locked and unlocked positions. If problems are found: Door is binding. Latchbolt will not deadlock. a. Either strike is out of alignment or the gap between door and jamb is too great. Realign strike or shim strike out towards flat area of latchbolt. Latchbolt does not retract or extend properly.
- Page 24 ASSA ABLOY Group company. All rights reserved. Reproduction in whole or in part without the express written permission of Yale Security Inc. is prohibited. YALE, with its unique global reach and range of products, is the world's favorite lock – the preferred solution for securing your home, family and personal belongings.
- Page 25 Yale Z -Wave Plus Module ® ® ® Installation and Programming Instructions Installing the Z -Wave Plus Module ® IMPORTANT: the batteries must be removed prior to removing and/or inserting the network module: • Remove battery cover and batteries. • Remove and/or insert Network Module.
- Page 26 Copyright © 2017, Yale Security Inc., an ASSA ABLOY Group company. All rights reserved. Reproduction in whole or in part without the express written permission of Yale Security Inc. is prohibited. YALE, with its unique global reach and range of products, is the world's favorite lock –...
- Page 27 Yale ZigBee Module ® ® ® Installation and Programming Instructions Installing the ZigBee Module ® IMPORTANT: the batteries must be removed prior to removing and/or inserting the network module: • Remove battery cover. • Remove batteries. • Remove and/or insert network module.
- Page 28 Copyright © 2017, Yale Security Inc., an ASSA ABLOY Group company. All rights reserved. Reproduction in whole or in part without the express written permission of Yale Security Inc. is prohibited. YALE, with its unique global reach and range of products, is the world's favorite lock –...
- Page 29 • Reinstall batteries and battery cover. Enrolling the iM1 Network Module: The Yale iM1 Network Module must be used with a Yale Assure Lock or Yale nexTouch Lock and cannot be used in conjunction with any other Yale Network Module.
- Page 30 Yale Locks & Hardware is a division of Yale Security Inc., an ASSA ABLOY Group company. Yale®, Yale Real Living® and Assure Lock® are registered trademarks of Yale Security Inc., an ASSA ABLOY Group Company. nexTouch™ is a trademark of Yale Security Inc., an ASSA ABLOY Group Company.
Need help?
Do you have a question about the nexTouch and is the answer not in the manual?
Questions and answers
Can I buy an outside return spring