Advertisement
Quick Links
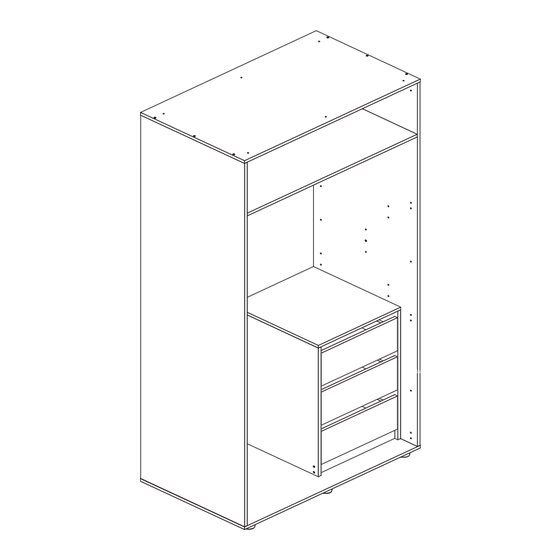
Atlas - Double Robe Carcass
Assembly Instructions -
Dimensions
Width - 100cm
Depth - 59.5cm
Height - 212.5cm
Important -
Please read these instructions fully before starting assembly
If you need help or have damaged or missing parts, call the Customer Helpline: 08456 400800
Please keep for future reference
IMPORTANT
This unit MUST be fixed to a wall
using both of the brackets supplied.
157/3309
151/4739
152/7458
There is the option of
purchasing an Internal 3
Drawer Chest that can be
placed inside your Robe
MADE IN
BRITAIN
Issue 2 - 05/02/14
Advertisement

Related Manuals for Argos Atlas 157/3309


Summary of Contents for Argos Atlas 157/3309
- Page 1 Atlas - Double Robe Carcass Assembly Instructions - 157/3309 Please keep for future reference 151/4739 152/7458 There is the option of purchasing an Internal 3 Drawer Chest that can be placed inside your Robe Dimensions Width - 100cm IMPORTANT Depth - 59.5cm MADE IN This unit MUST be fixed to a wall Height - 212.5cm...
-
Page 2: Care And Maintenance
Safety and Care Advice Important - Please read these instructions fully before starting assembly • Warning: This unit weighs • Make sure you have enough • We do not approximately 49kgs. space to layout the parts before recommend the Please lift with care. starting. - Page 3 If you have damaged or missing components, call the Components - Panels Customer Helpline: 08456 400800 quoting the reference numbers below Please check you have all the panels listed below Top/Base (D2395A) (1000 x 592mm) Fixed Shelf (D2397A) (968 x 590mm) 1 Universal End Hanging Rail (D2396A)
- Page 4 If you have damaged or missing components, call the Components - Fittings Customer Helpline: 08456 400800 quoting the reference numbers below Please check you have all the fittings listed below Note: The quantities below are the correct amount to complete the assembly. In some cases more fittings may be supplied than are required.
- Page 5 If you have damaged or missing components, call the Assembly Instructions Customer Helpline: 08456 400800 quoting the reference numbers below Step 1 If you are just Are you fitting 1 or 2 fitting 1 hanging hanging rails or, a rail, the fixed shelf pack? shelf will need to go here.
- Page 6 Assembly Instructions Step 3 Only follow Steps 2 and 3 if you are just fitting 1 hanging rail. If you are fitting 2 hanging rails, follow Step 4 and 5. Prepare the right end Refer to step 1 and, if you have chosen to fit 1 hanging rail, screw 2 metal dowels...
- Page 7 Assembly Instructions Step 5 Only follow Steps 4 and 5 if you are fitting 2 hanging rails. If you are just fitting 1 rail, follow Step 2 and 3. Prepare the right end Refer to step 1 and, if you have chosen to fit 2 hanging rails, screw 2 metal dowels into the...
- Page 8 Assembly Instructions Step 7 If you have fitted the 2 metal dowels in this position, the fixed Join the fixed shelf to shelf will go here. the right side Push the fixed shelf onto the right side Use a screwdriver to tighten the 2 large locking nuts fitted to...
- Page 9 Assembly Instructions Step 9 Prepare the base Screw the 6 feet into the shallow mark holes on the base using screws Finished front edge Step 10 Fit the base Attach the base the ends using 6 screws and tighten them using the allen key Finished Finished front edge...
- Page 10 Assembly Instructions Step 11 Unit colour on Fit the top the top surface Attach the top to the ends using 6 screws and tighten them using the allen key Finished front edge Step 12 The measurement from top corner X to bottom corner X must be equal to the measurement from top corner Y to bottom corner Y Fit the back Square up the unit by...
- Page 11 Assembly Instructions Step 13 IMPORTANT Fit the 2 brackets This unit MUST be fixed to a wall using both of the brackets supplied. To prevent possible The unit must be level and square overbalancing, we before fitting the brackets. recommend that this unit is secured to a suitable wall by use of the 2 brackets...
- Page 12 Door Chest If you need help or have damaged or missing parts, call the Customer Helpline: 08456 400800 and quote the reference numbers on the component pages. Argos Ltd, 489-499 Avebury Boulevard, Central Milton Keynes, MK9 2NW ALR2955...
Need help?
Do you have a question about the Atlas 157/3309 and is the answer not in the manual?
Questions and answers