Pitney Bowes K700 User Manual
Smart office series digital postage meter
Hide thumbs
Also See for K700:
- Operator's manual (89 pages) ,
- Networking manual (14 pages) ,
- Manual (109 pages)
Table of Contents
Advertisement
Quick Links
Advertisement
Table of Contents

Related Manuals for Pitney Bowes K700


Summary of Contents for Pitney Bowes K700
- Page 1 K700 Digital Postage Meter User Guide Canada English Version...
- Page 3 SV61503 Rev. A ©2005 Pitney Bowes Inc. All rights reserved. This book may not be reproduced in whole or in part in any fashion or stored in a retrieval system of any type or transmitted by any means, electronically or mechanically, without the express, written permission of Pitney Bowes.
- Page 4 Declaration of Conformity According to FCC Rules Part 2 , Paragraph 2.1077 This device, K700 digital postage meter, complies with Part 15 of the FCC Rules. Operation is subject to the following two conditions: (1) this device may not cause harmful interference, and (2) this device must accept any interference received, including interference that may cause undesired operation.
- Page 5 AAAEQ##TXXXX. The digits represented by ## are the REN without a decimal point (for example 03 is a REN of 0.3). If this equipment (K700 digital postage meter) causes harm to the telephone network, the telephone company will notify you in advance that temporary discontinuance of service may be required.
- Page 6 This equipment is not intended to be serviceable. Please refer to the warranty information if problems occur. Failed units will be returned to the Pitney Bowes U.S. Service Center. For reference purposes, the Pitney Bowes U.S. Service Center contact address is: Pitney Bowes Inc., 1 Elmcroft Road, Stamford, CT, 06926-0700, (800) 522-...
-
Page 7: If You Need Assistance
• For support, go to: www.pitneybowes.ca • To order Pitney Bowes supplies and accessories, call 1-800-672-6937 and follow the telephone prompts, or go to: www.pitneybowes.ca and click on Online Store. • All other inquiries can be done by calling 1-800-672-6937 and following the telephone prompts. - Page 8 SV61503 Rev. A...
-
Page 9: Table Of Contents
1 • Introduction About the Pitney Bowes Small Office Series™ ... 1-1 About Your Digital Postage Meter ... 1-1 About Downloads to Your Postage Meter ... 1-2 Postal Requirements ... 1-3 Other Sources of Information - Quick Reference Guide ... 1-4 Specifications ... - Page 10 Checking Your Account Balance in the Postage By Phone® System ... 5-3 Adding Postage to Your Postage Meter ... 5-4 Connecting to the Pitney Bowes Data Centre ... 5-5 Downloads from the Data Centre to Your Postage Meter ... 5-5 6 • System Settings Machine Settings ...
- Page 11 7 • Ink Maintenance Low Ink Warnings ... 7-1 Replacing the Ink Cartridge ... 7-1 Printing Test Pattern ... 7-3 Cleaning Printer Nozzles ... 7-4 Replacing the Print Head ... 7-4 Replacing the Ink Tray ... 7-5 8 • Reports Funds Report ...
- Page 12 Table of Contents 11 • Supplies and Options Supplies and Accessories ...11-1 Options ...11-1 Appendix A When is Text Entry Used? ... A-1 How is Text Entry Done? ... A-1 Account Names ... A-1 Special Characters ... A-2 Glossary Index SV61503 Rev.
-
Page 13: Introduction
About the Pitney Bowes Small Office Series™ Pitney Bowes Small Office Series™ is a line of unique mailing solu- tions for small businesses and those with home offices. The line has products for all volumes and types of postage usage from less than $30/month in postage to $300/month and more as well as products developed specifically for people shipping mostly packages. -
Page 14: About Downloads To Your Postage Meter
Add Envelope Ads You can add envelope ads when needed. Please contact Pitney Bowes to order (see Pitney Bowes Contact List at start of guide). Keep Your Postage Meter Current Software download capability means you'll always have the latest version of your postage meter's operating system. -
Page 15: Postal Requirements
90 days, the display prompts "Inspection Required." You won't be able to use your postage meter until you add post- age or connect to the Pitney Bowes Data Centre for inspection. • The tape sheets for putting postage on larger items must con- form to postal specifications. -
Page 16: Other Sources Of Information - Quick Reference Guide
1 • Introduction Other Sources of Information - Quick Reference Guide Don't like reading manuals? Try the Quick Reference Guide located in the front pull-out tray. It has condensed versions of many of the topics covered in this book. Specifications Equipment Size of Base Model: 8.4”... -
Page 17: Meter Settings
Meter Settings Maximum Imprint: $99.99 Reset Type: Postage-By-Phone Material (see figure below) Minimum Size: 5" x 3.5" (127 mm x 89 mm) Minimum Thickness: 0.007" (0.18 mm) Maximum Thickness: 5/16" (8.0 mm) IMPORTANT: For best results, always make sure your material conforms to our published specifications. -
Page 18: Important Safety Notes
• To obtain Pitney Bowes supplies, please contact our Supply Line to place orders. Material Safety Data Sheets can be obtained on the web or from the Supply Line. Refer to the Contact Informa- tion List in this guide for phone number and web address infor- mation. - Page 19 To prevent overheating, do not cover the vent openings. CAUTION: In case of an ink spill or leaking ink, im- mediately disconnect the power cord from the wall plug and contact Pitney Bowes at (see Pitney Bowes Contact List at front of guide). SV61503 Rev. A...
-
Page 20: Important Telephone Safety Instructions
1 • Introduction Important Telephone Safety Instructions The digital postage meter connects directly to analog telephone lines. For your protection, basic safety precautions should always be followed to reduce the risk of fire, electric shock, and injury to per- sons. These safety precautions include: CAUTION: To reduce the risk of fire, use only 26 AWG telecommunication line cord that was sup- plied with the digital postage meter. -
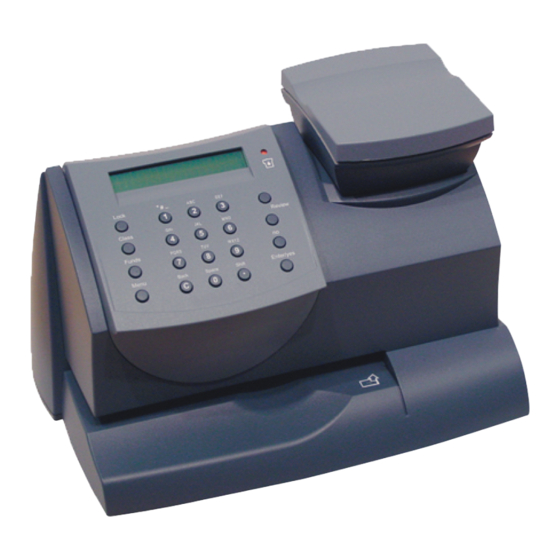
Page 21: Getting To Know Your Postage Meter
Getting to Know Your Postage Meter Digital Postage Meter–Front 1. Control Panel—allows you to enter and set up information on your meter. 2. LED—lights amber when your postage meter is low on ink (one blink indicates the postage meter is out of ink). 3. -
Page 22: Control Panel
2 • Getting to Know Your Postage Meter Control Panel Lock Verrouiller Class Classe Funds Fonds Menu 1. LCD Display—shows the current status of your postage meter and prompts you through all setup operations in a two-line LCD. 2. Lock Key—Prevents unauthorized use of your postage meter if lock feature is set up and postage meter is in "sleep mode";... -
Page 23: Digital Postage Meter-Rear
2 • Getting to Know Your Postage Meter Digital Postage Meter–Rear 1. Phone Jack—allows you to connect to an analog phone line (the same type of line that a Fax machine uses). The jack accepts a standard RJ-11 phone plug (supplied). When your postage meter is connected to an analog phone line, you can add postage any time by pressing Funds and following the prompts. - Page 24 2 • Getting to Know Your Postage Meter SV61503 Rev. A...
-
Page 25: Running Mail
Checklist Before Running Mail Before you run mail on your digital postage meter, review these items: • Make sure your postage meter is plugged into a properly ground- ed, 110 VAC receptacle. Always follow the safety precautions listed in Section 1- Introduction. •... -
Page 26: Determining The Amount Of Postage To Use
3 • Running Mail Determining the Amount of Postage to Use The amount of postage on a mail piece is based on CPC regulations and involves factors such as: • class of mail • weight • how fast you want the mail piece delivered •... -
Page 27: Processing A Letter Using The Optional Scale
Processing a Letter Using the Optional Scale All mail pieces under 500g are considered Lettermail and the post- age for these items must be calculated using the internal rating feature. The following outlines the procedure for rating Lettermail. NOTE: You cannot key in a postage value for an item that falls within a valid Lettermail postage amount. -
Page 28: Processing A Letter Without Optional Scale
3 • Running Mail Processing a Letter Without Optional Scale Use this method when you already know the weight of a mail piece and you are not using the optional scale. 1. Press Menu. 2. Use the Review keys to scroll and select "Type in a Weight?”. 3. -
Page 29: Processing Parcels
Processing Parcels NOTE: The K700 postage meter does not provide rates for packages. To process a package you must know the amount of postage for your weight of your package and the method in which you want to send it. -
Page 30: Adding More Postage To Correct A Mail Piece
3 • Running Mail Adding More Postage to Correct a Mail Piece In the event that a mail piece is rated incorrectly or an incorrect post- age value is entered for a parcel, you can add additional postage by printing a unique Postage Correction meter stamp. Follow the steps below. -
Page 31: Correcting The Date On A Mail Piece
Correcting the Date on a Mail Piece In the event that a mail piece has an incorrect date on its meter stamp, you can fix the date by printing a unique Date Correction me- ter stamp. Follow the steps below. 1. -
Page 32: Printing A Statement Of Mailing Or Manifest Payment
3 • Running Mail Printing a Statement of Mailing or Manifest Payment If you have a Canada Post Distribution Services Contract Agreement and you wish to use your postage meter as a method of payment for Canada Post Distribution products (Regular Parcel, Xpresspost, Priority Courier, Expedited Parcel), you must complete a Manifest. -
Page 33: Printing Options
Printing Options There are various printing options available when processing mail through your digital postage meter. Refer to the table below. Printing Option Print a normal meter stamp (postage indicia). Add an envelope ad as part of the meter stamp Print the date and time only (no meter stamp) Print the envelope ad only (no meter stamp) Sections of the Meter Stamp... -
Page 34: Auto-Advance Of Printed Date For The Meter Stamp
4 • Printing Options Auto-Advance of Printed Date for the Meter Stamp The postage meter automatically advances the printed date on the meter stamp (as well as its internally held date) when the system time reaches 12:00 AM. Manually Changing Printed Date for the Meter Stamp You may want to advance the date printed on the meter stamp if it is after normal business hours and you want to prepare outgoing mail for a future business day's mailing. -
Page 35: Adding/Removing An Envelope Ad To The Meter Stamp
3. A message confirms your choice and the main screen displays. Purchasing other Envelope Ads for Your Postage Meter If you want another envelope ad, contact Pitney Bowes (see the Pitney Bowes Contact List at start of this guide). Ready-made items can be purchased and downloaded directly into your postage meter. -
Page 36: Printing Envelope Ad Only (No Meter Stamp)
4 • Printing Options Printing Envelope Ad Only (no meter stamp) You may want to use this feature to add your company's message to incoming mail. 1. Press Menu. 2. Use the Review keys to scroll and select "Change meter stamp type?”. -
Page 37: Adding Postage
Postage By Phone® meter payment account (send in a check, direct withdrawal, establish cred- it, etc.). See the Pitney Bowes Contact List at start of this guide to call for further information. -
Page 38: Connecting Your Postage Meter To Analog Phone Line
Connecting Your Postage Meter to Analog Phone Line Your postage meter must be con- nected to an analog phone line to dial in to the Pitney Bowes Data Centre for any reason (add postage, check the balance in your Pitney Bowes Postage By Phone®... -
Page 39: Checking Your Account Balance In The Postage By Phone® System
2. Press Funds. The amount left in the postage meter displays. 3. Use the Review keys to scroll and select "Check amt available to download?". 4. The postage meter dials into the Pitney Bowes Data Centre. When connected, the amount in your Postage By Phone® (PbP) system account displays. -
Page 40: Adding Postage To Your Postage Meter
$1. 5. At the refill amount confirmation prompt, press Enter/yes. 6. The postage meter dials into the Pitney Bowes Data Centre. Var- ious screens displays, letting you know the status of the process. -
Page 41: Connecting To The Pitney Bowes Data Centre
5 • Adding Postage/Connecting to Data Centre Connecting to the Pitney Bowes Data Centre You can connect to the Pitney Bowes Data Centre any time to download a feature you ordered, comply with CPC inspection regulations, etc. 1. Connect your postage meter to an analog phone line. - Page 42 Postal/ZIP Code Update If the Postal Code on record at the Pitney Bowes Data Centre does not match the Postal Code of your postage meter, the code will be downloaded into your postage meter.
-
Page 43: Machine Settings
Machine Settings Machine Settings Machine settings allow you to customize your digital postage meter for the way you run your mail and add security to those features that are sensitive to your organization. These settings include: • Setting system time •... -
Page 44: Setting Display Contrast
6 • Machine Settings Setting Display Contrast You can adjust the LCD display contrast if necessary. 1. Press Menu. 2. Use the Review keys to scroll and select "Change set up". 3. Use the Review keys to scroll and select "Change display con- trast?". -
Page 45: Turning The Preset Feature On Or Off
Turning the Preset Feature On or Off 1. Press Menu. 2. Use the Review keys to scroll and select "Change setup?". 3. Use the Review keys to scroll and select "Use preset setup?". Turning ON Preset - Press Enter/yes at "Turn preset ON?" prompt. -
Page 46: Viewing The Preset
6 • Machine Settings Viewing the Preset 1. Press Menu. 2. Use the Review keys to scroll and select "Use preset setup?". 3. Use the Review keys to scroll and select "View stored preset?". Scroll through the preset values of class, postage amount, ac- count, etc. -
Page 47: Printing The Batch Count Information
Printing the Batch Count information 1. Press Menu. 2. Use the Review keys to scroll and select "Select a report?". 3. Use the Review keys to scroll and select "Print funds report?”. When prompted, insert an envelope or tape strip into the mail slot. -
Page 48: Setting/Disabling The Lock Code
6 • Machine Settings Setting/Disabling the Lock Code The lock code prevents unauthorized access to your system after the postage meter has been powered up and/or has entered sleep mode. 1. Press Menu. 2. Use the Review keys to scroll and select "Change Setup". 3. -
Page 49: Activating Sleep Mode Manually
Activating Sleep Mode Manually You can put the postage meter into "sleep mode" at any time. When the postage meter is in sleep mode, the display is blank (except for the time in the lower right) and you can't process mail. You awaken the postage meter by merely pressing any button on the control panel. -
Page 50: Weight Hold Mode
6 • Machine Settings Weight Hold Mode The weight hold mode, when activated (see instructions below), al- lows you to rate a piece of mail even if the weight is removed from the scale. You would use this mode when the size of the mail piece covers the display screen. -
Page 51: Setting The Low Funds Warning
Setting the Low Funds Warning You can have the postage meter warn you when your postage (funds) in the machine reaches a certain amount. This warning acts as a reminder for you to add more postage to your machine (by con- necting to the Data Centre and downloading funds). -
Page 52: Changing Language
6 • Machine Settings Changing Language You can change the language on the display to English or Français. 1. Press Menu. 2. Use the Review keys to scroll and select: English to French: "Change to Français" French to English: "Changer pour English" 3. -
Page 53: Ink Maintenance
Low Ink Warnings Your actual ink usage will vary, based on how frequently you use the postage meter, the graphic printed and environmental conditions. The postage meter display tells you when the ink supply is low or ex- hausted. “Low Ink" and amber LED lit - Replace the ink cartridge soon. If you don’t have a replacement cartridge on hand, you should order one now (see 11 - Supplies, Options and Accessories). - Page 54 7 • Ink Maintenance Replacing the Ink Cartridge (continued) 5. Press the top of the ink cartridge latch (on the green "unlock" icon). 6. Tilt the old cartridge towards you and lift out. Discard old cartridge. 7. Remove new cartridge from its package and pull off protective tape.
-
Page 55: Printing Test Pattern
Replacing the Ink Cartridge (continued) 10. Close postage meter cover. Press Enter/yes. 11. Press Enter/yes to confirm the replacement. A print head initial- ization occurs which lasts about 2-3 minutes. 12. When prompted, insert an envelope/tape sheet to print a test pat- tern to confirm print quality. -
Page 56: Cleaning Printer Nozzles
Replacing the Print Head IMPORTANT: This procedure should only be done under the direc- tion of or with the permission of a Pitney Bowes representative. 1. Press Menu. 2. Use the Review keys to scroll and select "Use ink functions?". -
Page 57: Replacing The Ink Tray
Replacing the Ink Tray IMPORTANT: This procedure should only be done under the direc- tion of or with the permission of a Pitney Bowes representative. 1. Press Menu. 2. Use the Review keys to scroll and select "Use ink functions?". - Page 58 7 • Ink Maintenance SV61503 Rev. A...
-
Page 59: Reports
Reports Your postage meter allows you to view and print reports for funds us- age, postage refills, postage tracked by account, and other valuable data. The printable reports are done right from your postage meter on an envelope or tape sheet. Funds Report A funds report allows you to print a record of how much postage has been used and how much is remaining in the postage meter. -
Page 60: Accounting Report
8 • Reports Accounting Report You can view and print your account totals any time. You may want to do this before you clear or delete an account, such as at the end of a fiscal year. 1. Press Menu. 2. -
Page 61: Software Version Report
Software Version Report This report lists software information about your postage meter. 1. Press Menu. 2. Use the Review keys to scroll and select "Select a report?". 3. Use the Review keys to scroll and select "Print Software Version report?". 4. - Page 62 8 • Reports SV61503 Rev. A...
-
Page 63: Optional Departmental Accounting Feature
Departmental Accounting (Optional) Optional Departmental Accounting Feature When you purchase the optional accounting feature, you can set your postage digital postage meter up to track postage costs in- curred by individuals or departments in your organization (e.g., Tom, Jane, Sales, Purchasing, etc.), up to five or ten accounts (depending on option purchased). -
Page 64: Creating An Account
9 • Departmental Accounting (Optional) Creating an Account You need to create an account before you can use the departmental accounting feature to track postage. 1. Press Menu. 2. Use the Review keys to scroll and select "Use Accounting func- tions?". -
Page 65: Editing An Existing Account
9 • Departmental Accounting (Optional) Editing an Existing Account You can edit an account name and password if you wish. 1. Press Menu. 2. Use the Review keys to scroll and select "Use Accounting functions?". 3. Use the Review keys to scroll and select "Edit an existing Account?". -
Page 66: Printing An Accounting Report
9 • Departmental Accounting (Optional) Printing an Accounting Report You can view and print your account totals any time. You may want to do this before you clear or delete an account, such as at the end of a fiscal year. 1. -
Page 67: Clearing All Or Some Of The Accounts
9 • Departmental Accounting (Optional) Clearing All or Some of the Accounts You can clear the postage totals on an account when necessary (for example, at the end of a fiscal year). IMPORTANT: Make sure your really want to clear an account. Once you do, the account information is gone forever. -
Page 68: Deleting An Account
9 • Departmental Accounting (Optional) Deleting an Account You can delete an account when necessary. IMPORTANT: Make sure your really want to delete an account. Once you do, the account information is gone forever. We suggest you print an accounting report first (see earlier topic) before deleting. 1. -
Page 69: Troubleshooting
In many cases, it can help you resolve the problem. If you need to contact Pitney Bowes, please have the following infor- mation at hand: • Product Model: K700 Serial number: See the back of the postage meter. -
Page 70: Nothing Displays
"1103", "2215", etc.), press Clear. If nothing happens in 5 sec- onds, turn off machine; wait 15 seconds, and then turn on machine. If problem persists, call Pitney Bowes (see Pitney Bowes Contact List at the start of this guide). -
Page 71: Display Is Difficult To Read
Display is Difficult to Read You can adjust the LCD display contrast if necessary. 1. Press Menu. 2. Use the Review keys to scroll and select "Change setup". 3. Use the Review keys to scroll and select "Change display contrast?". 4. -
Page 72: Accidentally Printing The Wrong Postage
10 • Troubleshooting Accidentally Printing the Wrong Postage Once you have printed a meter stamp, the postage funds have been “used up” by the machine, even if the printing is illegible. That’s why it is so important to make sure the correct value is shown on the ma- chine before inserting the mail piece or tape sheet, and that you do not let the ink level get too low. -
Page 73: Supplies And Options
Pitney Bowes offers a number of flexible options so you can tailor your postage digital postage meter to meet your exact needs today, and expand it as your business grows tomorrow. Contact Pitney Bowes to order these options (see Pitney Bowes Contact List at start of this guide). •... - Page 74 11 • Supplies and Options 11-2 SV61503 Rev. A...
-
Page 75: Enter Text
Appendix A Enter Text How to When is Text Entry Used? Text is entered when naming an account (with optional Departmental Accounting). How is Text Entry Done? Text entry is done via the numeric keypad in a fashion similar to cur- rent cell phone text entry. -
Page 76: Special Characters
Appendix A • How to Enter Text Special Characters Special characters are accessed by repeatedly pressing the “1” key. Special characters include: Symbol Name Comma & Ampersand Asterisk Period Colon Currency symbol Minus sign (dash) Question mark Forward slash Backward slash Open parenthesis Close parenthesis Exclamation point... -
Page 77: Glossary
Account—A department (e.g., “Human Resources”) to which post- age is charged (optional feature). You can assign a unique name to each account (up to 5 or 10 accounts, depending on feature pur- chased). The postage digital postage meter stores the total postage used and the number of mail pieces processed for each account. - Page 78 Postage By Phone® Meter Payment System—A service available through Pitney Bowes that allows you to buy postage and check account status over the phone. It also permits convenient postal in- spection by phone.
-
Page 79: Index
Accessories. See Options Accounting feature Clearing all or some of the accounts 9-5 Creating an account 9-2 Deleting an account 9-6 Editing an existing account 9-3 Printing an accounting report (single and mulitple) 9-4 Setting passwords 9-2 Turning feature ON or OFF 9-1 Viewing account totals 9-3 Account No. - Page 80 Index Data Centre (Pitney Bowes) Downloads available 5-5 Problems dialing into 10-3 When you access 1-3, 5-5 Date Auto-advance of date 4-2 How it shows on meter stamp 4-1 Manually changing printed date 4-2 Printing date/time on incoming mail 4-4 Digital indicia.
- Page 81 High value warning Explanation and setting 6-2, 6-8 Important safety notes 1-6 Important telephone safety instructions 1-8 Incoming mail Printing options 4-3 Indicia. See Meter stamp Ink cartridge Having a spare available when printing 3-1 Low ink warnings 7-1 Part number for new one 11-1 Replacing 7-1 Ink maintenance Cleaning printer nozzles 7-4...
- Page 82 Index Machine settings Activating sleep mode manually 6-7 Entering the prefix for dialing out to data centre 6-9 Selecting tone/pulse for dialing out to data centre 6-9 Setting/Disabling the lock code 6-6 Settings for the optional scale 6-7 Setting display contrast 6-2 Setting sleep mode activation time 6-6 Setting system time 6-1 Setting the high value warning 6-8...
- Page 83 Phone jack, location and use 2-3 Phone line Connecting your postage meter to analog phone line viii, 5-2 Pitney Bowes Contact List v Pitney Bowes Data Centre. See Data Centre (Pitney Bowes) Pitney Works Definition on refill screen 5-3 Postage...
- Page 84 Index Postal requirements 1-3, 3-2 Power receptacle 2-3 Prepaid on account Definition on refill receipt 5-4 Preset feature Explanation 6-2 Recalling preset 6-4 Storing a new one 6-3 Turning on or off 6-3 Viewing existing preset 6-4 When preset values are activated 6-2 Printing a funds (postage) report 5-1 Printing options 4-1 Print the date and time only 4-1, 4-3...
- Page 85 Serial port, location and use 2-3 Settings. See Machine settings Sleep mode Definition 6-6, B-2 Manual activation 6-6 Setting sleep mode activation time 6-6 Values present when awakened 6-2 Small Office Series™ 1-1 Software updates 5-6 Specifications Equipment 1-4 Material 1-5 Meter settings 1-5 Supplies E-Z Seal®...
- Page 86 Index Updates (downloaded into your meter) 5-5 USB Port, location and use 2-3 Weighing with optional scale Processing a Letter Using the Scale 3-3 View avoirdupois weight 6-7 Weight Hold Mode (using scale) 6-8 SV61503 Rev. A...
- Page 88 5500 Explorer Drive Mississauga, Ontario L4W 5C7 www.pitneybowes.ca For Service or Supplies PB Form SV61503 Rev. A 6/05 © 2005 Pitney Bowes Inc. All Rights Reserved Printed in the USA or Canada Printed on recyclable paper *SV61503REVA*...
Need help?
Do you have a question about the K700 and is the answer not in the manual?
Questions and answers