Crestron DM-NVX-350 Product Manual
Dm-nvx series digitalmedia 4k60 4:4:4 hdr network av encoders/decoders
Hide thumbs
Also See for DM-NVX-350:
- Product manual (96 pages) ,
- Quick start manual (9 pages) ,
- Do manual (2 pages)

Related Manuals for Crestron DM-NVX-350


Summary of Contents for Crestron DM-NVX-350
- Page 1 DM-NVX Series DigitalMedia™ 4K60 4:4:4 HDR Network AV Encoders/Decoders Product Manual Crestron Electronics, Inc.
- Page 2 Other trademarks, registered trademarks, and trade names may be used in this document to refer to either the entities claiming the marks and names or their products. Crestron disclaims any proprietary interest in the marks and names of others. Crestron is not responsible for errors in typography or photography.
-
Page 3: Table Of Contents
Contents Introduction Physical Description DM-NVX-350 and DM-NVX-351 ..................2 Front Panel......................2 Rear Panel ......................3 DM-NVX-350C and DM-NVX-351C ................4 Configuration Encoding and Decoding Functionality ................6 Configuration Using the Web Interface ..............7 Configuration Using SIMPL Windows ..............7 Stream Statistics ...................... - Page 4 USB 2.0 Routing......................21 Configuration Using the Web Interface ..............21 Configuration Using SIMPL Windows ..............22 HDCP 2.2 Compliance IGMP Snooping Troubleshooting Appendix: Device Discovery ii • Contents Product Manual – DOC. 7839D...
-
Page 5: Introduction
DM-NVX-350C and DM-NVX-351C cards. The cards are designed to occupy the DMF-CI-8 card chassis. The DM-NVX-351 and DM-NVX-351C provide the same functionality as the DM-NVX-350 and DM-NVX-350C with the addition of surround sound to stereo downmixing. This manual provides information about the following: •... -
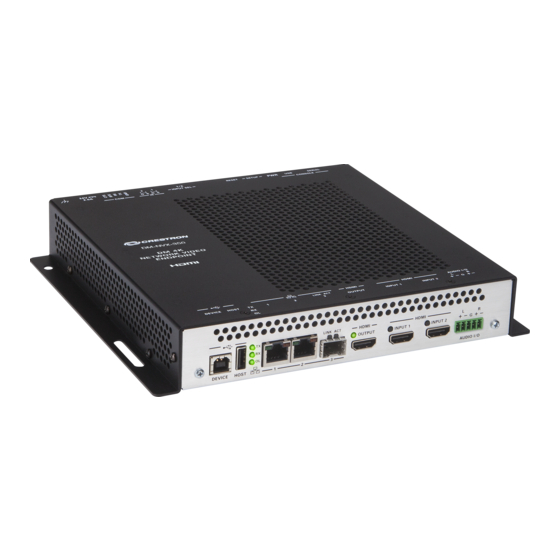
Page 6: Physical Description
Power pack included Ground: 6-32 screw; Chassis ground lug * Device control via RS-232, IR, CEC, or Ethernet requires integration with a Crestron control system. 2 • DM-NVX Series: 4K60 4:4:4 HDR Network AV Encoders/Decoders Product Manual – DOC. 7839D... -
Page 7: Rear Panel
LAN connection, the port requires connection to a 1000BASE-T switch in order to stream network video. The DM-NVX-350 and DM-NVX-351 can be powered by the connection of LAN 1 to a Crestron DM-PSU-ULTRA-MIDSPAN or other Crestron approved power injector (sold separately). Refer to Online Help Answer ID 5791 for additional information. -
Page 8: Dm-Nvx-350C And Dm-Nvx-351C
LAN 3 can be used as the primary LAN connection or can be connected to another DM-NVX device. LAN 3 can connect to a fiber-optic network using the appropriate Crestron SFP-1G transceiver module (sold separately). Refer to the SFP-1G Series Installation Guide (Doc. 7979) for information about installing Crestron SFP-1G series transceiver modules. - Page 9 LAN 3 can be used as the primary LAN connection or can be connected to another DM-NVX device. LAN 3 can connect to a fiber-optic network using the appropriate Crestron SFP-1G transceiver module (sold separately). Refer to the SFP-1G Series Installation Guide (Doc. 7979) for information about installing Crestron SFP-1G series transceiver modules.
-
Page 10: Configuration
Configuration The DM-NVX series can be configured using the web interface, which can be accessed from a web browser by entering the IP address or hostname of the device. SIMPL Windows can also be used to configure the DM-NVX series. This section provides information about configuration of the following items using the web interface or SIMPL Windows: •... -
Page 11: Configuration Using The Web Interface
Configuration Using the Web Interface Configure a DM-NVX device as an encoder or decoder on the Stream page of the web interface. In the Mode drop-down list, select Receiver or Transmitter. The default setting is Receiver (decoder). Stream Page - Encoder (Transmitter) or Decoder (Receiver) Configuration When a different mode is selected, a prompt appears asking for confirmation that the device be rebooted. -
Page 12: Configuration Using The Web Interface
Configuration Using the Web Interface Configure stream statistics on the Stream page of the web interface. In the Statistics section of the page, set Statistics to Enable or Disable. To reset statistics, click Reset Statistics. For additional information, refer to the online help of the web interface. Stream Page - Statistics Configuration Configuration Using SIMPL Windows Configure stream statistics in Slot-01: Stream Transmit or Slot-02: Stream Receive. -
Page 13: Configuration Using Simpl Windows
Configuration Using SIMPL Windows Using top-level programming for the DM-NVX device, configure automatic routing of inputs. Trigger the <AutomaticRoutingEnabled> digital input join to enable automatic routing. To disable automatic routing, trigger the <AutomaticRoutingDisabled> digital input join. For additional information, refer to the SIMPL Windows help file. Video Wall Processing NOTE: Video wall processing applies only to DM-NVX devices that function as receivers. -
Page 14: Configuration Using Simpl Windows
Output Page - Video Wall Configuration Configuration Using SIMPL Windows Configure a video wall in Slot-06: HDMI OUT as follows: 1. Set the <VideoWallMode>, <Horizontal_Bezel_Compensation>, and <Vertical_Bezel_Compensation> analog input joins to the desired values. 2. Repeat step 1 for each DM-NVX receiver that connects to a display for inclusion in the video wall. -
Page 15: Configuration Using The Web Interface
Configuration Using the Web Interface Configure underscan on the Output page of the web interface. In the HDMI Output Setting section of the page, configure underscan in the Underscan drop-down list by selecting the desired percentage or by selecting Custom. If Custom is selected, enter the desired percentage. -
Page 16: Configuration Using Simpl Windows
Output Page - HDMI Output Resolution Configuration Configuration Using SIMPL Windows Configure the output resolution in Slot-06: HDMI Out. Set the <Resolution> analog input join to the desired value. For additional information, refer to the SIMPL Windows help file. Maximum Color Depth and Color Space Mode Configure the maximum color depth (maximum bit depth supported by the output) and HDMI color space mode using the web interface or SIMPL Windows. -
Page 17: Configuration Using Simpl Windows
Output Page - HDMI Output Maximum Color Depth and Color Space Mode Configuration Using SIMPL Windows Configure maximum color depth and color space mode in Slot-06: HDMI Out. Set the <MaximumColorDepth> analog input join to the appropriate value for the maximum bit depth supported by the output. -
Page 18: Subscriptions
Main Inputs Page - EDID Configuration Input-Specific Page - EDID Configuration (HDMI Input 1 Page Shown) Subscriptions NOTE: Subscriptions apply only to a DM-NVX device that functions as a receiver. Subscription of a DM-NVX transmitter to a DM-NVX receiver sets up Real Time Streaming Protocol (RTSP) negotiation between the DM-NVX receiver and the DM-NVX transmitter. -
Page 19: Configuration Using The Web Interface
Configuration Using the Web Interface Configure subscriptions on the Subscriptions and Routing pages of the web interface as follows: 1. On the Subscriptions page, do either of the following: a. In the Subscribed Streams section, manually add each transmitter that is to be subscribed to the receiver or load one or more existing subscription lists (*.xiolist). -
Page 20: Configuration Using Simpl Windows
2. In the Xio-Routing section of the Routing page, select the desired transmitter to be routed to the receiver. Routing Page For additional information, refer to the online help of the web interface. Configuration Using SIMPL Windows NOTE: Selection of the transmitters for subscription or selection of subscription lists can be performed using the web interface only. -
Page 21: Switching Subscribed Transmitters
Switching Subscribed Transmitters To switch transmitters that are subscribed to a receiver in a daisy chain configuration, use the web interface or SIMPL Windows. Configuration Using the Web Interface To switch subscribed transmitters in a daisy chain configuration, do the following in the Xio-Routing section of the Routing page: 1. -
Page 22: 7.1 Surround Sound Audio
HDMI inputs. NOTE: Analog audio output from a DM-NVX-350 or DM-NVX-350C is functional only when the device is receiving a 2-channel stereo input signal. The DM-NVX-351 and DM-NVX-351C can derive a 2-channel downmix signal from a multichannel surround sound source. -
Page 23: Configuration Using The Web Interface
Configuration Using the Web Interface Configure analog audio on the Routing and Output pages of the web interface as applicable: 1. On the Routing page, set Analog Audio Mode to Insert or Extract. Routing Page - Analog Audio Mode Configuration 2. -
Page 24: Configuration Using Simpl Windows
Configuration Using SIMPL Windows NOTE: To insert or extract analog audio, use the web interface. Using top-level programming for the DM-NVX device, set the <AudioSource> analog input join to Analog Audio if analog audio is to be inserted into a network video stream or the HDMI output. - Page 25 NOTE: DM-NVX devices are engineered to deliver maximum compatibility with the widest possible range of USB products. Crestron does not guarantee that all USB products are compatible with DM-NVX devices. NOTE: When using high-traffic USB devices, bandwidth management must be considered.
- Page 26 USB Routing Page For additional information, refer to the online help of the web interface. Configuration Using SIMPL Windows Using SIMPL Windows, configure USB routing in Slot 30: USB by doing the following: 1. Determine the two DM-NVX devices that are to be paired: •...
- Page 27 HDCP 2.2 Compliance The DM-NVX series is compliant with HDCP 2.2. HDCP 2.2, commonly referred to as HDCP 2, is the next generation of HDCP (High-Definition Content Protection). Note the following about HDCP 2: • Compared to HDCP 1, HDCP 2 brings a higher level of cryptographic protection to HDMI technology.
- Page 28 IGMP Snooping A DM-NVX device sends IGMP join and leave messages. NOTE: DM-NVX devices support IGMPv2 and IGMPv3 only. IGMPv1 is not supported. The IGMP snooping support version (v2 or v3) is configurable in the web interface. The Network Interface section of the Network page allows the desired version to be selected.
- Page 29 In addition to building and maintaining lists of multicast group memberships, the snooping switch must also maintain a list of multicast routers. When multicast packets are forwarded, the packets should be forwarded not only on ports that have expressed joins using IGMP but also on ports to which multicast routers are attached.
-
Page 30: Troubleshooting
Troubleshooting The following table provides troubleshooting information. If further assistance is required, contact a Crestron customer service representative. DM-NVX Troubleshooting TROUBLE POSSIBLE CAUSE(S) CORRECTIVE ACTION 4K60 4:4:4 2-channel The display device is not Configure the display device non-HDR or 4K60 4:4:4 configured properly. - Page 31 An incorrect audio source is Set the audio source to analog selected. audio. The audio is multichannel Switch the audio input to on a DM-NVX-350 or 2-channel audio. DM-NVX-350C, which do not downmix a 2-channel signal from a multichannel surround sound source.
- Page 32 • On the Device page of the web interface, click the Restore button. • From the Tools menu in the Crestron Toolbox software, select Text Console and issue the restore command. • Power cycle the device 10 times.
- Page 33 Appendix: Device Discovery A DM-NVX device can be discovered on the network by using the Device Discovery Tool within the Crestron Toolbox software. To discover a DM-NVX device, do the following: 1. Open the Crestron Toolbox software. 2. From the Tools menu, select Device Discovery Tool.
- Page 34 Device Administration Login Page 6. Enter the user name and password. The default user name is admin, and the default password is admin. NOTE: The user name and password are case sensitive. 7. Click Sign In. The Status page of the DM-NVX device opens. For additional information, refer to the online help of the web interface.
- Page 35 This page is intentionally left blank. DM-NVX Series: 4K60 4:4:4 HDR Network AV Encoders/Decoders • 31 Product Manual – DOC. 7839D...
- Page 36 Crestron Electronics, Inc. Product Manual – DOC. 7839D 15 Volvo Drive Rockleigh, NJ 07647 (2045243) Tel: 888.CRESTRON 09.17 Fax: 201.767.7576 Specifications subject to www.crestron.com change without notice.
Need help?
Do you have a question about the DM-NVX-350 and is the answer not in the manual?
Questions and answers