Advertisement
Available languages
Available languages
Quick Links
Advertisement

Related Manuals for Lionelo Henny


Summary of Contents for Lionelo Henny
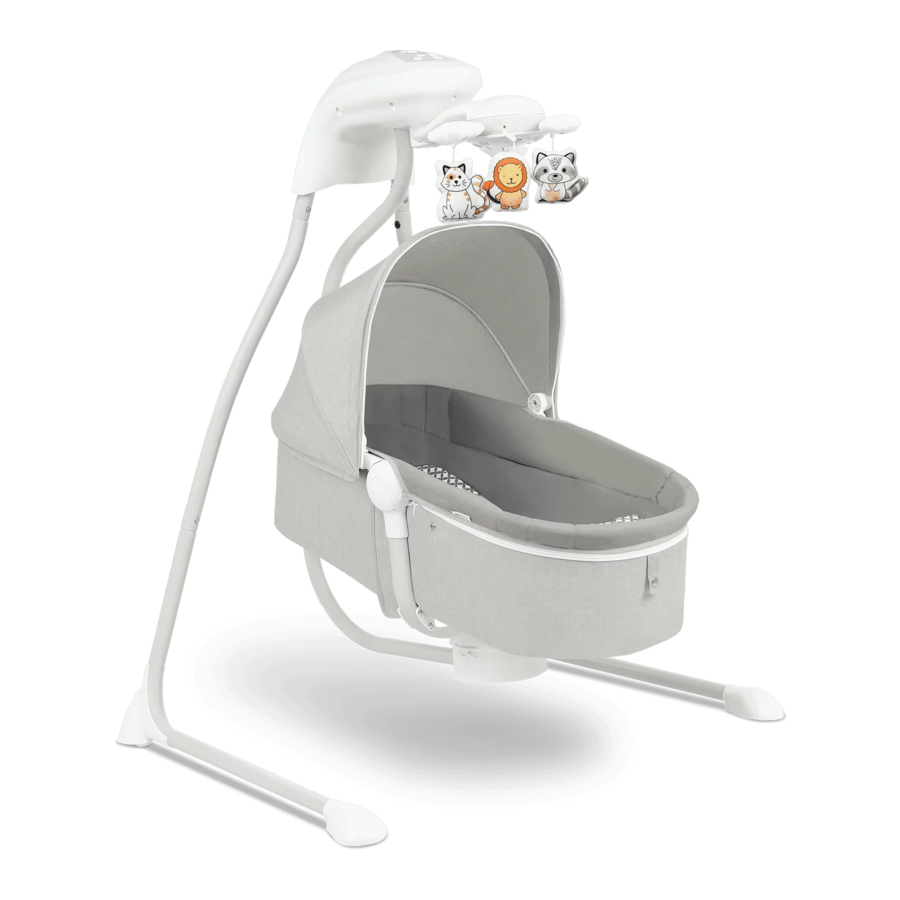
- Page 1 Instrukcja obsługi User manual HENNY bujaczek baby swing WWW.LIONELO.COM...
- Page 3 WWW.LIONELO.COM...
- Page 4 Wstęp Drogi Kliencie! Dziękujemy za obdarzenie nas zaufaniem i wybranie marki Lionelo. Nasze produkty wykonywane są z największą starannością, by zapewnić Twojemu dziecku komfort korzystania, równo- cześnie dbając o jego bezpieczeństwo. Dzięki wykorzysta- niu wysokiej jakości materiałów i nowoczesnych rozwiązań...
- Page 5 Uwaga! • Bujaczek przeznaczone jest dla dzieci o wadze do 9 kilo- gramów. • Przed użyciem upewnij się, że wszystkie części zostały prawidłowo zamocowane i zablokowane. • Zawsze używaj pasów bezpieczeństwa, które zapobie- gają wypadnięciu dziecka z siedzenia. • Nie stawiaj urządzenia na nierównych powierzchniach. •...
- Page 6 Składanie Zdjęcie Ilość 1. Połącz rury siedziska, wsuń rurę w prowadniki do momen- tu zablokowania, prawidłowe połączenie będzie potwierdzo- ne kliknięciem. Czynność powtórz z drugiej strony.
- Page 7 2. Zainstaluj rurę podtrzymującą siedzisko. Włóż stalową część rury z blaszką wewnątrz spodniej podstawy siedziska i dokręć ją śrubami. Użyj śrub nr 2 do zewnętrznych otworów i śrub nr 1 do środkowych otworów. 3. Montaż stopek. Włóż lewą i prawą stopkę w rury podsta- wy w sposób pokazany na poniższym rysunku.
- Page 8 4. Połącz podstawy bujaczka z łącznikami mechanizmu. Wsuń rurę w prowadniki do momentu zablokowania, prawi- dłowe połączenie będzie potwierdzone kliknięciem. 5. Połącz łączniki z mechanizmem zgodnie z oznacze- niami na rurkach. Wsuń rurki w prowadniki do momentu zablokowania, prawidłowe połączenie będzie potwierdzone kliknięciem.
- Page 9 6. Połącz rurę podtrzymującą siedzisko z mechanizmem. Wsuń rurki w prowadniki do momentu zablokowania, praw- idłowe połączenie będzie potwierdzone kliknięciem. 7. Załóż daszek na ramę siedziska w taki sposób, aby otwo- ry w uchwycie daszku zgrały się z pinem na ramie siedziska.
- Page 10 8. Po posadzeniu dziecka w foteliku należy zabezpieczyć je pasami bezpieczeństwa. Długość pasów można regulować za pomocą sprzączek. 9. Bujaczek posiada możliwość regulacji kąta pochylenia siedziska w trzech pozycjach. Naciśnij przycisk regulacji znaj- dujący się w tylnej części siedziska i ustaw pożądaną pozycję.
- Page 11 Siedzisko można również obracać:...
- Page 12 10. Bujaczek posiada możliwość złożenia podstaw do łatwiejszego przechowywania. Naciśnij przyciski znajdu- jące się w dolnej części mechanizmu i złóż podstawy. 11. Są dwie możliwości zasilania bujaczka LO-Henny. a) Zasilanie poprzez zasilacz dołączony do zestawu.
- Page 13 b) Zasilanie bateriami typu D+ R20 1.5V (4 sztuki). UWAGA: • Nie ładować baterii jednorazowych. • Akumulatorki mogą być ładowane tylko i wyłącznie przez osobę dorosłą. • Akumulatorki muszą być wyciągnięte z urządzenia przed ładowaniem. • Nie podłączać zasilacza jeśli baterie są zainstalowane w urządzeniu.
-
Page 14: Panel Sterowania
Panel sterowania pokrywa baterii włącznik diody prędkości bujania szybszy bieg wolniejszy bieg diody wyłącznika czasowego wyłącznik czasowy następna kołysanka / głośność wyłączni/wyłącznik muzyki dźwięki ptaków dźwięk wody włącznik karuzeli Port USB... -
Page 15: Czyszczenie I Konserwacja
Czyszczenie i konserwacja • Nie prać w pralce • Nie używać wybielacza do czyszczenia urządzenia. • Elementy materiałowe można prać jedynie ręcznie w wodzie do 30˚C • Przed czyszczeniem odłączyć urządzenie od zasilacza • Stelaż można przecierać wilgotną szmatką Produkt był testowany i jest zgodny z normą: EN16232-2013 Zdjęcia mają... -
Page 16: Dear Customer
Preface Dear Customer! Thank you for placing your trust in us and choosing Lionelo. Our products are made with the utmost care to ensure comfort and above all, maximum safety of your child. Imple- mentation of high quality materials and modern technolo- gies allows us to provide users with a product that is perfect- ly suited for everyday use. - Page 17 Note • The swing chair is suitable for children weighing up to 9 kilos. • Before using the product, please ensure that all the parts have been properly installed, tightened and secured. • Always use safety belts in order to ensure the child will not fall out of the chair.
- Page 18 Folding Snapshot Quantity 1. Combine the seat tubes. Slide the tubes into the guides until they lock in place. The “click” sound indicates proper connection. Repeat the procedure with the other side.
- Page 19 2. Then, install the tube that supports the seat (see the below picture). Insert the steel part of the tube (with the plate) into the bottom of the seat base and tighten it with screws. Use the screws with the following number: 2 - for outer holes;...
- Page 20 4. Attach the bases of the swing chair with the connecting tubes. Slide the tubes into the guides until they lock in place. The “click” sound indicates proper connection. 5. Combine the connecting tubes with the swinging mech- anism (paying attention to the marks on the tubes). Slide the tubes into the guides until they lock in place.
- Page 21 6. Combine the seat supporting tube with the swinging mechanism. Slide the tubes into the guides until they lock in place. The “click” sound indicates proper connection. 7. Put the canopy on the seat frame so that the holes in the canopy handle match the seat frame pin.
- Page 22 8. A child sitting in a seat must be secured with the safety harness. The length of the belts can be adjusted with the clasps. 9. The swing chair’s seat angle can be adjusted to three differ- ent positions. Press the adjustment button (behind the seat) and choose a desirable position.
- Page 23 The seat can also be flipped:...
- Page 24 10. It is possible to fold the bases for storage purposes. Press the buttons at the bottom of the swinging mechanism and fold the bases. 11. There are two methods of powering the LO-Henny swing chair: a) with an included power supply;...
- Page 25 b) with 4 D+ R20 1.5V batteries. WARNING: • Do not charge non-rechargeable batteries. • Rechargeable batteries can only be charged by adults. • Rechargeable batteries should be taken out of the device’s battery compartment before charging. • Do not plug in the power supply if the batteries are installed in the unit.
-
Page 26: Control Panel
Control panel battery cover power on / off key swinging speed LEDs swinging speed + swinging speed - timer LEDs timer next lullaby / volume music on / off key bird sounds water sounds carousel power switch USB port... -
Page 27: Cleaning And Maintenance
Cleaning and maintenance • Do not machine wash. • Do not use bleach to clean the device. • The fabric parts can only be washed by hand (in up to 30°C). • Disconnect the device from the power source before cleaning. •... - Page 28 WWW.LIONELO.COM...
- Page 29 BrandLine Group Sp. z o. o. ul.Dziadoszańska 10 61-248 Poznań www.lionelo.com WARRANTY CARD KARTA GWARANCYJNA Model: ………………………….. SN: …………………………..May be sold in: BE CZ DK DE EE IE EL ES FR HR IT LV LT HU MT NL AT PL PT RO SI SK FI SE UK...
-
Page 30: Warunki Gwarancji
Warunki gwarancji: 1. Marka Lionelo z siedzibą w Poznaniu (61-248) przy ul. Dziadoszańskiej 10 gwarantuje sprawne działanie produktu zgodnie z warunkami techniczno- -eksploatacyjnymi opisanymi w instrukcji obsługi. 2. Gwarancja jest udzielana na okres 36miesięcy, licząc od daty sprzedaży. W przypadku zakupu produktu przez firmę (faktura VAT) gwarancja udzielana jest na okres 12 miesięcy. - Page 31 do reklamowanego urządzenia opisu uszkodzenia, wszystkich akcesoriów, które klient otrzymał podczas kupna urządzenia oraz dowodu zakupu zawie- rającego datę sprzedaży. 13. Gwarancją nie są objęte: naturalne zużycie związane z eksploatacją, uszkodzenia powstałe w wyniku niewłaściwego i niezgodnego z instrukcją obsługi użytkowania, uszkodzenia lub rozdarcia wynikłe z winy nabywcy, płowienie tkanin spowodowane długotrwałym działaniem promieni słonecz- nych, pranie w nieodpowiedniej temperaturze, uszkodzenia mechaniczne, elektryczne, termiczne, ingerencje cieczy lub celowe uszkodzenia i wywołane...
-
Page 32: Warranty Conditions
Warranty conditions: 1. The Lionelo brand with its registered office at Dziadoszańska 10, 61-248 Poznań, Poland guarantees that the equipment is operational in accordance with the technical-operating conditions described in the manual. 2. The warranty is granted for a 36 months period from the date of sale. - Page 33 of the instructions described in the manual, tears or cracks caused by the Customer, fading of fabric resulting from prolonged exposure to sunlight or washing the product or its parts in the wrong temperature, mechanical, elec- trical, thermal and intentional damages and defects caused by them, as well as damage caused by unauthorised modifications or repairs.
- Page 34 Lionelo Service – Support List of Authorized Service Centers: Lista autoryzowanych centrów serwisowych: lionelo.com/en/service Dziękujemy za zakup urządzenia naszej marki!
- Page 36 WWW.LIONELO.COM...
Need help?
Do you have a question about the Henny and is the answer not in the manual?
Questions and answers