AGA 60 User's Manual & Installation Instructions
Hide thumbs
Also See for 60:
- User's manual & installation instructions (32 pages) ,
- Conversion manual (16 pages)
Table of Contents
Advertisement
AGA 60 Gas Hob
User Guide &
Installation Instructions
CAUTION: THIS UNIT IS HEAVY, PROPER EQUIPMENT AND ADEQUATE MANPOWER MUST BE USED IN MOVING THE
RANGE TO AVOID DAMAGE TO THE UNIT OR THE FLOOR.
REMEMBER, when replacing a part on this appliance, use only spare parts that you can be assured conform to the safety and
performance specification that we require.
DO NOT use reconditioned or copy parts that have not been clearly authorised by AGA.
PLEASE READ THESE INSTRUCTIONS BEFORE USING THIS APPLIANCE
AND KEEP IN A SAFE PLACE FOR FUTURE REFERENCE.
For use in AUSTRALIA
08/17 EINS 517558
Advertisement
Table of Contents

Related Manuals for AGA 60


Summary of Contents for AGA 60
-
Page 1: Installation Instructions
REMEMBER, when replacing a part on this appliance, use only spare parts that you can be assured conform to the safety and performance specification that we require. DO NOT use reconditioned or copy parts that have not been clearly authorised by AGA. PLEASE READ THESE INSTRUCTIONS BEFORE USING THIS APPLIANCE AND KEEP IN A SAFE PLACE FOR FUTURE REFERENCE. - Page 2 Make a note of your AGA appliance Serial Number when it is being installed. The serial number can be found behind the plinth cover. My AGA Details: Serial No: AGA Service No: Date of Installation:...
-
Page 3: Table Of Contents
Control panel Gas hob 12. Specifications Cooker hoods and oven venting 13. Electrical connection General advice Using the zones of the AGA 60 14. Installation sequence The ovens and procedure Gas hotplate Assembly of burners Pan supports Fitting of burner cap... -
Page 5: Health And Safety
Health and safety Consumer protection The appliance may contain some of the materials that are indicated below. It is the Users/Installers responsibility to As a responsible manufacturer, we take care to make sure ensure that the necessary personal protective clothing that our products are designed and constructed to meet the is worn when handling where applicable, the pertinent required safety standards when properly installed and used. - Page 6 If the supply cord is damaged, it must be replaced If you smell gas by the manufacturer, its service agent or similarly • DO NOT turn electric switches on or off qualified persons in order to avoid a hazard. • DO NOT smoke WARNING! This appliance must be installed with an appropriate device that will allow permanent •...
-
Page 7: Introduction
The AGA 60 has been designed to have all the attributes of a larger AGA within a small space. Refer to the diagram in the Overview chapter to familiarise yourself with the product and refer to the relevant sections for upper oven, lower oven, grill, gas hob etc. -
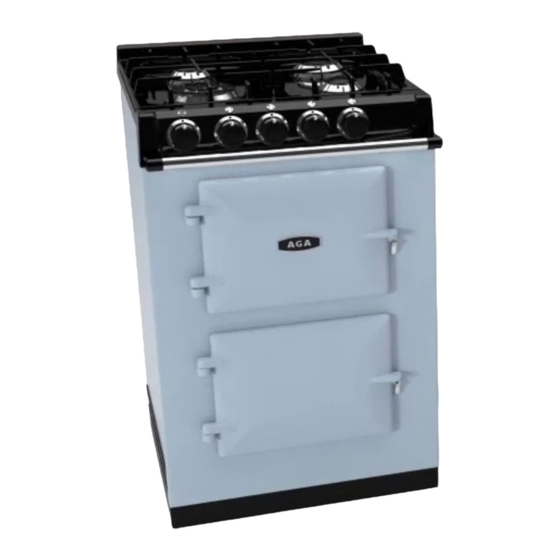
Page 8: Overview
Overview Fig. 3.1 DESN 517561 Cooker overview Fig. 3.1 Fig. 3.2 Gas hob Oven knob Gas knobs Roasting and baking oven Simmering oven Gas hob overview Fig. 3.2 Oven knob Wok burner and knob Rear semi-rapid burner and knob Rear rapid burner and knob Front semi-rapid burner and knob DESN 517562... -
Page 9: Control Panel
The AGA cooker will emit an odour for a short while, this is simply due to the protective oil we put on the hotplate and Large Flame - High Setting ovens burning off. -
Page 10: General Advice
The ovens Food should not be placed into any oven until it is up to Your AGA 60 has two ovens which are pre-set at a different normal operating heat. heat, just like the traditional AGA heat storage cooker. The top... -
Page 11: Gas Hotplate
Gas hotplate Fig. 3.3 The hotplate has four gas burners: Refer to Technical Data. The semi-rapid burners are especially suited for use with small pans and for gentle simmering or poaching. All burners have a set simmer position and are easily adjustable. -
Page 12: Wok Burner
SOME SAFETY POINTS Fig. 3.6 Fig. 3.10 Make sure that the flames are under the pans. Using a lid will help the contents boil more quickly (Fig. 3.6). Large pans should be spaced well apart. ArtNo.311-0002 Pan with rim Pans and kettles with concave bases or down-turned base rims should not be used (Fig. -
Page 13: Aga Accessories
If you have not already seen a demonstration, ask your AGA Specialist for details. A demonstration will show you how to get the best from your new AGA and will give you hints and tips. You will also see a selection of AGA utensils and accessories being used. - Page 14 If you have not already seen a demonstration, ask your AGA Specialist for details. A demonstration will show you how to get the best from your new AGA and will give you hints and tips. You will also see a selection of AGA utensils and...
-
Page 15: Roasting Oven Setting
These elements heat the air and the cast iron within to heat the air and the cast iron within to provide cooking provide cooking results consistent with the traditional AGA results consistent with traditional AGA heat storage cookers, heat-storage cooker, with the flexibility of being able to turn with the flexibility of being able to turn it off when not in use. -
Page 16: Simmering Oven
• To get the very best performance, we recommend to This element heats the air and the cast iron within it to use AGA cookware with thick bases and stacking lids. provide cooking results consistent with the traditional simmering oven of the traditional AGA heat-storage cooker, •... -
Page 17: Oven Shelves
Oven shelves Fitting the shelves Fig. 5.1 Fig. 5.2 DESN 512403 DESN 512404 Removing the shelves Fig. 5.3 Fig. 5.4 DESN 512405 DESN 512406... -
Page 18: Cooking Guide
Milk puddings For casseroles, stock, milk puddings and similar dishes bring to heat elsewhere on the AGA then transfer to the simmering oven (one exception is meringues). Rich fruit Stock cakes can be cooked here for a, long time on the oven grid shelf placed on the base of Meringues the oven. -
Page 19: Cleaning & Caring For Your Cooker
All that is usually needed to keep the vitreous damp cloth and polished up - the AGA E-cloths are excellent enamelled surfaces of your cooker bright and clean for this purpose as they are lint-free and eco-friendly. - Page 20 WARNING: Accessible parts may become hot during use. To avoid burns and scalds children should be kept away. If the lining is marked it is best cleaned when the hotplate is cold. It can be cleaned with hot soapy water and/or a cream cleanser.
-
Page 21: Servicing
• A full service is due at the end of year 5 (60 months). The appliance does not cover Commercial use (see separate warranty book provided for further details). -
Page 22: Installation Instructions
REMEMBER, when replacing a part on this appliance, use only spare parts that you can be assured conform to the safety and performance specification that we require. DO NOT use reconditioned or copy parts that have not been clearly authorised by AGA. PLEASE READ THESE INSTRUCTIONS BEFORE USING THIS APPLIANCE... -
Page 23: Installation Introduction
10. Installation introduction Consumer protection Checks for the installer As a responsible manufacturer, we take care to make sure Check with a qualified electrician if you are not sure the that our products are designed and constructed to meet the appliance is properly earthed. -
Page 24: Removal From Pallet And Appliance Installation
11. Removal from pallet and appliance installation Removing of transit brackets - Unscrew 4 screws and Fig. 11.1 remove brackets, from front and two screws from rear (Fig. 11.1). NOTE: Care must be taken not to trap mains cable. Appliance to be removed from rear of pallet only. Recess provided for suitable sack truck. - Page 25 Appliance can now be pushed back on its wheels into Fig. 11.5 desired position. NOTE: Care must be taken not to trap mains cable (Fig. 11.5). Levelling of appliance - Use 13mm socket to adjust wheel mechanism for FINE adjustment on both sides at rear of the appliance (Fig.
-
Page 26: Specifications
10 mm (3/8) beyond the figures quote above. This allows safe margin to take into account the natural dimensional variations found in major castings in particular the width across an appliance recess could be critical. Appliance weight (Excludes packaging) Model: AGA 60 Gas Hob 474 lbs (215 kg) - Page 27 Timer cable is 4 metres. Fitting into a 60cm gap If you are restricted to a 60cm width space, the AGA 60 will fit, subject to the following guide (Fig. 12.2). The appliance top plate casting width tapers outwards at its bottom edge.
- Page 28 Combustible Rear Walls Fig. 12.3 COMBUSTIBLE WALL FITTING USING FIRE RESISTANT BOARD Since this appliance can be used continuously, please take note of the IMPORTANT INSTRUCTIONS. Where the rear wall is constructed of combustible materials (such as all-timber or stud wall partitions and batoned plasterboard) these will require special wall heat protection measures.
-
Page 29: Electrical Connection
13. Electrical connection WARNING: THIS APPLIANCE MUST BE EARTHED. The isolator should not be positioned immediately above the appliance, but must be fitted within 2 metres of the THIS APPLIANCE IS DESIGNED FOR THE VOLTAGE appliance. STATED ON THE RATING PLATE, WHICH IS SITUATED BEHIND THE PLINTH COVER. -
Page 30: Installation Sequence And Procedure
14. Installation sequence and procedure Assembly of burners Fig. 14.1 IMPORTANT: The cast iron pan supports on the appliance are much heavier than those on most gas hotplate cookers, therefore care must be taken when removing or re-fitting them to the hob. It is important that they are lifted from the appliance and not dragged across nearby enamelled parts which would result in damaging the enamel. -
Page 31: Gas Connection
Gas connection Fig. 14.4 CAUTION: ENSURE THAT THE APPLIANCE IS ISOLATED FROM ELECTRIC SUPPLY The appliance can be installed with an approved flexible connection. Supply piping should not be less than 3/8 I/D. Connection is made to the R1/2 (1/2”BSP) female threaded fitting located just below the hotplate level on the rear right-hand side of the appliance. -
Page 32: Cooker Stability
Cooker stability Fig. 14.7 A safety chain must be anchored firmly to the wall and cooker to prevent the flexible hose from straining, when the cooker is withdrawn for servicing. When fitting a safety chain refer to Fig. 14.7. Restraint where a hose assembly is used, shall have means to limt the extent of movement of the gas appliance to no greater than 80% of the hose assembly length. -
Page 33: Circuit Diagram
15. Circuit diagram CAUTION: label all wires prior to disconnection when servicing controls wiring errors can cause improper and dangerous operation. Verify proper operation after servicing. 600W 600W 300W 600W 600W 300W 600W 300W Hi -Sim Sim Lo -Sim North America Australia NZ Code Description Code Description... -
Page 34: Technical Data
16. Technical data This appliance is supplied set for Natural Gas (NG) at a pressure of 1 kPa (4” wg). It must be converted to run on Propane X, at a pressure of 2.54 kPa (10” wg). HOTPLATE - Natural Gas Left-hand Front Right-hand Rear Left-hand Rear... -
Page 35: Checklist
17. Checklist Hand these instructions to the user for retention, and instruct in the safe operation of the appliance. Tick Box / Not Serial No. Applicable (N/A) Check pan supports, gas hotplate burners are correctly fitted. Check gas pressure is correct. Check fit of control knobs and bezels. - Page 36 Notes...
- Page 37 Notes...
- Page 38 Notes...
- Page 39 Notes...
- Page 40 For further advice or information contact your local AGA Specialist. With AGA Rangemaster’s policy of continuous product improvement, the Company reserves the right to change specifications and make modifications to the appliances described and illustrated at any time. Manufactured By...
Need help?
Do you have a question about the 60 and is the answer not in the manual?
Questions and answers