Table of Contents
Advertisement
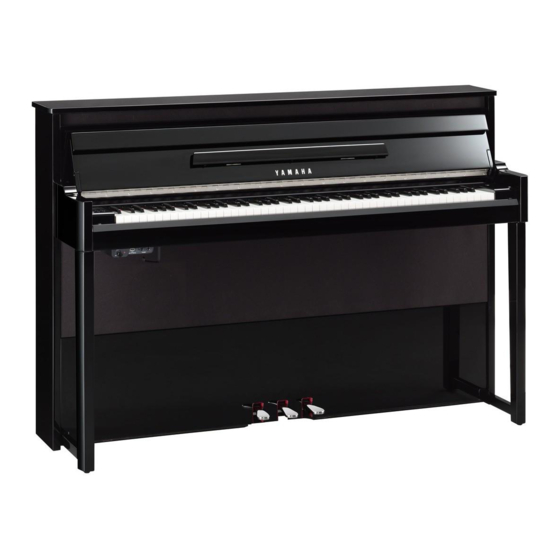
Owner's Manual
Mode d'emploi
Manual de instrucciones
Before using this instrument, be sure to read "PRECAUTIONS"
on pages 5–6.
Avant d'utiliser cet instrument, lisez attentivement la section
« PRÉCAUTIONS D'USAGE » aux pages 5-6.
Antes de utilizar el instrumento, lea la sección
"PRECAUCIONES", en las páginas 5-6.
EN
FR
ES
Advertisement
Table of Contents

Related Manuals for Yamaha AVANTGRAND NU1X


Summary of Contents for Yamaha AVANTGRAND NU1X
- Page 1 Before using this instrument, be sure to read “PRECAUTIONS” Owner’s Manual on pages 5–6. Avant d'utiliser cet instrument, lisez attentivement la section Mode d'emploi « PRÉCAUTIONS D'USAGE » aux pages 5-6. Antes de utilizar el instrumento, lea la sección Manual de instrucciones “PRECAUCIONES”, en las páginas 5-6.
-
Page 2: Special Message Section
SPECIFICATIONS SUBJECT TO CHANGE: The information contained in this manual is believed to be cor- rect at the time of printing. However, Yamaha reserves the right to change or modify any of the specifications without Model notice or obligation to update existing units. - Page 3 Yamaha Corporation of America or its subsidiaries. devices. Compliance with FCC regulations does not guarantee * This applies only to products distributed by YAMAHA CORPORATION OF AMERICA. (class B) COMPLIANCE INFORMATION STATEMENT...
-
Page 4: Important Safety Instructions
Explanation of Graphical Symbols The lightning flash with arrowhead symbol within an equilateral triangle is intended to CA U TIO N alert the user to the presence of uninsulated RISK OF ELECTRIC SHOCK “dangerous voltage” within the product’s DO NOT OPEN enclosure that may be of sufficient magni- tude to constitute a risk of electric shock to persons. -
Page 5: Precautions
• Only use the voltage specified as correct for the instrument. The required voltage cord from the AC outlet. Then have the instrument inspected by qualified Yamaha is printed on the name plate of the instrument. - Page 6 Yamaha cannot be held responsible for damage caused by improper use or modifications to the instrument, or data that is lost or destroyed. Always turn the power off when the instrument is not in use.
-
Page 7: About Copyrights
• This product incorporates and bundles contents in which Yamaha owns copyrights or with respect to which Yamaha has license to use others' copyrights. Due to copyright laws and other relevant laws, you are NOT allowed to distribute media in which these contents are saved or recorded and remain virtually the same or very similar to those in the product. - Page 8 Authentic acoustic piano touch with special upright piano action and piano keyboard The AvantGrand NU1X features a specially designed mechanism in which the keyboard action and the hammer workings realistically reproduce those of an acoustic piano.
-
Page 9: Table Of Contents
Online Member Product Registration ×1 Bench* ×1 The “PRODUCT ID” on the sheet will be needed when you fill out the * May not be included depending on your area. Check with your Yamaha User Registration form. dealer. Warranty* ×1 Felt strip set ×1... -
Page 10: Panel Controls And Terminals
Panel Controls and Terminals Setting Up Overview Music Rest (page 11) ] (Standby/On) switch (page 12) Control panel (see below) Fallboard (page 11) [MASTER VOLUME] control (page 14) Front surface Jacks and Terminals (page 35) [USB TO DEVICE] terminal (page 31) [PHONES] jacks (page 15) Rear surface... -
Page 11: Playing The Keyboard
Playing the Keyboard Opening/Closing the Fallboard and the Music Rest To raise the fallboard and the music rest With both hands, hold the hand grip, then lift and open the fallboard. Fold down the top of the fallboard. Open the music rest. CAUTION Be careful to avoid catching your fingers between the fallboard and the instrument. -
Page 12: Turning The Power On/Off
Use only the AC power cord supplied with the instrument. If the supplied power cord is lost or damaged and needs to be replaced, contact your Yamaha dealer. The use of an inappropriate replacement can pose a fire and shock hazard! -
Page 13: Confirming The Firmware Version Of This Instrument
Highest key (C7) About the latest Firmware Version Yamaha may from time to time update firmware of the product without notice for improvement. Make sure to check our website for information of the latest release and upgrade the firmware for your instrument. -
Page 14: Adjusting The Master Volume
Playing the Keyboard Adjusting the Master Volume To adjust the volume level by using the [MASTER VOLUME] control located at the front left, just below the keyboard while playing the keyboard. MASTER VOLUME The level The level decreases. increases. USB TO CAUTION Do not use this instrument at a high volume level for a long period of time, or your hearing may be damaged. -
Page 15: Using Headphones
Playing the Keyboard Using Headphones Since this instrument is equipped with two [PHONES] jacks, you can connect two sets of MASTER VOLUME standard stereo headphones. If you are using only USB TO DEVICE PHONES one set of headphones, insert a plug into either jack;... -
Page 16: Using The Pedals
Playing the Keyboard Using the Pedals The instrument has three pedals that produce a range of expressive effects similar to those produced by the pedals on an acoustic piano. Damper Pedal (Right) Pressing this pedal will sustain notes longer. Releasing this pedal immediately stops (damps) any sustained notes. -
Page 17: Main Operations
Its spacious sound evokes the size of the instru- Imperial ment, and is ideal for expressing tenderness in compositions. The sound of Yamaha’s C7 grand piano, which is often used in Studio Grand recording studios. Its bright and clear sound is good for popular styles. -
Page 18: Listening To The Voice Demo Songs
Piano + Strings Original The Songs d. 0 3 d. 0 4 d. 0 6 – d. 0 8 , and d. 1 3 – d. 1 5 are Yamaha’s original pieces (©2017 Yamaha Corpora- tion). 18 • NU1X Owner’s Manual... -
Page 19: Using The Metronome
Basic Operations and More Using the Metronome The metronome feature is convenient for practicing with an accurate tempo. Press [METRONOME] to start the metronome. While the metronome sounds, a dot at the right side of the LED display and the lamp of the metronome button flash on and off to the tempo. -
Page 20: Adjusting The Tempo
Basic Operations and More Adjusting the Tempo The tempo of Metronome can be adjusted. You can also adjust the playback tempo of a MIDI Song (page 25) as well as the playback speed of an Audio Song (page 25) as they are playing. ... -
Page 21: Playing The Realistic Resonance-Enhanced Vrm Voices
Basic Operations and More Playing the Realistic Resonance-enhanced VRM Voices On an actual acoustic piano, if you press the damper pedal and play a key, not only does the string of the pressed key vibrate, it also causes other strings and the soundboard to vibrate, with each influencing the rest, creating a rich and brilliant resonance that sustains and spreads. -
Page 22: Enhancing The Sound With Reverb
Basic Operations and More Enhancing the Sound with Reverb The Reverb effect simulates the natural reverberation of a concert hall. Turning the Reverb on or off Press [REVERB] repeatedly (if necessary). Lights up when REVERB is on. Adjusting the Reverb Depth While holding down [REVERB], press [+] or [-]. -
Page 23: Transposing The Pitch In Semitones
Basic Operations and More Transposing the Pitch in Semitones You can shift the pitch of the entire keyboard up or down in semitones to facilitate playing in difficult key signatures and match the pitch of the keyboard to the range of a singer or other instruments. For example, if “+5”... -
Page 24: Setting The Scale Tuning
Basic Operations and More Setting the Scale Tuning You can select various scales for the instrument. Equal Temperament is the most common contemporary piano tuning scale. However, history has known numerous other scales, many of which serve as the basis for certain genres of music. -
Page 25: Playing Back Songs
Playing Back Songs This instrument can play back Songs contained in internal memory or USB flash drive connected to the [USB TO DEVICE] terminal. There are two kinds of Songs that can be played back: MIDI Songs and Audio Songs. ... -
Page 26: Playing Back Songs
Playing Back Songs Playing Back Songs To play back a Song on a USB flash drive: Read “About USB Devices” (page 31), then connect the USB flash drive to the [USB TO DEVICE] terminal, and fol- low the instructions below. While holding down [DEMO/SONG], press [+] to select the NOTE The Song Categories will appear on the... - Page 27 Playing Back Songs Playback-related Operations Adjusting the tempo (MIDI Song) or playback speed (Audio Song) MIDI Song Setting range: 5 to 500 beats per minute You can change the playback tempo of a MIDI Song. You can also adjust the Default setting: Depends on the selected playback speed of an Audio Song during its playback.
-
Page 28: Recording Your Performance
Recording Your Performance This instrument allows you to record your performance by using one of the following two methods. The recorded performance can be played back as a User Song. MIDI recording With this method, your keyboard performances are recorded and saved to internal memory of this instrument or USB flash drive as a MIDI Song (via the SMF format 0). -
Page 29: Start Recording
Recording Your Performance Select a Voice (page 17) and other parameters such as Beat Using the Metronome You can use the metronome while record- (page 19) for recording. ing, although the metronome sound will not be recorded. Press [REC] to engage the Record mode. If memory space is running low: An “... -
Page 30: Deleting A Song File
Recording Your Performance Deleting a Song file A User Song can be deleted. If necessary, connect the USB flash drive to the [USB TO NOTE In case a message appears on the display DEVICE] terminal. when connecting a USB flash drive to the instrument, refer to the “Message List”... -
Page 31: Using Usb Flash Drives
The instrument does not necessarily support all com- as well as read data from the connected USB flash mercially available USB devices. Yamaha cannot guar- drive. antee operation of USB devices that you purchase. -
Page 32: Formatting Usb Flash Drive
Using USB Flash Drives Formatting USB Flash Drive NOTICE Executing the Format operation will delete all data in the USB flash drive. Before formatting, save important data to a computer or another storage device. Connect the USB flash drive to the [USB TO DEVICE] terminal. >... -
Page 33: Copying User Songs In The Instrument To Usb Flash Drive
Using USB Flash Drives Copying User Songs in the Instrument to USB Flash Drive You can copy the User Song in the instrument to the USB flash drive. The copied Song is saved as SMF format 0 to the “USER FILES” folder in the USB flash drive, and the file is automatically named as “USERSONG**.MID”... -
Page 34: Backup Data And Initialization
Backup Data and Initialization Backup Data in Internal Memory The following data, referred to as Backup data, as well as User Song data and External Song data will be maintained even if the power is turned off. • Character Code ..............page 27 •... -
Page 35: Connections
Connections CAUTION Before connecting the instrument to other electronic components, turn off the power to all the components. Before turning the power on or off to all components, set all volume levels to minimum (0). Otherwise, damage to the components, electrical shock, or even permanent hearing loss may occur. -
Page 36: Connecting External Midi Devices (Midi [In] [Out] Terminals)
Connections Minimizing noise of the input sound via Noise Gate Default setting: On By default, this instrument cuts unwanted noise from the input sound. However, this may result in necessary sounds also being cut, such as the soft decay sound of a piano or guitar. -
Page 37: Connecting To A Computer ([Usb To Host] Terminal)
Connections Example for MIDI connection Example 1: The connection below allows you to play the sounds of an external MIDI tone generator from the keyboard of this instrument. MIDI tone generator MIDI OUT MIDI IN Performance data NU1X Set the MIDI Receive Channel of the external MIDI tone generator to “1,” since the MIDI Transmit Channel of this instrument is set to “1.”... -
Page 38: Connecting To A Smart Device Such As Iphone/Ipad ([Usb To Device]/ [Usb To Host], Midi [In][Out] Terminals)
For information about the compatible smart devices and application tools, access the Web page of each application tool on the following page: http://www.yamaha.com/kbdapps/ NOTICE Do not place your smart device such as an iPhone/iPad in an unstable position. Doing so may cause the device to fall and result in damage. -
Page 39: Using The Bluetooth Audio Function
Connections Using the Bluetooth audio function Before using the Bluetooth function, be sure to read “About Bluetooth” on page 40. This instrument is equipped with Bluetooth functionality. You can input the sound of the audio data saved in a Bluetooth-equipped device to this instrument and listen to it through the built-in speaker of the instru- ment. -
Page 40: About Bluetooth
• The speed of signal transfer and the distance at which communication is possible differs according to the distance between the communicating devices, the presence of obstacles, radio wave conditions and the type of equipment. • Yamaha does not guarantee all wireless connections between this unit and devices compatible with Bluetooth func- tion. -
Page 41: Appendix
(page 32) and connect to the instrument again. A malfunction has occurred in the instrument. Contact your nearest Yamaha dealer or authorized distributor. A malfunction has occurred in the instrument. Contact your nearest Yamaha dealer or authorized distributor. -
Page 42: Troubleshooting
The USB flash drive is not compatible with the instrument. Only use the USB flash drive whose compatibility has been confirmed by Yamaha (page 31). The instrument can cover the range of C-2–G8 when you set the transposition. If notes Higher or lower notes do not sound correctly lower than C-2 are played, the actual resulting sound is one octave higher. -
Page 43: Preset Song List (50 Classical Music Masterpieces)
Preset Song List (50 Classical Music Masterpieces) Display Song Name Composer Arrangements P. 0 1 Canon D dur J. Pachelbel P. 0 2 Air On the G Strings J. S. Bach P. 0 3 Jesus, Joy of Man’s Desiring J. S. Bach P. -
Page 44: Specifications
Wireless MIDI Adaptor (UD-BT01/MD-BT01) * The contents of this manual apply to the latest specifications as of the publishing date. To obtain the latest manual, access the Yamaha website then download the manual file. Since specifications, equipment or separately sold accessories may not be the same in every locale, please check with your Yamaha dealer. -
Page 45: Index
Index Numerics Headphone hanger .....15 Headphones ........15 50 Classical Music Masterpieces Recording ..43 ........28 Hz (Hertz) ........23 Reverb ........22 Rewind ........27 Acccess Point Mode ....38 Infrastructure Mode ....38 Access point .......38 Initialization ........34 Accessories ........9 Scale ........... 24 Installing ........7 Aliquot Resonance... - Page 47 Information for users on collection and disposal of old equipment: This symbol on the products, packaging, and/or accompanying documents means that used electrical and electronic products should not be mixed with general household waste. For proper treatment, recovery and recycling of old products, please take them to applicable collection points, in accordance with your national legislation.
-
Page 48: For Canada
For U.S.A. This transmitter must not be co-located or operated in conjunction with any other antenna or transmitter. For CANADA This device complies with Industry Canada licence-exempt RSS standard(s). Operation is subject to the following two conditions: (1) this device may not cause interference, and (2) this device must accept any interference, including interference that may cause undesired operation of the device. - Page 49 DECLARACIÓN UE DE CONFORMIDAD SIMPLIFICADA EGYSZERŰSÍTETT EU-MEGFELELŐSÉGI NYILATKOZAT Por la presente, Yamaha Music Europe GmbH declara que el tipo de equipo radio- Yamaha Music Europe GmbH igazolja, hogy a [NU1X] típusú rádióbe- eléctrico [NU1X] es conforme con la Directiva 2014/53/UE. El texto completo de la rendezés megfelel a 2014/53/EU irányelvnek.
- Page 51 Clarissenhof 5b, 4133 AB Vianen, The Netherlands Jebel Ali FZE, Dubai, UAE Tel: +31-347-358040 Tel: +971-4-801-1500 Head Office/Manufacturer: Yamaha Corporation 10-1, Nakazawa-cho, Naka-ku, Hamamatsu, 430-8650, Japan DMI20-1 (For European Countries) Importer: Yamaha Music Europe GmbH Siemensstrasse 22-34, 25462 Rellingen, Germany...
- Page 52 Yamaha Global Site https://www.yamaha.com/ Yamaha Downloads http://download.yamaha.com/ Manual Development Group © 2017 Yamaha Corporation Published 07/2017 POSC*.*- **A0 Printed in China ZW14240...