Table of Contents
Advertisement
Quick Links
Advertisement
Table of Contents
Troubleshooting

Related Manuals for Chison Q9


Summary of Contents for Chison Q9
- Page 1 Q9 Digital Color Doppler Ultrasound System Digital Color Doppler Ultrasound System Model OPERATION MANUAL Direction: CHUMQ9-001 V1.0 December 10, 2013 CHISON MEDICAL IMAGING CO., LTD. We reserve the right to make changes to this manual without prior notice.
- Page 2 Directive 93/42/EEC. Accessories without the CE mark are not guaranteed to meet the Essential Requirements of the Medical Device Directive. This manual is a reference for the Q9. Please verify that you are using the latest revision of this document. If you need the latest revision, contact your distributor.
-
Page 3: Important Information
8. This manual contains warnings regarding foreseeable potential dangers, but user shall always be alert to dangers other than those indicated as well. CHISON shall not be liable for damage or loss that results from negligence or from ignoring the precautions and operating instructions described in this operation manual. - Page 4 14. While the system or probe is over life time, please refer to operation manual section 9.5. 15. Important data must be backed up on external memory media. CHISON shall not be liable for loss of data stored in the memory of this system caused by operator error or accidents.
-
Page 5: Table Of Contents
Q9 Digital Color Doppler Ultrasound System TABLE OF CONTENTS ..............................1 HAPTER NTRODUCTION 1.1 System Overview................................1 1.2 Contact Information................................ 1 ................................ 2 HAPTER YSTEM AFETY 2.1 Safety Overview ................................2 2.2 Electrical Safety................................3 Labels ..................................5 Patient Environmental Devices ........................... 6 Biological Safety ................................. -
Page 6: Table Of Contents
Q9 Digital Color Doppler Ultrasound System 9.2 System Care and Maintenance ........................... 157 9.3 Safety Check ................................159 9.4 Troubleshooting ................................159 9.5 Service Responsibility ..............................160 CE R ....................163 PPENDIX NFORMATION OF EPRESENTATIVE ......................164 PPENDIX YSTEM ONE... -
Page 7: C Hapter 1 I Ntroduction
Q9 Digital Color Doppler Ultrasound System Chapter 1 Introduction This manual contains necessary information for safe system operation. Read and understand all instructions in this manual before operating the system. Always keep this manual with the equipment, and periodically review the procedures for operation and safety precautions. -
Page 8: Safety Overview
The system should be installed only by personnel authorized by the manufacturer. Do not attempt to install the system by yourself. Only a CHISON's authorized service engineer can perform maintenance. Only a qualified operator, or someone under qualified supervision, can use the system. -
Page 9: Electrical Safety
To prevent from arm or neck injury, the operator should not stay at the same position for too long during patient scanning without taking break. Do not put liquid on top of the main unit. NOTE: *To dispose of this product properly, please contact the local CHISON’s Authorized Service Representative. 2.2 Electrical Safety Type of protection against electric shock... - Page 10 Locate the equipment as far away as possible from other electronic equipment. Be sure to only use the cables provided by or designated by CHISON. Connect these cables following the installation procedures (e.g. wire power cord separately from signal cables).
-
Page 11: Labels
Q9 Digital Color Doppler Ultrasound System Labels Fig.2-1 Rear panel label 2.3.1. Symbols on label Dangerous electric voltage. Unplug the main plug Caution, consult accompanying documents. before opening the system! This symbol advises the reader to consult the accompanying documents for important safety related information such as warnings and pre-cautions that Cannot be presented on the device itself. -
Page 12: Patient Environmental Devices
Q9 Digital Color Doppler Ultrasound System accompanied by the name and the address of the authorized representative in the European Community. MANUFACTURER: This symbol This symbol is followed by the serial number accompanied by the name and the address of the of the device. - Page 13 The Patient Environmental devices shown above are specified to be suitable for use within the PATIENT ENVIRONMENT. CAUTION: DO NOT connect any probes or accessories without approval by CHISON within the PATIENT ENVIRONMENT. DO NOT touch patient and devices without IEC/EN 60601-1 approval to avoid the leakage current risk within the PATIENT ENVIRONMENT.
-
Page 14: Biological Safety
Such malfunction may impact the stability, effectiveness and safety of the system and probes, and users should immediately stop using the system and probes until CHISON authorized engineer has checked the system and confirm the effectiveness and safety of the system and probes. -
Page 15: Scanning Patients And Education
Q9 Digital Color Doppler Ultrasound System Approved March 26, 1997 Diagnostic ultrasound has been in use since the late 1950s. Given its known benefits and recognized efficacy for medical diagnosis, including use during human pregnancy, the American Institute of Ultrasound in Medicine herein addresses the clinical safety of such use: There are no confirmed biological effects on patients or instrument operators caused by exposures from present diagnostic ultrasound instruments. - Page 16 Q9 Digital Color Doppler Ultrasound System Understand the meaning of the TI, TIS, TIB, TIC and MI output display, as well as the relationship between these parameters and the thermal/cavitation bioeffect to the tissue. Expose the patient to only the very lowest practical transmit power levels for the shortest possible time to achieve a satisfactory diagnosis (ALARA - As Low As Reasonably Achievable).
- Page 17 Q9 Digital Color Doppler Ultrasound System results. In obstetric examinations, TIS (soft tissue thermal index) should be monitored during scans carried out in the first eight weeks after gestation, and TIB (bone thermal index) thereafter. In applications where the probe is very close to bone (e.g. trans-cranial applications), TIC (cranial bone thermal index) should be monitored.
- Page 18 Q9 Digital Color Doppler Ultrasound System and MI ≤ 0.23. Track-3 gives the user the freedom to increase the output acoustic power for a specific exam, and still limit output acoustic power within the global maximum de-rated Ispta ≤ 720 mW/cm under an Output Display Standard.
- Page 19 Q9 Digital Color Doppler Ultrasound System 0.5754 0.1903 0.0631 0.0158 I’=I*R Where I’ is the intensity in soft tissue, I is the time-averaged intensity measured in water. Tissue Model: Tissue temperature elevation depends on power, tissue type, beam width, and scanning mode. Six models are developed to mimic possible clinical situations.
- Page 20 Q9 Digital Color Doppler Ultrasound System MI = Pr’ / sqrt(fc) Pr’ is the de-rated (0.3) peak rare-fractional pressure in Mpa at the point where PII is the maximum, and fc is the center frequency in MHz. PII is the Pulse Intensity Integral that the total energy per unit...
- Page 21 Q9 Digital Color Doppler Ultrasound System controls. Direct: The Acoustic Output control has the most significant effect on Acoustic Output. Indirect: Indirect effects may occur when adjusting controls. Controls that can influence MI and TI are detailed under the bioeffect portion of each control in the Optimizing the Image chapter.
-
Page 22: Site Requirements
Q9 Digital Color Doppler Ultrasound System Chapter 3 Preparing the System for Use 3.1. Site Requirements 3.1.1. Operation Environmental Requirements The following environmental conditions are within system tolerances for operation: Temperature: 10º C ~ 40º C Relative Humidity: 30%~75%, non-condensing... -
Page 23: System Specifications
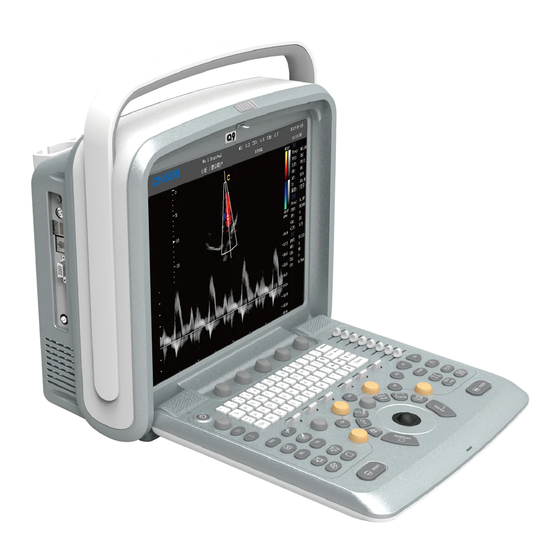
Q9 Digital Color Doppler Ultrasound System 3.1.2. Transport and Storage Environmental Requirements The following environmental transport and storage conditions are within system tolerances: Temperature: -5º C ~ 40º C Relative Humidity: ≤80% non-condensing Atmosphere Pressure: 700hPa ~ 1060hPa 3.1.3. Electrical Requirements... - Page 24 Q9 Digital Color Doppler Ultrasound System Fig. 3-1 a: Console Overview The following pictures show the system in different views. Handle S-Video USB port LAN port VGA port LCD monitor TV port Control panel Fig. 3-1 b: System Side View...
- Page 25 Q9 Digital Color Doppler Ultrasound System Fig. 3-1 c: System Back view 3.2.2. Physical Specification Dimensions of main unit (approx.): 370mm(Length)*185mm(Width)*395mm(Height) Net weight of main unit (approx): <11KG (no probe included) 3.2.3. Key System Features Display B(2D) 、B/B、4B、B/M、M、PWD、CFM、CPA、DPD、CW、Steer M、Color M 、TDI、...
- Page 26 Q9 Digital Color Doppler Ultrasound System Elliptical method and tracing method are provided for area/circumference measurement Many kinds of body marks can be displayed together with corresponding probe position indication. Comment function in image area of the screen, special comment terms for different exam mode can be added according to user’s requirement;...
-
Page 27: System Positioning & Transporting
Q9 Digital Color Doppler Ultrasound System V4C40L Foot switch 3.2.5. I/O ports VGA output for external monitor S-VIDEO,TV output for B&W video printer or Color video printer Remote port for video printer LAN port output for PC printer, DICOM and image review station 2 USB 2.0 ports for flash drive... -
Page 28: Powering The System
Q9 Digital Color Doppler Ultrasound System Use extra care when transporting the system in a vehicle. After preparing the system as described above, take the following additional precautions: Before transporting, place the system in its original storage case. Ensure that the system is firmly secured while inside the vehicle. - Page 29 Q9 Digital Color Doppler Ultrasound System WARNING: To avoid risk of fire, the system power must be supplied from a separate, properly rated outlet. Under no circumstances should the AC power plug be altered, changed, or adapted to a configuration rated less than specified. Never use an extension cord or adapter plug.
-
Page 30: Probes
Q9 Digital Color Doppler Ultrasound System NOTE: If the system is down or has not fully shut down, press and hold the Power button located on for more than 4 seconds and release it, this will force the system to shut the left of control panel down completely. -
Page 31: Deactivating The Probe
Q9 Digital Color Doppler Ultrasound System Carefully position the probe cord so it is free to move and is not resting on the floor. When the probe is connected, the system will be automatically recognized. CAUTION: Fault conditions can result in electric shock hazard. DO NOT touch the surface of probe connector that is exposed when the probe is removed. -
Page 32: Optional Installation
Q9 Digital Color Doppler Ultrasound System When transporting a probe a long distance, store it in its original carrying case. Storing the Probe It is recommended that all probes should be stored in the original carrying case. Place the probe connector into the carrying case. - Page 33 Q9 Digital Color Doppler Ultrasound System Fig. 3-3b 3) Connect the video signal cable to the TV port of the ultrasound system as below. See picture in Fig. 3-3c. Fig. 3-3c 3.6.2 Set the system for Video Printer. Caution: Please confirm the video printer is turned on and connected well with the main unit, then you can do below setting.
- Page 34 Q9 Digital Color Doppler Ultrasound System Fig.3-4 2 ) Choose "Extended Desktop" for “Operation Mode”. 3) Choose “Notebook” for “Primary Device”, and choose “Secondary Device” for “Television”, and then press “apply”. See picture in Fig.3-5 Fig.3-5 4) The below dialog box will appear, and press “OK”. See picture in Fig.3-6.
- Page 35 Q9 Digital Color Doppler Ultrasound System Fig.3-6 5) Set the video print option to choose different methods for video print. Choose the “General” setting, and select Keyboard submenu. See picture in Fig. 3-7. Fig.3-7 6) Choose “video print” under print key menu or Foot SW menu, and set the “video print option”.
-
Page 36: User Interface Control
Q9 Digital Color Doppler Ultrasound System “Image only” means only print the ultrasound image. “Standard” means print the ultrasound image with patient information. 7) Press the print key on keyboard or use foot switch for printing. Note: You need to restart the system after connect the cables between Video printer and the System. - Page 37 Q9 Digital Color Doppler Ultrasound System Blood Effection Steering Color ROI panning Doppler sample volume adjustment Doppler angle correction Baseline movement Time base scrolling speed Annotation Patient data entry Measurement and calculation package File management and image archiving Clip image saving...
- Page 38 Q9 Digital Color Doppler Ultrasound System This group of controls performs patient entry, exam mode/probe type selection and report production etc. Press system power key momentary on the left of Alphanumeric Keyboard to turn on the system. Press this key and choose “turn POWER off”...
- Page 39 Q9 Digital Color Doppler Ultrasound System If the probe supports CW mode, e.g. a phased array probe, press CW mode CW-key starts CW mode. The CW control operates in the same manner as the PW. Press the M-knob to enter B/M mode if the current mode is B;...
- Page 40 Q9 Digital Color Doppler Ultrasound System Press the key to browse images, edit or print the stored images, Browse etc. REPORT Press this key to generate a report with all the measurements PRINT Print the images when the printer is working.
- Page 41 Q9 Digital Color Doppler Ultrasound System In 2D (B and Color) cine mode, DIST-key is used for Distance measurement. In Doppler cine mode, press DIST-key one time to measure Flow DIST Velocity. In M cine mode, press DIST-key for Distance measurement...
- Page 42 Q9 Digital Color Doppler Ultrasound System In Color mode, use this paddle to change the CROI steer angle for STEER linear probe; in Doppler mode, this paddle can be used to change PW cursor steering directions for linear probe. Use this paddle to change the setting of the Wall Filter in the color WALL FILTER or Doppler modes.
-
Page 43: General Description
Q9 Digital Color Doppler Ultrasound System Chapter 4 Imaging 4.1. General Description How to begin an exam How to select a probe and an application. How to optimize the image The operations after getting the image: adding annotation and body mark, storing and recalling the image 4.2. - Page 44 Q9 Digital Color Doppler Ultrasound System Fig. 4-1 4.2.2. Patient Data Entry Press the PATIENT-key to display the Patient interface. Fig. 4-2 Method of entering the patient information: 1) Move the cursor to input area and input the patient information through the keyboard. Move trackball to...
- Page 45 Q9 Digital Color Doppler Ultrasound System exchange between each option. E.g., patient name, birthday (birthday result will be automatic calculated after entering the age), age (age result will be automatic calculated after entering the birthday), sex, weight, height.etc. 2) Click “OK” key to save the data after entering the appropriate information, then the system will go back to B mode.
- Page 46 Q9 Digital Color Doppler Ultrasound System operation note area:The first line shows the status of the current system. The second line indicates the current function of the trackball. In the picture Fig. 4-3, the first line display “freeze menu”. It means the system is in frozen status.
-
Page 47: Optimizing The Image
Q9 Digital Color Doppler Ultrasound System Fig. 4-5 Switch input language 4.3. Optimizing the Image 4.3.1. Image Parameters Display Meaning CFM/PD Meaning Meaning Meaning Sweep Freq. Frequency Freq. Frequency Speed Frame rate Wall Filter D: Dynamic range Wall Filter Doppler Gain... - Page 48 Q9 Digital Color Doppler Ultrasound System B/M Mode M Mode PW Mode CW Mode CFM Mode CPA Mode B/BC Mode Steer M Mode Color M Mode HPRF Mode Panoramic Imaging Mode TDI Mode 4.3.3. B Mode Intended Use: B-mode is intended to provide two-dimensional images and measurement capabilities concerning the anatomical structure of soft tissue.
- Page 49 Q9 Digital Color Doppler Ultrasound System key second time, system will freeze the image displayed at the left side and activate the image displayed at the right side at the same time. Press key continuously to achieve exchange of the freeze/real status between left side image and right side image.
- Page 50 Q9 Digital Color Doppler Ultrasound System 4.3.6. B/BC Mode In active color mode, turn the [B/BC] item on to display a real B mode image at the left side of the screen and active Color mode image at the right side of the screen.
- Page 51 Q9 Digital Color Doppler Ultrasound System Fig. 4-8 B/M Mode M-mode Exam Procedure: Get a good B-mode image. Survey the anatomy and place the area of interest near the center of the B-mode image. Press the M-knob, move the Trackball to position the M cursor over the area that you want to display in M- mode.
- Page 52 Q9 Digital Color Doppler Ultrasound System Trackball: used to move the Steer M line. Angle: used to rotate the Steer M line. 4.3.9. CFM mode Intended Use: CFM is a Doppler mode intended to add color-coded qualitative information concerning the relative velocity and direction of fluid motion within the B-mode image.
- Page 53 Q9 Digital Color Doppler Ultrasound System Fig. 4-9 CFM Mode CFM Scanning Hints: PRF: increase/decrease the PRF on the color bar. Imaging of higher velocity flow requires increased velocity scale values to avoid aliasing Wall Filter: affect low flow sensitivity versus motion artifact Color Map: allow you to select a specific color map.
- Page 54 Q9 Digital Color Doppler Ultrasound System Fig. 4-10 PD Mode Press CPA -key to enter into the CPA mode and then CPA lights is on Direction PD mode In Power Doppler(CPA) mode, press MENU -knob to pop up the PD Menu . Rotate MENU- knob to select the PD (CPA) Mode and press MENU-knob to enter into DPD mode.
- Page 55 Q9 Digital Color Doppler Ultrasound System anatomical sites. PW Doppler can be combined with B-mode for quick selection of the anatomical site for PW Doppler examination. The site where PW Doppler data is derived appears graphically on the B-mode image (Sample Volume Gate).
- Page 56 Q9 Digital Color Doppler Ultrasound System Doppler mode Scanning Hints: The best Doppler data will be got when the scanning direction is parallel to the direction of the blood flow; when the scanning direction is perpendicular to the anatomic target, you can get the best B mode image, so you should keep the balance as you don’t usually get both an ideal B-mode image and ideal Doppler data simultaneously.
- Page 57 Q9 Digital Color Doppler Ultrasound System 4.3.14. HPRF Mode High Pulse Repetition Frequency (HPRF) is a special operating mode of PW Doppler. In HPRF mode, multiple energy pulses are used. This allows higher velocities to be detected without causing aliasing artifacts.
- Page 58 Q9 Digital Color Doppler Ultrasound System 4.3.16. Elastography mode Ultrasound elastography is a new ultrasound technology to study traditional ultrasound can not detect tumors and spread of disease imaging, can be applied to the breast, thyroid, prostate and other aspects.
- Page 59 Q9 Digital Color Doppler Ultrasound System function for the first line; rotate shortcut can adjust parameters for next line. 3. Use other keys 4.3.18. Image Optimization of B Mode Soft menu adjustment: Menu Function Menu Adjustable Range Adjust scan width of B image; frame rate will be fast if scan width is...
- Page 60 Q9 Digital Color Doppler Ultrasound System position (rotate) Compound Open compound imaging On, Off imaging (press) i-Image Open optimizing image multi-step adjustable (rotate) It can be on or off while COMPOUND is Open SRA off. (press) 0~7 grade adjustable,clockwise for...
- Page 61 Q9 Digital Color Doppler Ultrasound System gain can adjust sensitivity of overall images (brightness). Rotate the knob of B mode could adjust B gain after the B light is on. The gain will be increased if rotate clockwise; the gain will be decreased if rotate contra.
- Page 62 Q9 Digital Color Doppler Ultrasound System Blood Effection Choose different blood effection Smooth, HighRes Shortcut Adjustment: Shortcut Menu Menu Function Menu Item adjustable Rang (action) Adjust the frequency of Frequency Refer to current probe probe (press) Adjust angle of sampling box...
- Page 63 Q9 Digital Color Doppler Ultrasound System 4.3.21. Power Doppler(CPA) Mode imaging optimization Soft menu adjustment: MENU Menu Function Menu Item Adjustable Rang Packet Size Adjust the value of packet size 6~15, adjust range: 1 Wall Thre. 0~15, adjust range:1 Adjust wall threshold...
- Page 64 Q9 Digital Color Doppler Ultrasound System Note: this function can only support linear probe. 4.3.22. Pulse Wave Doppler Imaging Optimization(PWD) Soft menu adjustment: MENU Menu Function Menu Item Adjustable Rang 2D Map Adjust the color of spectrum 1~6, adjust range: 1...
- Page 65 Q9 Digital Color Doppler Ultrasound System Other adjustments: 1、 PRF Hold faster or slower blood flow through rate adjustment. PRF toggle key is for adjusting the value of PRF and the maximum PRF value depends on the probe and the position of sampling gate.
- Page 66 Q9 Digital Color Doppler Ultrasound System Adjust PRF value The maximum PRF value depends on SK3(rotate) the probe and the position of sampling gate. Speed Adjust scanning speed SK4(rotate) 1,2,3 adjustable. Adjust clockwise, the numerical increase and adjust anticlockwise, the numerical decrease.
-
Page 67: After Capturing The Image
Q9 Digital Color Doppler Ultrasound System 4.4. After Capturing the Image 4.4.1. Adding Comments Comment means input the words or symbols on images for making explanation. Add comments can through keyboard input directly or using the default comments. Input characters Operation:... - Page 68 Q9 Digital Color Doppler Ultrasound System Operation: 1 In comments status, moves the cursor to comments note which need to be changed then press [ENTER] key. 4.4.2. Adding Body Mark Operation: 1、 Press BODY- key to enter into the body status.
- Page 69 Q9 Digital Color Doppler Ultrasound System Shortcut Action Reset the range of cine Set the initial Set the final Play or Pause playback,the default range of Press point of point of cine playback playback is 1-maximum playback playback frame of current cine...
- Page 70 Q9 Digital Color Doppler Ultrasound System Transfer files to DICOM. Transfer files to media. Delete the files. 4.4.5. Browse Images Press key to enter into the browse interface. Info:press this key can check the information of current patient. Report:press this key can see the report of current patient Close:click this key and choose to close information of patient.
- Page 71 Q9 Digital Color Doppler Ultrasound System Continue/Edit Exam:continue to check the current patient and back to B mode if press this key. If current exam is 24 hours later than last exam, the system will not allow you to continue the exam. The function will be changed to “Edit”...
- Page 72 Q9 Digital Color Doppler Ultrasound System Search: Can search the patient files after enter a search term. Search will be more accurate when input more conditions. Information:View the selected patient information. Backup:Click this item will store the database of this patient to the portable storage medium Recover: Click this item can recover the images or video from USB to the system Send to:Select the content and click, can send files to other medium.
- Page 73 Q9 Digital Color Doppler Ultrasound System After transmit into the target computer, open the shared folder, you can see the pictures you sent. 4.4.9. DICOM Function(Option) The system support DICOM storage, DICOM print, MPPS, WORKLIST, DICOM SR storage. 1. Connect the machine into LAN before setting the DICOM 2.
- Page 74 Q9 Digital Color Doppler Ultrasound System Add: Press this icon to add a DICOM service link Modify: Select the DICOM link which need to be modified. Press this icon to modify the parameters inside. Delete: Select the DICOM link which needs to be deleted. Press this icon to delete the DICOM link.
- Page 75 Q9 Digital Color Doppler Ultrasound System Service: Click the drop list to select storage function. AE title: Name the server at will Host: Set the IP of the service host Port: Make the port of the work station the same as the port of the server.
- Page 76 Q9 Digital Color Doppler Ultrasound System Service: Click the drop list to select print function. AE title: Name the server at will Host: Set the IP of the server Port: Make the port of the work station the same as the port of the server.
- Page 77 Q9 Digital Color Doppler Ultrasound System DICOM Worklist DICOM Worklist parameters setting. Service: Click the drop list to select worklist function. AE title: Name the server at will Host: Set the IP of the server Port: Make the port of the work station the same as the port of the server.
- Page 78 Q9 Digital Color Doppler Ultrasound System Press the keyboard button shaped as “ ”, and press “Worklist” Press “Search” to start a worklist update by the matching key specified in Worklist Configuration, all the matched items will be queried in worklist table. User also can add additional for matching keys, which are “PatientID”, “PatientName”, “Accession#”...
- Page 79 Q9 Digital Color Doppler Ultrasound System Service: Click the drop list to select MPPS function. AE title: Name the server at will Host: Set the IP of the server Port: Make the port of the work station the same as the port of the server.
- Page 80 Q9 Digital Color Doppler Ultrasound System Host: Set the IP of the server Port: Make the port of the work station the same as the port of the server. Alias: The name of current link Time out: time delay. Only OB/GYN and Cardiac report support this server.
-
Page 81: C Hapter 5 G Eneral M Easurements
Q9 Digital Color Doppler Ultrasound System Chapter 5 General Measurements Introduction Measurements and calculations derived from ultrasound images are intended to supplement other clinical procedures available to the physician. The accuracy of measurements is not only determined by system accuracy, but also by the use of proper medical protocols by the operator. -
Page 82: Fast Measurement
Q9 Digital Color Doppler Ultrasound System 【UPDATE】 During the measurement, UPDATE-KEY is used to switch the start point and end point, long axis and short axis when the measurement is not finished. During the distance measurement, press the【ENTER】to fix the start point, when the end point is not fixed, press the UPDATE-KEY to switch the start point and end point. - Page 83 Q9 Digital Color Doppler Ultrasound System same steps to create other distance pairs 6) Press the DIST-key or EXIT-key to exit. Distance ratio In B mode, press the DIST-key to bring up the first white plus sign (“+”) cursor. Rotate SK1,choose %stD。...
- Page 84 Q9 Digital Color Doppler Ultrasound System Volume—1 straight line 1) In B mode, press the distance-key or trace-key to enter the measurement mode. 2) Press SK3-key to enter volume measurement,the default measurement method is 1 straight line. Volume—1 ellipse 1) In B mode, press the distance-key or trace-key to enter the measurement mode.
- Page 85 Q9 Digital Color Doppler Ultrasound System Peak 1) In PW Cine mode, press the Dist-key to bring up the sample marker. 2) Move the marker to the measurement start point with the Trackball, press Enter key, velocity and pressure of the current point will appear on the screen automatically.
-
Page 86: Measurement And Calculation
Q9 Digital Color Doppler Ultrasound System 5)The measurement result will appear on the screen automatically. M Time 1) In M Cine mode, press the DIST-key to enter M distance measurement. The cursor“+”will appear on the screen. 2) Rotate SK1,choose M time. - Page 87 Q9 Digital Color Doppler Ultrasound System 1. Distance 1) Move the trackball to move the cursor to the “distance” item. Press Enter-key to select it and a mark “+”will appear on the screen 2) Move the trackball to anchor the first mark and press Enter-key to set it.
- Page 88 Q9 Digital Color Doppler Ultrasound System 6. Volume(2distance) Through 2 distance measurement, calculate the volume object. Volume =distance1×distance2×distance2×3.1415926/6 (distance1>distance2) Volume =distance2×distance1×distance1×3.1415926/6 (distance2>distance1) 7. Volume(3 distance) Through 3 distance measurement, calculate the volume of object Volume=distance1×distance2×distance3×3.1415926/6 8. Volume(1distance1ellipse) Through 1distance measurement and 1 ellipse measurement, calculate the volume of object.
- Page 89 Q9 Digital Color Doppler Ultrasound System 5.3.1.2. Cardiology Measurement in B mode Single Plane This method calculates the left ventricular volumes by using the 2D-mode long-axis image.When the left ventricle is traced and its long axis is specified on a 2D-mode cross-sectional image, this method allows the system to automatically divide the long axis into 20 segments to calculate the volume of the left ventricle as the 2D-mode cross- sectional image is rotated.
- Page 90 Q9 Digital Color Doppler Ultrasound System :Radius of i-th ellipse(4CH) LVLd: Length of the left-ventricular long axis at end diastole for 2CH or 4CH, whichever is longer. LVLs: Length of the left-ventricular long axis at end systole for 2CH or 4CH, whichever is longer.
- Page 91 Q9 Digital Color Doppler Ultrasound System (Distance)". Heart rate Refer to "Distance Measurement (Distance)". <<Items to be calculate>> Calc. item name Description [Unit] Calc. formula End-diastolic volume [mL] EDV =(5/6.0)*LVLd * LVAMd End-systolic volume [mL] ESV =(5/6.0)*LVLs * LVAMs Stroke Volume [mL] SV=EDV –...
- Page 92 Q9 Digital Color Doppler Ultrasound System [mL] volume>> End-systolic left ventricular volume Refer to << Calculation formula for [mL] volume>> Stroke volume [mL] SV=EDV – ESV Cardiac output [L/min] CO=SV x HR /1000 Ejection fraction [no unit] EF=SV/ EDV Cube Method This method calculates the left ventricular volume by approximating the given region to a cube.
- Page 93 Q9 Digital Color Doppler Ultrasound System <<Item to be measured>> Description Meas. item Meas. method name RVIDd Right ventricular short-axis diameter at end diastole Refer to "Distance Measurement (Distance)". IVSTd lnterventricular septal thickness at end diastole Refer to "Distance Measurement (Distance)".
- Page 94 Q9 Digital Color Doppler Ultrasound System Fractional shortening FS = (LVIDd -LVIDs)/LVIDd AO/LV <<Item to be measured>> Meas. item Description Meas. method name Root of aorta Root of aorta diameter Refer to "Distance Measurement (Distance)". LVIDd Light ventricular short-axis diameter at end diastole Refer to "Distance...
- Page 95 Q9 Digital Color Doppler Ultrasound System <<Item to be measured>> Description Meas. item Meas. method name AV Diam Tricuspid valve diameter Refer to "Distance Measurement (Distance)" AVArea Tricuspid valve area Refer "area Measurement 5.3.1.3. Urology Measurement in B mode Meas. item...
- Page 96 Q9 Digital Color Doppler Ultrasound System Note:SPSA must be input by manual in patient interface when you select the urology exam type Refer to "Distance Measurement (Distance) Length Refer to "Distance Measurement (Distance) Width Left_Kidney Refer to "Distance Measurement (Distance) Height V = (π/6) * Length* Width* Height...
- Page 97 Q9 Digital Color Doppler Ultrasound System 5.3.1.4 Pediatric Measurement in B mode Hip is used for evaluating the abnormity of the cotyle. In order to make measurement, user has to draw three lines on the image responding to the anatomy. The system will calculate the angles automatically.
- Page 98 Q9 Digital Color Doppler Ultrasound System 5.3.1.6 Vascular Measurement in B mode Meas. item mark unit Meas. Method and calc. formular name Prox CCA A Out Refer to “Area/Circumference Measurement A In (Area)” (Rt)/(Lt) StA% Refer to “Area/Circumference Measurement D Out (Area)”...
- Page 99 Q9 Digital Color Doppler Ultrasound System Prox The same as above The same as above The same as above (Rt)/(Lt) Mid ICA The same as above The same as above The same as above (Rt)/(Lt) Distal ICA The same as above...
- Page 100 Q9 Digital Color Doppler Ultrasound System The same as above The same as above The same as above ATA(Rt)/ (Lt) The same as above The same as above The same as above PTA(Rt)/ (Lt) The same as above The same as above The same as above PERON(Rt)...
- Page 101 Q9 Digital Color Doppler Ultrasound System Right_OV_Volume Right_OV_L Refer to "Distance Measurement (Distance) Right_OV_W Refer to "Distance Measurement (Distance) Right_OV_H Refer to "Distance Measurement (Distance) Right_OV_Volume PV = (π/6) * L* W* H Left_FO_D Length Refer to "Distance Measurement (Distance) Width Refer to "Distance Measurement (Distance)
- Page 102 Q9 Digital Color Doppler Ultrasound System 5.3.1.8 OB Measurement in B mode Meas. item name Mark Unit Meas. Method and calc. formular Refer "Distance Measurement week/day (Distance)” mm/dd/yyyy EDD = current date + (280days – average UGA) Refer "Distance Measurement...
- Page 103 Q9 Digital Color Doppler Ultrasound System week/day (Distance)” mm/dd/yyyy Refer "Distance Measurement week/day (Distance)” mm/dd/yyyy Refer "Distance Measurement HC(ellipse) week/day (Distance)” mm/dd/yyyy Refer "Distance Measurement week/day (Distance)” mm/dd/yyyy Refer "Distance Measurement week/day (Distance)” mm/dd/yyyy Refer "Distance Measurement AC(ellipse) week/day (Distance)”...
- Page 104 Q9 Digital Color Doppler Ultrasound System mm/dd/yyyy ULNA ULNA Refer "Distance Measurement week/day (Distance)” mm/dd/yyyy Tibian Tibian Refer "Distance Measurement week/day (Distance)” mm/dd/yyyy Refer "Distance Measurement (Distance)” Refer "Distance Measurement (Distance)” CLAV CLAV Refer "Distance Measurement week/day (Distance)” mm/dd/yyyy Refer "Distance...
- Page 105 Q9 Digital Color Doppler Ultrasound System LtRenalAP LtRenalAP Refer "Distance Measurement (Distance)” RtRenalAP RtRenalAP Refer "Distance Measurement (Distance)” LVWrHEM LVWrHEM Refer "Distance Measurement (Distance)” Refer "Distance Measurement (Distance)” Refer "Distance Measurement (Distance)” Refer "Distance Measurement (Distance)” Refer "Distance Measurement (Distance)”...
- Page 106 Q9 Digital Color Doppler Ultrasound System A Out Refer to "Area Measurement (Ellipse)” Subclavian A(Lt/Rt) A In Refer to "Area Measurement (Ellipse)” StA% StA %=(A Out-A In)/ A Out*100% D Out Refer to "Distance Measurement (Distance)” D In Refer to "Distance Measurement (Distance)”...
- Page 107 Q9 Digital Color Doppler Ultrasound System 5.3.1.10 Abdomen Measurement in B mode Meas. item name Mark Unit Meas. Method and calc. formular Refer to "Distance Measurement (Distance)” GB Wall GB Wall Refer to "Distance Measurement (Distance)” Liver Length Liver Refer to "Distance Measurement (Distance)”...
- Page 108 Q9 Digital Color Doppler Ultrasound System Volume Volume = (π/6) * Length* Width* Height Renal Vol.(Rt/Lt) Length Refer to "Distance Measurement (Distance)” Height Refer to "Distance Measurement (Distance)” Width Refer to "Distance Measurement (Distance)” Lliac(Rt/Lt) Height Refer to "Distance Measurement (Distance)”...
- Page 109 Q9 Digital Color Doppler Ultrasound System Time is the measurement between the two vertical time lines created by two cursors. The position of the horizontal distance line does not affect time measurements. 3. Velocity Velocity is the measurement between the intersections of the two cursors. Velocity can be positive or negative, and is measured as the rate of change between the two points defined by the intersections of the cursors in cm/sec.
- Page 110 Q9 Digital Color Doppler Ultrasound System Meas. item name Description [Unit] Meas. Method IVSd lnterventricular septal thickness at Refer to distance measurement end diastole [mm] (Distance)in B mode LVIDd Left ventricular short-axis Refer to distance diameter at end diastole [mm]...
- Page 111 Q9 Digital Color Doppler Ultrasound System ENDOS Endocardium of posterior wall of Refer to distance measurement in left ventricular at systole M mode EPIS Epicardium at systole Refer to distance measurement in M mode <<Items to be calculated>> Calc. item name Description [Unit] Calc.
- Page 112 Q9 Digital Color Doppler Ultrasound System mode <<Items to be calculated>> Calc. item name Description [Unit] Calc. formula Ratio between LA and aorta LAR=LAS/AOD Ratio between PEP and LVET ETR=PEP/LVET 7. AVSHORT <<Items to be measured>> Meas. item name Description [Unit] Meas.
- Page 113 Q9 Digital Color Doppler Ultrasound System <<Items to be measured>> Meas. item name Description [Unit] D wave E wave F wave EPSS The distance between mitral valve and interventricular septum <<Items to be calculated>> Calc. item name Description [Unit] EPSS...
- Page 114 Q9 Digital Color Doppler Ultrasound System Ejection time[ms] M Time RVOTD Diameter of right ventricular M distance outlet[mm] 11. AO/LV <<Items to be measured>> Meas. item name Description [Unit] Meas. Method AO Root Aorta diameter[mm] M distance LA Diam Left ventricular diameter[mm]...
- Page 115 Q9 Digital Color Doppler Ultrasound System 5.3.3.1 General Measurement in PW mode 1. Velocity Rotate the trackball to move the cursor to the velocity item in the menu and press Enter-key to select it. A cursor”+” will appear on the screen.
- Page 116 Q9 Digital Color Doppler Ultrasound System Move the cursor by rotating the trackball to the start point of the one cycle and press Enter-key to fix it. A second cursor “|” will appear. Rotate the trackball the end point of the cycle and press Enter-key to fix it.
- Page 117 Q9 Digital Color Doppler Ultrasound System 5. Manual trace Automatically measure the Peak Systolic Velocity, VTI, end diastolic velocity, HR, Time, minimum velocity, PI, and RI after manually tracing of the curve is finished. Note: Manual trace requires the user to trace two peak point of two cycles 6.
- Page 118 Q9 Digital Color Doppler Ultrasound System 5.3.3.2 Cardiology Measurement in PW mode 1. MV Measurement of Mitral valve function is performed in frozen Doppler spectral trace. <<Measurement and calculation items>> Meas. item name Description [Unit] Meas. procedure / Calc. formula...
- Page 119 Q9 Digital Color Doppler Ultrasound System 2) Measure [MV V Trace]. 3) Measure [MV Diameter 2. AV Measurement of aortic valve function is performed by using 2-D-mode and Doppler images. <<Measurement items>> Meas. Item name Description [Unit] Meas. method LVOT Vel PW-mode LV out tract flow Refer to "Velocity Measurement'.
- Page 120 Q9 Digital Color Doppler Ultrasound System AoV VM Meas. Item name Description [Unit] Meas. method AoV MPG Aortic valve mean pressure Refer to “Full trace” gradient [mmHg] AoV PPG Aortic valve maximum Refer to “Full trace” pressure gradient [mmHg] LVOT Diam Left ventricular outflow tract Refer to “Distance Measurement in B...
- Page 121 Q9 Digital Color Doppler Ultrasound System Tricuspid valve mean pressure gradient TV MPG Refer to " Manual Trace Measurement ". [mmHg] Tricuspid valve maximum pressure Refer to "Manual Trace Measurement ". TV PPG gradient [mmHg] TV Vel Tricuspid valve velocity [cm/s] Refer to "Velocity Measurement”.
- Page 122 Q9 Digital Color Doppler Ultrasound System PV Max PG Maximum pressure gradient Refer to "Velocity Measurement” [mmHg] PV Diam Pulmonary artery diameter Refer to "Distance Measurement in B [mm] mode”. Heart rate [bpm] Refer to "Heart Rate Measurement (HR)” RV ET Ejection time [ms] Refer to "Time Measurement (Time)”...
- Page 123 Q9 Digital Color Doppler Ultrasound System 4) Measure [PV Diam] 5.3.3.3 Urology Measurement in PW mode The measurement method and calculation items are the same as general measurement in PW mode 5.3.3.4 Pediatric Measurement in PW mode The measurement method and calculation items are the same as general measurement in PW mode.
-
Page 124: Edit Measurement Results
Q9 Digital Color Doppler Ultrasound System Edit measurement results After the user finishes the measurements, this system allows users to move the position of measurement results, or change the font size of measurement results. To move result position, operations are as follows: In the measurement status, rotate SK2-key to choose “Move result position”. - Page 125 Q9 Digital Color Doppler Ultrasound System report to remove it. Preview: preview the whole report and its format before printing Print: print the current report, please make sure that the printer is nomal working. Save: store the report on the disk.
- Page 126 Q9 Digital Color Doppler Ultrasound System Input Template: Input annotation from templates...
-
Page 127: Chapter 6 Preset
Q9 Digital Color Doppler Ultrasound System Chapter 6 Preset 6.1. Recall Preset a) Press button to choose the probe type. b) Choose a clinical application. c) Choose a preset. d) Choose a user defined preset and double-click it. The default choice of the system is DEFAULT preset. -
Page 128: Manage Preset
Q9 Digital Color Doppler Ultrasound System 6.3. Manage Preset Press key to enter into system setting interface. Select preset page. Add or delete the current preset. Name: input Application/Preset/User Defined name. Exam Type: select clinical application. Add: add Application/Preset. Delete: delete a Application/Preset . -
Page 129: General Settings
Q9 Digital Color Doppler Ultrasound System Chapter 7 System Setting Press the key to enter system setting interface. User can do user-defined setting. 7.1. General settings Normal Settings: set the hospital information, date-time, language etc. Hospital Input hospital name, department name hospital;Department;... - Page 130 Q9 Digital Color Doppler Ultrasound System seconds fast storage User-defined setting the storage seconds Fast storage manually Storage derive to mobile medium Color Map Click the Configure key to set the color map Keyboard Settings, Footswitch Choose the footswitch function Video Print;PC Print;...
-
Page 131: Measurement
Q9 Digital Color Doppler Ultrasound System 7.2 Measurement Set the measurement formula of measurement. Edit Settings: Click the measurement page, and click on the Edit page, then users can edit custom configuration measurement. 1、Package Name: Choose the different examinations. 2、Choose the different exam modes. - Page 132 Q9 Digital Color Doppler Ultrasound System Font size: Set to default font size of the measurement results HR cycle options: One cycle: one cycle to measure heart rate in the Doppler envelope calculation Two cycles: two cycles to measure heart rate in the Doppler envelope calculated, the result will be more accurate.
-
Page 133: Comment
Q9 Digital Color Doppler Ultrasound System Set measurement Item: choose a measurement project, gestational age table or developmental table, and then choose a formula, click the information button, you can view the current formula. Click New, you can create a new formula in the current directory. -
Page 134: Report
Q9 Digital Color Doppler Ultrasound System Edit notes: 1. Select exam type, select annotation that needs to be edited 2. Input the comments in the lower right corner of the comment box. Input the abbreviations in the abbreviation box. 3. Press the edit-key, finish the edition of current comment. - Page 135 Q9 Digital Color Doppler Ultrasound System Report Name:select report type Left:Set left margins Right:Set right margins Top:Set top margins Bottom:Set bottom margins Sections: list all the sections which can be added Selected sections: Section used in current report All: Click this button to add " available section " to " selected section Add: Select the section that need to be added, then click this button, add selected section "selected section"...
- Page 136 Q9 Digital Color Doppler Ultrasound System Modify template note: Select the template note which you want to change, input modification content in the right box Add Folder: Press this icon to add a new Folder and name it. Add Item: Press this icon to a new Item under current folder, and name it.
-
Page 137: Network
Q9 Digital Color Doppler Ultrasound System 7.5 Network ress key to enter into the system setting unit. Click the page of Network Settings to enter into the network settings interface. Before setting up the network settings, plug the cable into the LAN port of the system. - Page 138 Q9 Digital Color Doppler Ultrasound System Configuration information: Click this button to display the network configuration information For more information: Click this button to display network details Release of the connection: Click this button to disconnect the current connection Update Connection: Click this button to update the current connection status Network test: in the case of network connection status is connected, enter the IP address of the test, click the test, you can test the network the connection status between the IP of current system and the IP that needs to be tested.
- Page 139 Q9 Digital Color Doppler Ultrasound System Select “Share this folder”, and click “Permissions” to modify user permissions. Select “Full Control”, “Change”, “Read” for “Allow”, click “OK” to complete modification.
- Page 140 Q9 Digital Color Doppler Ultrasound System Click Network Storage page, enter the network storage settings page. Then input shared directory name and IP address, and click Add. Shared Dir: The shared directory name should be same as the shared folder name in target computer.
-
Page 141: System
CHISON's authorized service engineer to get the corresponding password. Software Lease: Key Input It is time to the data time, Q9 cannot be entered for use. User can decode by pressing Key Input key and input the code which gets from CHISON's authorized service engineer. - Page 142 Q9 Digital Color Doppler Ultrasound System Operating methods: insert U disk with installation driver to the system, click “Install Driver”, Select the driver, click “Install”, the system will jump out installation guide. Complete the installation by following up the guide.
- Page 143 Q9 Digital Color Doppler Ultrasound System Click “Yes” Select “Dynamic Mode”, click “Install”...
- Page 144 Q9 Digital Color Doppler Ultrasound System Being installed automatically Click “Finish” to finish the printer installation. Add:Click “Add”, complete adding printer according to operation guide.
- Page 145 Q9 Digital Color Doppler Ultrasound System Click “NEXT” Select “Local printer attached to this computer”, and Click “Next”.
- Page 146 Q9 Digital Color Doppler Ultrasound System Select “Use the following port”, and click “Next”. Select the printer, and click "Next".
- Page 147 Q9 Digital Color Doppler Ultrasound System Select “Keep existing driver (recommended)”, and Click “Next”. Select “Yes”, and Click "Next".
- Page 148 Q9 Digital Color Doppler Ultrasound System Select “Yes” to print a test page, and click “Next” to continue. Click “Finish”. Display Settings: The settings include display device, display Settings, color correction, short Keys etc..
- Page 149 Q9 Digital Color Doppler Ultrasound System Display Devices:set display device Operating Mode:Select display Mode. There are 3 options: Single Display:Single display Intel(R)Dual Display Clone:Intel(R)Dual Display copy, the display content of two screens are the same. Extended Desktop:Expanded display Display Selection:Select display device.
- Page 150 Please follow the instructions above strictly when changing the display setting or installing the printer driver. Any other changes are not allowed. If user changes to wrong settings, it may cause the system abnormal or malfunction. Any doubt or question, please contact CHISON's authorized service engineer.
-
Page 151: Chapter 8 Probe
Before and after each use, inspect carefully the probe’s lens, cable, casing, and connector. Look for any damage that would allow liquid to enter the probe. If any damage is suspected, do not use the probe until it has been inspected and repaired/replaced by a CHISON's authorized service engineer. NOTE:... -
Page 152: Cleaning And Disinfecting
Before inserting the connector into the probe port, inspect the probe connector pins. If a pin is bent, DO NOT use the probe until it has been inspected and repaired/replaced by a CHISON's authorized service engineer. Electrical leakage checks should be performed on a routine basis by CHISON's authorized service engineer. - Page 153 Q9 Digital Color Doppler Ultrasound System A defective probe or excess force can cause patient injury or probe damage: Observe depth markings and do not apply excessive force when inserting or manipulating endocavitary probe. Inspect probes for sharp edges or rough surfaces that may injure sensitive tissue.
- Page 154 Q9 Digital Color Doppler Ultrasound System Diagnostic ultrasound systems utilize ultrasound energy that must be coupled to the patient by direct physical contact. Depending on the type of examination, this contact occurs with a variety of tissues ranging from intact skin in a routine exam to recirculating blood in a surgical procedure.
- Page 155 Q9 Digital Color Doppler Ultrasound System Rinse the probe with enough clean potable water to remove all visible soap residue. Air dry or dry with a soft cloth. CAUTION: To minimize the risk of infection from blood-borne pathogens, you must handle the probe and all disposables that have contacted blood, other potentially infectious materials, mucous membranes, and non-intact skin in accordance with infection control procedures.
- Page 156 CAUTION: Please do not use any gel or other materials which are not provided by CHISON. Un-authorized gel, lubricants and other materials may corrode probes and other parts of the device, for example the keyboard.
- Page 157 Q9 Digital Color Doppler Ultrasound System The following maintenance plan is suggested for the system and probes to ensure optimum operation and safety. Daily: inspect the probes After each use: clean the probes disinfect the probes. As necessary: inspect the probes, clean the probes, and disinfect the probes.
- Page 158 Q9 Digital Color Doppler Ultrasound System probe clean. There are four generally recognized categories of disinfection and sterilization. Sterilization is the complete elimination of all forms or microbial life including spores and viruses. Disinfection, the selective removal of microbial life, is divided into three classes: High-Level Disinfection - Destruction/removal of all microorganisms except bacterial spores.
- Page 159 Q9 Digital Color Doppler Ultrasound System Other agents such as quaternary ammonium compounds are not considered high level disinfectants and should not be used. Isopropanol is not a high level disinfectant when used as a wipe and probe manufacturers generally do not recommend soaking probes in the liquid.
-
Page 160: Probe Operation Instructions
Q9 Digital Color Doppler Ultrasound System Obstet. Gynecol 1996;87:27-9. Milki AA, Fisch JD. Vaginal ultrasound probe cover leakage: implications for patient care. Fertil Steril 1998;69:409-11. Hignett M, Claman P. High rates of perforation are found in endovaginal ultrasound probe covers before and after oocyte retrieval for in vitro fertilization-embryo transfer. - Page 161 Q9 Digital Color Doppler Ultrasound System Only water-solvable solutions or gel can be used. Petroleum or mineral oil-based materials may harm the cover. When the transvaginal probe is activated outside patient’s body, its acoustic output level should be decreased to avoid any harmful interference with other equipment.
- Page 162 Q9 Digital Color Doppler Ultrasound System usable). When cleaning the TV probe, it is important to be sure that all surfaces are thoroughly cleaned. Disinfecting 2% Glutaraldehyde-based solutions have been shown to be very effective for this purpose. Cidex is the only germicide that has been evaluated for compatibility with the material used to construct the probes.
-
Page 163: C Hapter 9 S Ystem M Aintenance And T Roubleshooting
To avoid electric shock hazard, do not remove panels or covers from console. This servicing must be performed by CHISON's authorized service engineer. Failure to do so could serious injury. If any defect is observed or malfunctions occur, do not operate the equipment but inform CHISON’s authorized... - Page 164 Q9 Digital Color Doppler Ultrasound System service engineer for information. Weekly Maintenance The system requires weekly care and maintenance to function safely and properly. Clean the following: LCD monitor Operator control panel Footswitch Printer Cleaning the System Prior to cleaning any part of the system, turn off the system power and disconnect the power cord. See Section 3.4.4“Power Off”...
-
Page 165: Safety Check
Q9 Digital Color Doppler Ultrasound System When cleaning the operator control panel, make sure not to spill or spray any liquid on the controls, into the system cabinet, or in the probe connection receptacle. DO NOT use Tspray or Sani Wipes on the control panel. -
Page 166: Service Responsibility
4)Please make sure the switch on the rear panel of printer is “on” status. 9.5 Service Responsibility If users install, use and maintain the system fully according to CHISON’s installation manual, operation manual and service manual, then CHISON Q9 main unit has a life time of 5 years and... - Page 167 Q9 Digital Color Doppler Ultrasound System CHISON Q9 probes have life time of 5 years after ex-work (except that the 4D probe V4C40L life time is 18 months). The warranty of the system and probes after ex-work is as the time in the warranty card.
- Page 168 Q9 Digital Color Doppler Ultrasound System Manufacturers Association, Rosslyn, VA; 2004a. 2) Implementation of the Principle of As Reasonably Achievable (ALARA) for Medical and Dental Personnel, National Council on Radiation Protection and Measurements (NCRP), report NO.107, December 31,1990 3) FDA Center for Devices and radiological Health (CDRH), 510(K) Guidance for Diagnostic Ultrasound and...
-
Page 169: Ce R Epresentative
Q9 Digital Color Doppler Ultrasound System Appendix A The Information of CE Representative Shanghai International Holding Corp.GmbH(Europe) Add: Eiffestrasse 80,20537 Hamburg,Germany Tel: 0049-40-2513175 Fax:0049-40-255726 E-mail: antonsissi@hotmail.com shholding@hotmail.com... -
Page 170: Recovery F Unction
Q9 Digital Color Doppler Ultrasound System Appendix B System one-key-recovery Function This system has one-key-recovery function. User can use this function to recovery system when the system has problems. Detailed operations are as follows: 1. Press button to boot the system. - Page 171 Q9 Digital Color Doppler Ultrasound System 4. After click “Chison System Recovery”, the system will start to backup ultrasound system data, after finishing the backup, the system will transfer to the recovery procedure automatically, and the following interface will pop up.
- Page 172 Q9 Digital Color Doppler Ultrasound System Callout the display setting interface, and set up Operating Mode and Display Selection respectively. Click “OK” , the following interface will pop up, and click “OK” again to confirm it.
- Page 173 Q9 Digital Color Doppler Ultrasound System...
- Page 174 Q9 Digital Color Doppler Ultrasound System Appendix C MAXIMUM ACOUSTIC OUTPUT REPORT Acoustic Output Table System: Q9 Transducer Model: D3C60L-B Operating Mode: Non- - - - scan scan scan scan Index Label Scan Scan Non- - - - scan scan...
- Page 175 Q9 Digital Color Doppler Ultrasound System Acoustic Output Table System: Q9 Transducer Model: D3C60L-B Operating Mode: Non- - - - scan scan scan scan Index Label Scan Scan Non- - - - scan scan Scan Scan scan scan Aaprt Aaprt...
- Page 176 Q9 Digital Color Doppler Ultrasound System Acoustic Output Table System: Q9 Transducer Model: D3C60L-B Operating Mode: Non- - - - scan scan scan scan Index Label Scan Scan Non- - - - scan scan Scan Scan scan scan Aaprt Aaprt...
- Page 177 Q9 Digital Color Doppler Ultrasound System Acoustic Output Table System: Q9 Transducer Model: D3C60L-B Operating Mode: Non- - - - scan scan scan scan Index Label Scan Scan Non- - - - scan scan Scan Scan scan scan Aaprt Aaprt...
- Page 178 Q9 Digital Color Doppler Ultrasound System Acoustic Output Table System: Transducer Model: D3P64L Operating Mode: Non- - - - scan scan scan scan Index Label Scan Scan Non- - - - scan scan Scan Scan scan scan Aaprt Aaprt Aaprt...
- Page 179 Q9 Digital Color Doppler Ultrasound System Acoustic Output Table System: Q9 Transducer Model: D3P64L Operating Mode: Non- - - - scan scan scan scan Index Label Scan Scan Non- - - - scan scan Scan Scan scan scan Aaprt Aaprt...
- Page 180 Q9 Digital Color Doppler Ultrasound System Acoustic Output Table System: Q9 Transducer Model: D3P64L Operating Mode: Non- - - - scan scan scan scan Index Label Scan Scan Non- - - - scan scan Scan Scan scan scan Aaprt Aaprt...
- Page 181 Q9 Digital Color Doppler Ultrasound System Acoustic Output Table System: Q9 Transducer Model: D3P64L Operating Mode: Non- - - - scan scan scan scan Index Label Scan Scan Non- - - - scan scan Scan Scan scan scan Aaprt Aaprt...
- Page 182 Q9 Digital Color Doppler Ultrasound System Acoustic Output Table System: Transducer Model: D7L40L Operating Mode: Non- - - - scan scan scan scan Index Label Scan Scan Non- - - - scan scan Scan Scan scan scan Aaprt Aaprt Aaprt...
- Page 183 Q9 Digital Color Doppler Ultrasound System Acoustic Output Table System: Q9 Transducer Model: D7L40L Operating Mode: Non- - - - scan scan scan scan Index Label Scan Scan Non- - - - scan scan Scan Scan scan scan Aaprt Aaprt...
- Page 184 Q9 Digital Color Doppler Ultrasound System Acoustic Output Table System: Q9 Transducer Model: D7L40L Operating Mode: Non- - - - scan scan scan scan Index Label Scan Scan Non- - - - s s s s can Scan Scan Aaprt...
- Page 185 Q9 Digital Color Doppler Ultrasound System Acoustic Output Table System: Q9 Transducer Model: D7L40L Operating Mode: Non- - - - scan scan scan scan Index Label Scan Scan Non- - - - scan scan Scan Scan scan scan Aaprt Aaprt...
- Page 186 Q9 Digital Color Doppler Ultrasound System Acoustic Output Table System: Transducer Model: D6C12L Operating Mode: Non- - - - scan scan scan scan Index Label Scan Scan Non- - - - scan scan Scan Scan scan scan Aaprt Aaprt Aaprt...
- Page 187 Q9 Digital Color Doppler Ultrasound System Acoustic Output Table System: Q9 Transducer Model: D6C12L Operating Mode: Non- - - - scan scan scan scan Index Label Scan Scan Scan Scan Non- - - - scan scan scan scan Aaprt Aaprt...
- Page 188 Q9 Digital Color Doppler Ultrasound System Acoustic Output Table System: Q9 Transducer Model: D6C12L Operating Mode: Non- - - - scan scan scan scan Index Label Scan Scan Scan Scan Non- - - - scan scan scan scan Aaprt Aaprt...
- Page 189 Q9 Digital Color Doppler Ultrasound System Acoustic Output Table System: Q9 Transducer Model: D6C12L Operating Mode: Non- - - - scan scan scan scan Index Label Scan Scan Non- - - - scan scan Scan Scan scan scan Aaprt Aaprt...
- Page 190 Q9 Digital Color Doppler Ultrasound System Acoustic Output Table System: Transducer Model: D12L40L Operating Mode: Non- - - - scan scan scan scan Index Label Scan Scan Non- - - - scan scan Scan Scan scan scan Aaprt Aaprt Aaprt...
- Page 191 Q9 Digital Color Doppler Ultrasound System Acoustic Output Table System: Q9 Transducer Model: D12L40L Operating Mode: Non- - - - scan scan scan scan Index Label Scan Scan Scan Scan Non- - - - scan scan scan scan Aaprt Aaprt...
- Page 192 Q9 Digital Color Doppler Ultrasound System Acoustic Output Table System: Q9 Transducer Model: D12L40L Operating Mode: Non- - - - scan scan scan scan Index Label Scan Scan Scan Scan Non- - - - scan scan scan scan Aaprt Aaprt...
- Page 193 Q9 Digital Color Doppler Ultrasound System Acoustic Output Table System: Q9 Transducer Model: D12L40L Operating Mode: Non- - - - scan scan scan scan Index Label Scan Scan Scan Scan Non- - - - scan scan scan scan Aaprt Aaprt...
- Page 194 Q9 Digital Color Doppler Ultrasound System Acoustic Output Table System: Transducer Model: V4C40L Operating Mode: Non- - - - scan scan scan scan Index Label Scan Scan Non- - - - scan scan Scan Scan scan scan Aaprt Aaprt Aaprt...
- Page 195 Q9 Digital Color Doppler Ultrasound System Display Accuracy and Acoustic Measurement Uncertainties According to IEC60601-2-37 and NEMA UD-3 2004, the display accuracy and acoustic measurement uncertainties are summarized in the table below. Display accuracy of MI is ±20%, and TI is ±40% or <0.1, if MI,TI below 0.5.
-
Page 196: S Urface T Emperature
The calculation of the expanded uncertainty is based on the ISO Guide tout ye Expression of uncertainty in measurement. Three transducer samples have been tested and the confidence coefficient is at 95%,the value of t.975 is 4.30. The measurement data were obtained under the test conditions employed at CHISON. Ambient Maximum surface... - Page 197 IEC 61000-3-3 2. Guidance and manufacturer’s declaration – electromagnetic immunity The Q9 is intended for use in the electromagnetic environment the Q9 should assure that it is used in such an environment. Immunity test IEC 60601...
- Page 198 Q9 Digital Color Doppler Ultrasound System Surge ±1 kV line(s) to ±1 kV line(s) to Mains power quality IEC 61000-4-5 line(s) line(s) should be that ±2 kV line(s) to earth ±2 kV line(s) to earth of a typical commercial or hospital environment.
- Page 199 If the measured field strength in the location in which the Q9 is used exceeds the applicable RF compliance level above, the Q9 should be observed to verify normal operation. If abnormal performance is observed, additional measures may be necessary, such as reorienting or relocating the Q9.
- Page 200 RF communications equipment and the Q9 The Q9 is intended for use in an electromagnetic environment in which radiated RF disturbances are controlled. The customer or the user of the Q9 can help prevent electromagnetic interference by...
-
Page 201: Appendix F Measurement Results Summary
Q9 Digital Color Doppler Ultrasound System APPENDIX F MEASUREMENT RESULTS SUMMARY Measurement Useful Range Accuracy Distance Full Screen <±5% Circumference: Full Screen <±5% trace method,ellipse method Area: Full Screen <±10% trace method,ellipse method Volume Full screen <±10% Angle Full screen <±5%...
Need help?
Do you have a question about the Q9 and is the answer not in the manual?
Questions and answers