
Related Manuals for BURY CC 9055


Summary of Contents for BURY CC 9055
-
Page 1: Table Of Contents
CC 9055 Index Introductory information 1. General 2. Security guidelines Installation of the hands-free car kit 3. Scope of supply 4. Positioning and mounting 5. Connecting the Electronic box 6. Installation of the audio switchbox AC 5120 7. Installation instructions for the fuses Operating guidelines 8. -
Page 2: Introductory Information
Congratulation on purchasing a BURY hands-free car kit. You have cho- sen a high quality product that is extremely easy to use. All aspects of BURY production through to sales and service are subject to strict qua- lity management according to DIN EN ISO 9001. All BURY hands-free car kits meet CE and e1 security standards. - Page 3 Faults Do not commission the device if you detect or assume a defect. In this case, contact a Bury specialised dealer or our hotline. Improper repair efforts can be dangerous for you. Therefore, only skilled personnel may perform inspections.
-
Page 4: Installation Of The Hands-Free Car Kit
Installation of the hands-free car kit 3. Scope of supply... - Page 5 Description of the components: 1) Electronics box (with or without an internal switch box, depending on version) 2) Monitor on installation pad 3) Microphone 4) Installation and Operating manual on CD 5) Fixing screws for electronics box, rider, adhesive pad, cleaning cloth Variant 1: 6) External loudspeaker switch-box AC 5120 Variant 2:...
-
Page 6: Positioning And Mounting
Installation of the hands-free car kit 4. Positioning and mounting Step 1: First of all, please choose the most convenient position for the monitor and the installation pad in your vehicle by attaching the monitor / hook- and-loop fastener to the pad and checking different positions in the vehicle. - Page 7 Example of installation 1: Example of installation 2:...
- Page 8 Installation of the hands-free car kit Step 2: Depending on the vehicle type and its equipment (e.g. airbags), it is reasonable to install the microphone either at the A-pillar, at the sun shield or at the roof interior. For details about the equipment features please refer to the vehicle documents.
-
Page 9: Connecting The Electronic Box
Refer to the separate chapter: Installation of the audio switch box AC 5120 2 - System 9 Socket Socket for connection of the basePlate suitable for the CC 9055 from the System 9. 3 - Voice output of the hands-free car kit... - Page 10 Refer to separate chapter: Installation of the audio switch box AC 5120 4 - Speaker output Please connect the 3.5 mm jack plug of the external BURY loudspeaker (available as an accessory) to this socket. 5 - Microphone input This is where you plug in the microphone jack. After connection 3 has already been occupied use the rider.
-
Page 11: Installation Of The Audio Switchbox Ac 5120
If your car radio doesn‘t have this function, then the signals will be suppressed by the speaker switchbox. You can use the AC 5120 through the connections that your BURY hands free car kit offers, which guarantee voltage supply via molex plugs and also have a speaker output. - Page 12 Installation of the hands-free car kit Now disconnect the (a) and/or the (b) loudspeaker connector from the speaker socket on the radio at the back. Connect this connector with the suitable socket (3) on the AC 5120. Now con- nect the plug (4) with the radio. Depending on the switcher position (5), the voice of your conversation partner will be fed back through either the front right speaker, the front left speaker, or through both of the front loudspeakers.
- Page 13 Different connections of the ISO plug on the radio The layout of the pins on the ISO plug used in a car depends on the type of car. Before using the switchbox, you should make sure that the connections are correct in order to prevent possible damage to the device.
- Page 14 Installation of the hands-free car kit In the operating manual of the radio device, you can find the pin assignment for the “mute” signal. This signal can occur on one of three cables marked with “mute1”, “mute2”, or “mute3”. mute 1 mute (yellow) mute 2 radio device...
-
Page 15: Installation Instructions For The Fuses
7. Installation instructions for the fuses If you install the CC 9055 without the AC 5120 switch box then the power supply must be secured with a fuse in the way described below. Please cut through the red, the black and the blue cable by means of a wire cutter or scissors. Now insert the two endings of the red cable resulting from the cut into one of the binders, then close it. -
Page 16: Operating Guidelines
® search for Bluetooth devices. In this case, search for a device labelled ® „CC 9055“. If several devices were identified, please select the HFCK and enter the PIN number 1234. The Bluetooth connection (pairing) ® will then be established between your mobile phone and the HFCK. The HFCK supports the profiles „hands-free operation“... - Page 17 If it is not possible to establish a connection, please check and update the software release (firmware) of your mobile phone or of the HFCK. You will find an overview dealing with this subject on the Internet at www.bury.com. Please note: In the internet you can find an overview with a large number of mobile telephones which have been tested with this hands-free car kit.
-
Page 18: Disconnect A Bluetooth ® Connection
Operating guidelines 10. Disconnect a Bluetooth connection ® If you wish to cancel a Bluetooth connection, you can either discon- ® nect it conveniently at the HFCK or at your mobile phone. In addition, the connection is disconnected, if you move too far away from the ve- hicle while taking your mobile phone with you and thus leave the recep- tion radius of the HFCK. - Page 19 Menu structure – no telephone connected: -> Day / night -> Automatic connection -> Sleep mode -> Off -> 15 seconds -> 30 seconds -> 60 seconds -> Voice commands (voice tags, inactive) -> Music (music player control panel) -> Bluetooth ->...
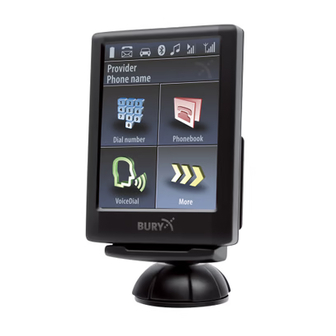
- Page 20 Operating guidelines Menu structure – telephone connected: -> Dial number -> Telephone book -> Call lists -> Missed calls -> Calls made -> Received calls -> Voice commands (voice tags) -> Music (music player control panel) -> Bluetooth -> Display linked telephones ->...
- Page 21 Dial number In this menu you can comfortably enter the telephone number you wish to dial using the touch-screen. The field with the number zero has a double function. If you press the symbol for 2 seconds then a plus sign appears and completely replaces the previously entered numbers.
- Page 22 Operating guidelines Music If your mobile telephone possesses the Bluetooth profile A2DP, you can play music (e.g. MP3 files) in stereo quality via the HFCK. It is important to play the music title selected respectively on the HFCK via the func- tion ‚play via...‘.
- Page 23 Ring tones Many mobile telephones also transfer their own ring tone to the HFCK during an incoming call. There are exceptions, however. In such in- stances you can specify a signal tone here which you want to be played back. Languages The menu language setting you can choose here.
- Page 24 You should write down these data if you have problems in using the HFCK with your mobile telephone and contact the Bury hotline or if you e.g. wish to update the firmware (the operating system of the HFCK).
-
Page 25: Further Information
In case of general or technical queries, suggestions and comments, please do not hesitate to contact our team at any time. Suggestions and feedback are always welcomed: BURY GmbH & Co. KG Robert-Koch-Straße 1-7 32584 Löhne Hotline: +49(0)180 5 - 842 468*... - Page 26 Federal Communications Commission (FCC) Compliance Statement - United States This device complies with part 15 of the FCC Rules. Operation is subject to the following two conditions: 1 This device may not cause harmful interference, and 2 the device must accept any interference received, including interfe- rence that may cause undesired operation.
Need help?
Do you have a question about the CC 9055 and is the answer not in the manual?
Questions and answers