
Related Manuals for Primera FX400e


Summary of Contents for Primera FX400e
- Page 1 021109-FX400E-(01) (FX400e Foil Imprinting System) User's Manual © 2009 All rights reserved...
- Page 2 Notices : The information in this document is subject to change without notice. NO WARRANTY OF ANY KIND IS MADE WITH REGARD TO THIS MATERIAL, INCLUDING, BUT NOT LIMITED TO, THE IMPLIED WARRANTIES OF MERCHANTABILITY AND FITNESS FOR A PARTICULAR PURPOSE. No liability is assumed for errors contained herein or for incidental or consequential damages in connection with the fur- nishing, performance, or use of this material.
-
Page 3: Table Of Contents
Table of Contents Section 1: Getting Started ..................1 A. Choosing a Good Location ................1 B. Unpacking and Inspection.................2 C. Identifying the Parts ...................3 D. Computer Specifications ................4 Section 2: Hardware and Software Setup ............5 A. Installing NiceLabel..................5 B. Installing the Printer...................5 C. -
Page 5: Section 1: Getting Started
Section 1: Getting Started THANK YOU… ...for choosing an FX400e Foil Imprinting System. The FX400e Foil Imprinter adds brilliant, shiny metallic gold and silver highlights to your inkjet-printed labels. This User's Manual is your complete step-by-step guide to quickly and easily setting up and printing with your new Foil Imprinting System. -
Page 6: Unpacking And Inspection
B. UNPACKING AND INSPECTION While unpacking your printer, inspect the carton to ensure that no damage has occurred during shipping. Make sure that all supplied accessories are included with your unit. The following items should be included: • Foil Imprinter •... -
Page 7: Identifying The Parts
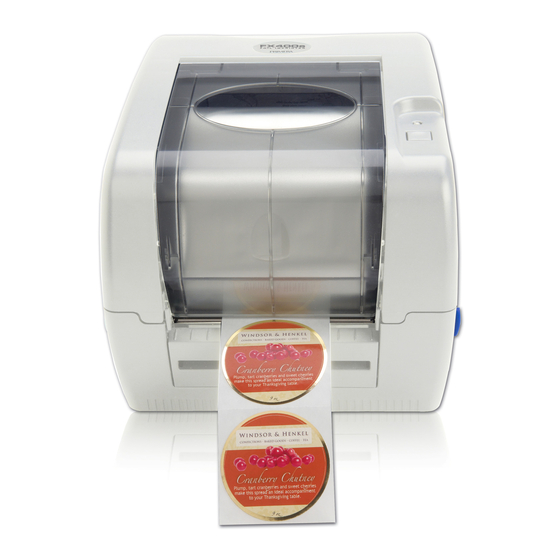
C. IDENTIFYING THE PARTS This illustration shows the front of the printer with its control but- tons and LED indicator lights: Ribbon Access Window LED Indicator Feed / Pause Button Top Cover Open Lever This illustration shows the input ports and power switch found on the rear panel of the printer. -
Page 8: Computer Specifications
D. COMPUTER SPECIFICATIONS Minimum PC Specifications For optimal printing speed you must have a PC with the following minimum specifications: • Windows XP/Vista • Pentium IV Processor • 512 MB of RAM • 5 GB of Free Hard Drive Space •... -
Page 9: Section 2: Hardware And Software Setup
Section 2: Hardware and Software Setup A. INSTALLING NICELABEL 1. Place the Installer CD in your CD-Rom Drive. 2. Double-click the My Computer Icon, then double-click the icon of the appropriate CD drive containing the Software Installer disc. 3. Double-click on the folder Nicelabel and double-click again on the NiceLabel-SE5.exe The on screen instructions will guide you step-by-step through the installation process. -
Page 10: Loading The Ribbon
5. Then select Install the software automatically and click Next. You may see a notice like the one shown here stating that the printer has not passed Windows Logo Testing. Click Continue Anyway to continue installing the printer driver for your printer. C. - Page 11 4. Install a ribbon on the Ribbon ribbon supply spindle. Supply Spindle Mount the ribbon supply Ribbon spindle on the rear hubs. Supply Spindle Rear Hub Open the printer’s top Printer Top Cover cover by releasing the green top cover open levers located on each side of the printer and lifting the top cover.
-
Page 12: Loading The Labels (External)
D. LOADING THE LABELS (EXTERNAL) 1. Place the printer onto the two pegs of the external label roll mount. 2. Depending on the inner diameter of the paper core of the label stock, take the apropriate label spindle and insert it into the paper roll. -
Page 13: Loading The Labels (Internal)
E. LOADING THE LABELS (INTERNAL) 1. Place the lable stock onto the small lable spindle. If your paper core is between 1,5” and 2,95“, use the 1.5” core adapters on the small label spindle. Paper Roll 1.5” Core Adapter Printing Side Face Up 1”... -
Page 14: Diagnostic Tool
F. DIAGNOSTIC TOOL The Diagnostic Utility is a toolbox that allows users to explore the printer's settings and status; change printer settings; download graphics, fonts, and firmware; create printer bitmap fonts; and to send additional commands to the printer. Using this convenient tool, you can explore the printer status and settings and trouble- shoot the printer. -
Page 15: Adjusting The Stock Sensor
The detail functions in the Printer Function Group are listed as below. Description Calibrate the sensor specified in the Printer Setup group media sensor field. Setup the IP address, subnet mask, gateway for the on board Ethernet. Synchronize printer Real Time Clock with PC. Print a test page. -
Page 16: Section 3: Printing
Section 3: Printing A. USING NICELABEL Your printer ships with a version NiceLabel SE for Primera. This easy-to-use software is designed to allow you to create full color labels with text and barcodes quickly and simply. The following is a tutorial to guide you through creating and printing a sample label. - Page 17 b. When finished typing, click on Finish and you will see the text appear in a box with "edit handles". You can drag and resize the text anywhere in the document window. If the text is dragged off of the printable area, NiceLabel will turn the text red as a warning.
- Page 18 While dragging: At desired position: Printing...
- Page 19 NiceLabel. This feature is available in upgraded versions. Sealing labels with clear film Clear film is also available for FX400e. It lets you produce labels with a high degree of resistance to water, chemicals, cleaning solu- tions, UV and other harsh environmental factors.
-
Page 20: Printer Driver Settings
Set the dimensions of your label and unit of measure and click Next. b. Select your printer. This should be the Primera FX400e. Then choose the orientation of the labels and click Finish. 4. Click the Line Button, then click on a corner of the label and pull the line to the other corner of the label. - Page 21 The Printing Preferences menu includes plenty of options, but not all of them are really necessary to change or they even don’t have any effects. This is because the driver was originally designed for professional use. So only the involved options will be explained. Options Tab In the Options tab you can set general print Settings, the Paper Format, the Size of the labels and the Unprintable Area.
-
Page 22: Section 4: Troubleshooting
Section 4: Troubleshooting A. CREATING A FULL BLEED PRINT (CLEAR FILM SEALING) If you are having trouble making the image cover the entire label, first make sure the image is printing at least as big as the label size you have selected. To accomplish this using Nice Label, make the image a few millimeters larger than the label by dragging the image over the edge of the label on all sides. -
Page 23: Technical Support
Source Location NiceLabel Software Help files Open the software. Click on the Help Menu - Contents Email Support support@primera.eu Phone Support +49-(0)611-92777-0 (Mon - Thu 9 a.m. - 5.00 p.m, Fri 9 a.m. - 3.00 p.m. CET) Troubleshooting... -
Page 24: Section 5: Label Specifications
Section 5: Label Specifications Label Sensing Methods Label Width Liner Width Gap Between Labels Method 1: Label Gap Sensing Distance from edge of Media Method 2: Thru-Hole Sensing Width of Opening Label Height Distance from edge of Media to edge of Label Method 3: Reflective/Black Mark Sensing (Black Mark must be printed... - Page 25 Distance from edge of 48,3 mm (1,90“) 5,1 mm (0,20“) media to edge of thru-hole Reflective/Black Mark Equal to distance 25,4 mm(1“) Width* between labels Max Outer Diameter (OD) 127 mm (5,0“) see roll specifications below Inner Core Diameter (ID) Stock Thickness 152 Mikron (0,006“) N/A Distance from edge of...
-
Page 26: Section 6: Technical Specifications
Pentium ® IV computer or better, 512MB RAM, Minimum System: 5GB free hard drive space, USB 1.1/2.0 port Label Design Software: NiceLabel™ SE Primera Edition included. Can also be used with most other popular Windows-based label design software programs. DC output: 24 VDC @ 3.75A... -
Page 27: Index
Index Adjusting Label Stock Sensor ................11 Centronics ........................3 Computer Specifications..................4 Connecting Power ....................5 Diagnostic Tool......................10 External Label Roll Mount ..................8 Factory Defaults ......................10 Feed Button........................3 Installing Label Stock (External) ................8 Installing Label Stock (Internal) ................9 Installing NiceLabel....................5 Installing the Printer....................5 Installing the Printer Driver..................5 Internal Label Roll Mount ..................9 Label Size .........................20... - Page 30 P/N FX400E...
Need help?
Do you have a question about the FX400e and is the answer not in the manual?
Questions and answers