
Related Manuals for Primera Eddie PT-E763-001


Summary of Contents for Primera Eddie PT-E763-001
- Page 1 User’s Manual © 2020 All rights reserved. For the most recent version of this manual please visit http://www.primera.com/EddieDownloads...
- Page 2 Trademark Acknowledgments: Primera and Primera Eddie are registered trademarks of Primera Technology, Inc. Windows is a registered trademark of Microsoft Corporation. All other trademarks are the property of their respective owners.
-
Page 3: Table Of Contents
2A Cookie / Print Item Specifications ..................... 24 2B Installing / Replacing the Ink Cartridge ....................25 2C Loading the Print Item ........................28 Section 3 Primera PrintHub ........................29 3A Calibrating the Carousel Platter / Demo Mode ................. 30 3B Cartridge Life/Expiration Date ......................31 3C Using the Cost Estimator ........................ - Page 4 6B1 The Carousel Platter........................75 6B2 Crumb Catcher ..........................76 6B3 The Carousel ..........................78 6B4 The Ink Trough ..........................79 6B5 Exterior and Interior of Printer – Stainless Steel Surfaces ............81 6B6 The Cookie Platform ........................82 6B7 Ink Maintenance Area (Wiper and Cap) ..................83 6C Replacing the Ink Filters ........................
-
Page 5: Section 1: Getting Started
Section 1: Getting Started THANK YOU… ...for choosing Eddie the Edible Ink Printer. Eddie will print vibrant colors and stunning photo- realistic photographs directly onto cookies and other approved print items. This User's Manual is your complete step-by-step guide to quickly and easily setting up and printing with your new Edible Ink Printer! 1A Choosing a Good Location •... -
Page 6: Unpacking And Inspection
1B Unpacking and Inspection While unpacking your printer, inspect the carton to ensure that no damage has occurred during shipping. Make sure that all supplied accessories are included with your unit. The following items are included in the supply box: 1. -
Page 7: Setup The Printer
1C Setup the Printer Some assembly is required to setup your printer. • Install the clear top cover aligning the pins with the holes on the top section of the printer. Install one side and then bend the cover gently to allow the second pin to reach the hole on the opposite side. - Page 8 • Open the top of the printer and remove the foam shipping insert. Keep it along with the other boxing material.
- Page 9 • Locate the Carousel positioning holes in the base. • Locate the Carousel Base. Locate the position pins. • Lift the base of the printer slightly and slide the carousel base underneath. Align the holes with the pins and lower the printer into place.
- Page 11 • Locate the 6 Pin Mini Din Cable attached to the Carousel Base. Route the cable along the left side of the unit until it reaches the back of the printer. Open the Top Cover. Cover Open Route Cable Here Carousel Base 6 Pin Mini Din Cable •...
- Page 12 • Locate the Power Supply.
- Page 13 • Install the appropriate adapter by aligning the tabs on the plug to the slots in the power adapter. Rotate the plug until it snaps into place. Slots Release Tab • Connect the Power Brick to a wall outlet and the round barrel connector to the back of the printer.
- Page 14 • Switch on the Power Switch. • Lift up on the top section of the printer just under the control panel. Control Panel Lift Here...
- Page 15 • The top section of the printer will open and stay open with a gas spring. As long as the power is on, the cookie platform will move up and out of the way so you may install the Crumb Catcher. Cookie Platform...
- Page 16 • Locate the Crumb Catcher. There are hooks on the back that correspond to slots on the back of the printer. Hooks Slots...
- Page 17 • Install the Crumb Catcher by inserting the hooks into the slots. You will see the hooks through the slots on the back of the printer. Align the front Crumb Catcher tabs on either side of the Carousel Base connection bracket. Back View Hooks Crumb Catcher...
- Page 18 • Locate the Carousel Platter. Note the location of the alignment holes and the Center hole. Center Hole Alignment Holes • Install the platter by aligning the center hole with center Hub on the Carousel platter base. Rotate the platter by hand until the holes in the platter are aligned with the pegs on the base.
-
Page 20: Identifying The Parts
1D Identifying the Parts Assembled View Control Panel Top Cover Carousel Platter Cookie Slots Placement Pegs... - Page 21 Interior Carriage View Cookie Height/Diameter Control Panel Cartridge Lid Sensor Cookie Platform Encoder Strip Cartridge Carrier...
- Page 22 Under Carriage View Crumb Catcher Filter Crumb Catcher Ink Trough Cartridge Carrier...
- Page 23 Back View USB Port Ethernet Port Mini Din Port Power Switch Power Port...
-
Page 24: Section 2: Print Item And Cartridges
Height .08” to .75” For best print quality results follow the specifications below: • The surface of each cookie should be frosted with the Primera recommended icing, or similar, or use the recipe printed in this manual. • The surface should be as smooth as possible •... -
Page 25: Installing / Replacing The Ink Cartridge
2B Installing / Replacing the Ink Cartridge You can replace cartridges at any time or wait for the Low Ink Warning to prompt you to replace cartridges. You will receive low ink warnings at 10% and 0%. Press the Load/Feed button to continue printing after you receive this warning. - Page 26 2. Press or pinch the tab on the front of the cartridge holder. 3. Remove the cartridge. 4. Locate a new cartridge and remove it from its packaging. Remove the foil outer package and the tape covering the nozzles.
- Page 27 5. Place the new cartridge into the empty carriage. Note: When installing the cartridge, tilt the cartridge at a slight backward angle of approximately 30 degrees. 6. Make sure the cartridge is pushed back far enough so the ridge on the cartridge is behind the spring-loaded pusher on the lid.
-
Page 28: Loading The Print Item
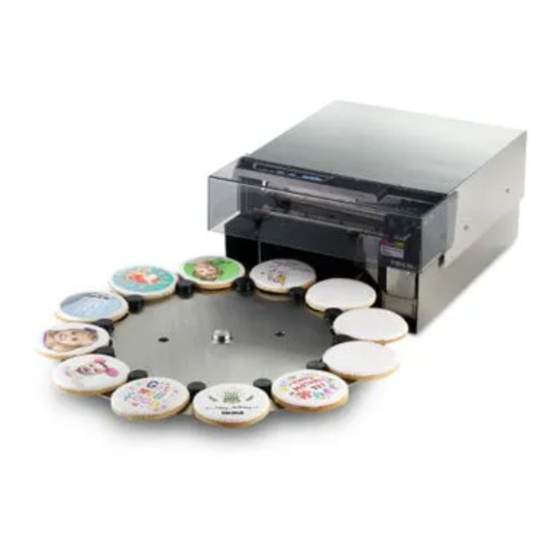
2C Loading the Print Item Up to 12 cookies or print items can be loaded on the carousel platter. You can load the cookies near the front first and then work your way to the back. To access the areas under the cover either lift the cover to place the cookie or press the load/feed button to rotate the platter clockwise until an open slot is accessible. -
Page 29: Section 3 Primera Printhub
Section 3 Primera PrintHub Primera PrintHub is used to interact with the printer for gathering ink levels, maintenance, alignment, cost calculation and several other functions. You can use it to manage these functions on multiple Eddie printers and other Primera label printer models. PrintHub automatically installs with your printer driver and can be accessed through the printer driver preferences or as a program on your Windows start menu. -
Page 30: Calibrating The Carousel Platter / Demo Mode
3A Calibrating the Carousel Platter / Demo Mode If cookie lifting and placement is out of alignment you can do a calibration manually. Platter Calibration Hold for 3 seconds Press and hold the Load/Unload button and the Pause button simultaneously for 3 seconds. The Carousel Platter will make a 1 and ¼... -
Page 31: Cartridge Life/Expiration Date
3B Cartridge Life/Expiration Date Cartridges are good for one year after purchase. The expiration date is printed on the cartridge box. Do not use cartridges beyond this date. Once opened, cartridges last for six months. PrintHub will track the cartridge life from the first time they are used in the printer. -
Page 32: Using The Cost Estimator
3C Using the Cost Estimator The cost estimator is found under the queue section on the first tab of the PrintHub. The last five job costs are stored in the list. Each job will show the cost per label based on the cost per cartridge entered below the list. -
Page 34: Printhub Settings
3D PrintHub Settings General application settings that apply to the software and all printers can be found by clicking the blue “Settings” button in the lower left. Printer specific settings can be found on the “Printer Settings” Tab. See next section. Language. - Page 35 Advanced. Check the “Generate Printer Status XML” box to create an XML at "C:\ProgramData\PTI\PrintHub\PrinterStatus.xml". Software developers can use this file to display status information such as error messages and ink levels in 3rd party applications.
-
Page 36: Printhub Printer Settings
3E PrintHub Printer Settings Printer settings can be found in Primera PrintHub on the Printer Settings Tab for the Eddie. Information. This section displays all current driver, software and firmware versions. -
Page 37: 3F1. Multiple Printer Support
Advanced Setting Button. Click the Advanced Settings button to view the following settings. General Settings 3F1. Multiple Printer Support. You can install multiple printers to the same computer and use them simultaneously. To do so you will need to change the USB serial number identifier of one of the two printers, two of three printers, three of four printers etc. - Page 38 3. Click Set. You will hear the printer reset and the settings window will turn gray. After it resets you will be able to see the settings window again. Keep the printer connected. 4. Now you can connect the next printer. Windows will automatically install a new driver for that new printer and name it Edible Ink Printer (Copy 1).
- Page 39 another 12 items. Uncheck this setting to disable this feature. Increase or decrease the number to pause after that many items. We recommend that this feature is only disabled if an operator is watching the machine and reloading blank items while they are removing printed items.
-
Page 40: Section 4: Printing
Section 4: Printing Any program can be used to print to Eddie. In the following sections we provide information on how to print using BarTender. Please note the print behavior below for any print from any program. • By default, the printer will pause printing after 12 items or one complete revolution. This is meant to allow time to remove the printed items and replace them with blank items. -
Page 41: Using Bartender
4A Using BarTender Primera recommends BarTender for printing only. A fully functional Free Edition can be downloaded from the BarTender website. https://www.bartendersoftware.com/free-edition-download/ When you open BarTender you will be given the choice to select an existing label or create a new one using a wizard. - Page 42 2. Select "Blank Template". Click "Next". 3. Select "Edible Ink Printer". Click "Next".
- Page 43 4. Select "Specify Custom Settings". Click "Next". 5. Set the page size to one of the options available in the dropdown menu. Or click User defined Size to set your own size up to 4.72” x 4.72” (120mm).
- Page 44 6. Select your label shape. This should be a circle if you are printing to cookies. 7. Set all of the margins to zero. (You can adjusted the left margin and Top of Form in the Label Alignment Section). Click Next.
- Page 45 8. Set Rows and Columns to 1 for a standard label. Click Next. 9. Set Template Size to be the same as page size set in step 5. Click Next.
- Page 46 10. Check the "Picture" box to add a background photo or graphic to your label. Click "Next". If you click "Finish", the remaining default wizard options will be set and no picture will be added. We recommend adding the picture as a background as it will automatically crop any square you add to the design to fit inside the circle and ONLY the portion inside the circle will print.
- Page 47 12. Click Finish to open the template. You can edit any of these initial settings by going to the File Menu and selecting "Page Setup". Basic and advanced settings are available on the various tabs. 13. When you are ready to print, click the printer icon or go to file print. Important Note: The first time you print or any time you print after you power on the printer, the carousel will move one quarter turn and skip 3 cookies before printing.
-
Page 48: Add Text And Graphics To A Bartender Design
4B Add Text and Graphics to a BarTender Design Once you have created your label size you will be able to add text, a barcode and/or graphics. This can be done using one of the buttons on the button bar at the top of the screen. Add Text. -
Page 49: Removing Image Background With Paint 3D
4C Removing Image background with Paint 3D Paint 3D is a free program that comes with Windows 10. 1. Choose an image and open it in Windows Photo Viewer. You can choose any image that you would like to remove the background from. Simply click on the image to automatically open it with Windows Photo Viewer. - Page 50 3. Edit the Image with Magic Select. When your image opens in Paint 3D, choose “Magic Select” in the upper left of the toolbar. When this is chosen, a crop box will appear around your image. Drag the crop box around the image that you have selected to be removed from the background.
- Page 51 4. Refine the part of the image you would like. After pressing next in step 3, you will see that the outside edges of your image are now highlighted. Sometimes the software (depending on how complex/busy the background is) will take more or less image than you want and highlight that as well, such as extra space around the shoulder of the person in the image.
- Page 52 6. Paste the image into your bartender template.
-
Page 53: Printing From Other Programs
4D Printing from Other Programs Since this printer uses a standard Windows printer driver you can print from any application you would like. There are just a few things to remember that will make it much easier. 1. Set the Page/Label Size in the Driver. BarTender automatically prompts you for the size of the print. -
Page 54: Printer Driver Settings
4E Printer Driver Settings Once the printer driver has been successfully installed, you will need to setup the driver with the appropriate print options. Refer to the following steps to change or verify your default printer driver preferences. These settings will apply to all new designs created in BarTender or other programs after the preferences were changed. - Page 55 Note on PC Settings: Most applications allow you to change these same printer driver options from their "Print" and/or "Printer Setup" screens. Some applications such as BarTender save your settings with the label, others use settings only for the current print job just sent to the printer. Paper Size If you are using BarTender, this setting is adjusted during the setup wizard.
- Page 56 Set to "Yes" for fastest print speed. Requires an alignment print after every cartridge change. Set to "No" for better quality print (in some cases). Launch PrintHub This setting will open the Primera PrintHub application. Details Select this setting to see current firmware and driver version information and other printer...
-
Page 57: Section 5: Printing From A Mac
Section 5: Printing from a Mac 5A Print Utility Settings (Eddie Config Utility) The Eddie Config Utility is used to interact with the printer for gathering ink levels, maintenance, alignment, and several other functions. To Find Eddie Config Utility: The Eddie Config Utility automatically installs with your printer driver and can be accessed through the Printer &... - Page 58 3. The Eddie Config Utility has 4 tabs that are arranged on the top of the window. Each tab opens a screen that has various similar functions. Status Tab (First Tab). Displays ink levels, print counter and any error messages. Cartridge Tab (Second Tab).
-
Page 59: Adjusting Print Alignment
5B Adjusting Print Alignment Eddie comes from the factory calibrated to print exactly to the edge of Primera Cookies. Eddie senses the beginning of the print object height and the front and back edge of the print object with an optical sensor. However, due to variability it may be necessary to fine tune these settings. -
Page 60: Printing From Swift Publisher
5C Printing from Swift Publisher Swift Publisher is an inexpensive software that can be used to design/layout and print your images. Below is a tutorial on how to setup a print using Swift Publisher by Belight. Download a Free Trial Here: https://www.swiftpublisher.com/ When you open the software for the first time you will be asked to choose a Template. - Page 61 1. Hundreds of templates are available. Locate the Search box near the bottom. 2. Type “Primera” in the search box. Choose one of the predefined circular templates if it is the correct size. Click OK. Otherwise, with one of the circular templates selected,...
- Page 62 3. Name the custom layout and set the items highlighted and noted below. Click OK - Page Size: Set to Other. Size should match the label size. - Width: Match Page Size - Height: Match Page Size - Corner Radius: This should always equal half the Width or Height. - Margin: Leave at the default of zero - Spacing: Leave at the default of zero - Columns/Rows: Leave at the default of 1...
- Page 63 4. You will be able to choose this template again from the custom tab of the templates window. Click OK to select it. 5. You can now create your design. Add Text, Barcodes, shapes and images to your design. Change Font Add Image Add Text Add Shapes...
- Page 64 6. For this example, we will add an image that we created in another design application. It does not need to be formatted as a circle. The template will crop it as a circle. Click the insert Icon and choose Image from file…. Note: You can also add images from the Backgrounds menu included with Swift Publisher.
- Page 65 7. Once your image is imported into your template you will need to adjust the size to fill the entire template (if that is your intention). Adjust the size by clicking the ruler icon in the Inspector with the image selected. Check the “Fit aspect ratio” box and then type in your size.
- Page 66 9. You are now ready to print. Click the Print icon to open the print dialog box. 10. Select Printer Features from the dropdown menu. Adjust the settings if desired. Click Print.
-
Page 67: Creating A Custom
5F Creating a Custom Page Size In many programs such as Adobe Illustrator, Photoshop or Acrobat Reader you will need to choose your label/page size before you print. If the label size you need to use is not already on the list of available pages sizes you will need to create a new custom size on the print screen of the program you are using to print. - Page 68 2. Click the + to create a new size. 3. Enter the height and width as the same. 4. Set all margins to zero. 5. Rename the size the same as the width and height. Rename Set Width and Height Click “+”...
-
Page 69: Printer Driver Settings
5H Printer Driver Settings Printer driver settings are accessible on the print window of any application right before you click print. Printing from Swift Publisher Click on the Swift Publisher 5 dropdown menu and choose Printer Features. - Page 70 Printing from Preview: Click on the Preview dropdown menu and choose Printer Features.
- Page 71 Printing from Adobe Reader 1. First click on Page Setup to set your page size. 2. Next click on Printer... to access settings. Click on the Layout dropdown menu and choose Printer Features.
- Page 72 Print Quality There are 4 levels of print quality in the driver. The lower the Quality, the faster the print. Quality 1 provides the fastest print available while Quality 4 provides the best...
- Page 73 quality. It is recommended that you experiment with the different levels when designing your label to find a good balance between print quality and print speed. Color Matching Best for Graphics mode is best used for graphical images where accurate color reproduction is not as essential.
-
Page 74: Section 6 : Troubleshooting/Maintenance
Section 6 : Troubleshooting/Maintenance 6A Solving Print Alignment Problems Normally the printer scans the size and height of the cookie and adjust accordingly. If you find that alignment is still off you it can be adjusted in the Advanced printer settings area. Click on the Printer Settings Tab –... -
Page 75: Maintenance/ Cleaning
6B Maintenance/ Cleaning Eddie is made of stainless steel to facilitate easy cleaning. Each of the parts have their own cleaning schedule and procedure. Refer to the following subsections for more information. All stainless-steel parts can be hand-cleaned on the printer with mild detergent What to use: such as Dawn™... -
Page 76: 6B2 Crumb Catcher
6B2 Crumb Catcher This can be removed from the printer in fully submerged in water to clean or cleaned in a dishwasher. First Remove the filter. Wash separately by hand. Cleaning Frequency: Clean Daily. Crumb Catcher Filter... - Page 77 To remove the Crumb Catcher from the printer first remove the Carousel Platter and then lift up on the top section of the printer. Power should be connected at this point, so the Cookie Platform is moved out of the way. Now you may access the Crumb Catcher. Lift near the back to disengage the hooks that secure it to the back of the printer.
-
Page 78: 6B3 The Carousel
6B3 The Carousel This carousel cannot be submerged in water. Disconnect it from the back of the printer. Submerge a soft cloth in a dishwashing soap/water mixture Wring the cloth until it is damp but no dripping water is present. Wipe the carousel clean with the damp cloth. Repeat the process if necessary. -
Page 79: 6B4 The Ink Trough
6B4 The Ink Trough The Ink Trough can be accessed by lifting up on the top section of the printer. Squeeze the steel together near the top to disengage the locking tabs. This item can be placed in a dishwasher. Cleaning Frequency: Clean Monthly. - Page 80 Locking Tabs Note: To remove or insert the ink trough squeeze the ink trough not the tabs. Ink Trough Guides...
-
Page 81: 6B5 Exterior And Interior Of Printer - Stainless Steel Surfaces
6B5 Exterior and Interior of Printer – Stainless Steel Surfaces These items cannot be submerged in water. Disconnect power from the back of the printer. Submerge a soft cloth in a dishwashing soap/water mixture. Wring the cloth until it is damp but no dripping water is present. -
Page 82: 6B6 The Cookie Platform
6B6 The Cookie Platform The Cookie Platform will accumulate crumbs and edible ink overspray. Occasionally brush the crumbs from the platter into the Crumb Catcher below. This will ensure that cookies are lifted and moved properly and are level and in the correct position for printing. If more thorough cleaning is necessary, disconnect power from the back of the printer. -
Page 83: 6B7 Ink Maintenance Area (Wiper And Cap)
6B7 Ink Maintenance Area (Wiper and Cap) This area should be cleaned with water and a cotton tipped cleaner. Open the cartridge lid and remove the cartridge. This will expose the black rubber cartridge cap. To access the wiper, open the top lid, press and hold the load/feed button for 3 seconds. The cartridge cap will be retracted, and the wiper will be exposed. -
Page 84: Replacing The Ink Filters
There are two ink filters that capture ink overspray that naturally occurs during printer. These filters can be clean or replaced. Filters are available on Primera’s website. Filter Pack. SKU 740123 - Contains ink trough filter and Crumb Catcher filter set. - Page 85 Ink Trough Filter Replacement The Ink Trough can be accessed by lifting up on the top section of the printer. Squeeze the steel together near the top to disengage the locking tabs. Once the trough is removed, the filter can be accessed near the back of the printer. Replacement/Cleaning Frequency: Clean Monthly.
- Page 86 Release Tabs Note: To remove or insert the ink trough squeeze the ink trough not the tabs. Ink Trough Guides Pull near the top to pivot the filter out Ink Trough Filter Insert this end first Ink Trough Filter toward the back of the printer This is the side of the filter you see when it...
- Page 87 Cleaning/Replacement Checklist Date Carousel Crumb Cookie Carousel Maintenance Filter Platter Catcher Platform Trough Area Replacement Daily Daily Daily Monthly Weekly Weekly 6 Months ☐ ☐ ☐ ☐ ☐ ☐ ☐ ☐ ☐ ☐ ☐ ☐ ☐ ☐ ☐ ☐ ☐ ☐...
-
Page 88: Poor Print Quality - Cleaning The Cartridge
6D Poor Print Quality – Cleaning the Cartridge It may be necessary to clean the ink cartridge nozzles if you notice reduced print quality, or if you suspect a cartridge nozzle has become slightly dried out or clogged. If the cartridge has been left out of the printer more than 30 minutes, the ink in the print head nozzles may have dried. - Page 89 Soak the paper towels in water for 5 seconds. 6. Place one paper towel on cartridge nozzles. Gently press the paper towel with your finger. Leave the paper towel on the nozzles for 30-40 seconds.
- Page 90 Wipe the nozzles. a. Place second paper towel on flat/hard surface. b. Press the nozzles into the paper towel. c. Firmly tap the top of the cartridge three times to force the ink out. d. Wipe/Drag the cartridge in the direction indicated. e.
- Page 91 Dry excess water from cartridge. Ensure cartridge contacts are completely dry. Printer damage may result if cartridge contacts are not completely dry. 9. Verify cartridge is now functioning properly by printing your image.
-
Page 92: Technical Support
6E Technical Support. If you have difficulties operating your Printer, contact technical support using one of the methods listed below. Source Location Primera Knowledge Base www.primera.com/kb Email Support www.primera.com/customer-support 763-475-6669 (Mon - Fri 7 a.m. - 10 p.m CST Phone Support and Saturday 11 a.m. -
Page 93: Section 7: Technical Specifications
Section 7: Technical Specifications PRINT SPEED 5-6 cookies per minute, varies by size and print PRINT RESOLUTION Up to 4800 x 1200 dpi PRINT TECHNOLOGY Thermal Inkjet INK TYPES Edible Ink STANDARD CONNECTIVITY USB 2.0 (USB 3.0 compatible) Max Print Width 4.5”... - Page 94 Certifications Food Equipment: NSF/ANSI STANDARD 18 MANUAL FOOD AND BEVERAGE DISPENSING EQUIPMENT Safety NA/USA/Canada: UL 763 STANDARD FOR MOTOR-OPERATED COMMERCIAL FOOD PREPARING MACHINES - Edition 5 - Issue Date 2018/02/28 CSA C22.2 NO. 195-16 MOTOR-OPERATED FOOD PROCESSING APPLIANCES (HOUSEHOLD AND COMMERCIAL) - Edition 2 - Issue Date 2016/06/01 Safety Europe: IEC 60335-2-64 HOUSEHOLD AND SIMILAR ELECTRICAL APPLIANCES -- SAFETY.
-
Page 95: Section 8: Recipes
Section 8: Recipes Recipe for Printable Iced Sugar Cookies Milad Audi, 12/20/2019 Sugar Cookies The key to making these cookies is to use cold butter, no leavening, and add cornstarch to the dough. This will result in cookies that do not spread or rise during baking. It is crucial that the dough is rolled out perfectly flat (use rolling pin rings) and cut out carefully so that the finished cookies will have a flat surface for printing. - Page 96 Royal Icing The key to making this icing is adding meringue powder to get an icing that will harden well and have a little air in it to absorb ink. It is crucial to get the consistency right so that the icing will flood well and give a smooth and flat surface for printing, but not so thin that it takes too long to dry.
Need help?
Do you have a question about the Eddie PT-E763-001 and is the answer not in the manual?
Questions and answers