Hunter X-CORE Owners Manual And Programming Instructions
Residential irrigation controller
Hide thumbs
Also See for X-CORE:
- Quick start manual ,
- Owners manual and programming instructions (372 pages) ,
- Instructions (3 pages)

Related Manuals for Hunter X-CORE


Summary of Contents for Hunter X-CORE
- Page 1 X-CORE ® Residential Irrigation Controller Owner’s Manual and Programming Instructions...
-
Page 3: Table Of Contents
Programmable Rain Off .............. 23 Manually Bypassing the Weather Sensor ........13 Seasonal Adjustment ............23 CONNECTING A HUNTER SOLAR SYNC ET SENSOR ....14 Manually Run a Single Station ..........23 Installing Solar Sync Sensor ............14 One-Touch Manual Start and Advance ........24 Installing the Wireless Solar Sync®... -
Page 4: X-Core Components
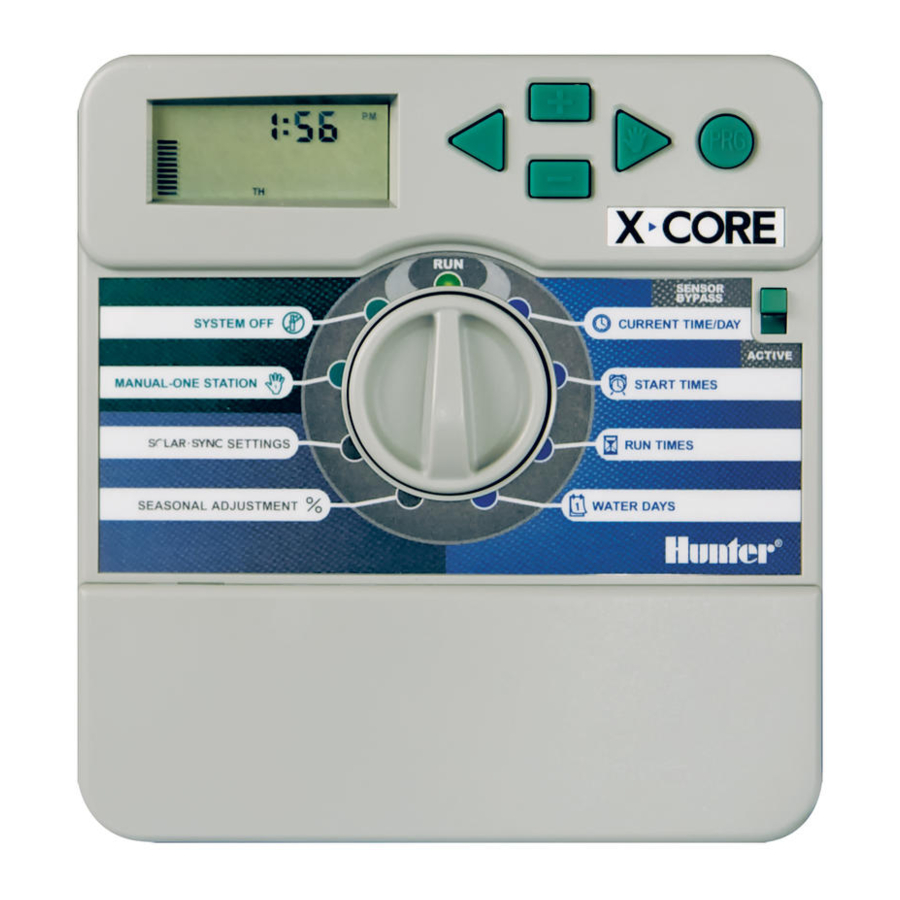
X-CORE COMPONENTS LCD Display Allows user to set each valve station run time from 1 minute to 4 hours Run Times Allows 1 to 4 start times to be set in each program Start Times Station Number Indicates currently selected station number... - Page 5 Use to attach transformer, sensor, and valve wires from their source to the controller Reset Button Use to reset the controller (located on right side of controller) Allows for connection of Hunter SmartPort and Hunter Remote Controls ® Sensor Bypass Switch Ignores “Clik”...
- Page 6 X-CORE COMPONENTS Indoor Model Outdoor Model (Internal Transformer Included) Note: Plug may look different from illustration Terminal block for -E (International models only)
- Page 7 X-CORE COMPONENTS Dial Settings Normal dial position for all controller automatic and manual operation Allows current day and clock time to be set Current Time/Day Allows 1 to 4 start times to be set in each program Start Times Allows user to set each valve station run time from 1 minute to 4 hours...
-
Page 8: Mounting The Controller To Wall
MOUNTING THE CONTROLLER TO WALL Note: The indoor version of the X-Core is not water- proof or weather-resistant, and must be installed indoors or in a protected area. 1. Secure one screw into the wall. Install screw anchors if attaching to drywall or masonry wall. -
Page 9: Connecting Valves And Transformer
CONNECTING VALVES AND TRANSFORMER Installation of the X-Core should only be done by trained personnel. Valve 4 1. Route valve wires between the control valve location and controller. 2. At valves, attach a common wire to either solenoid wire on all valves. -
Page 10: Activating The Battery
ACTIVATING THE BATTERY After installing your X-Core, make sure to remove the battery contact insulator to allow the X-Core to keep time in the event of a power outage. CAUTION: RISK OF EXPLOSION IF BATTERY IS REPLACED BY AN INCORRECT TYPE. DISPOSE OF USED BATTERIES AC- CORDING TO THE INSTRUCTIONS. -
Page 11: Connecting A Master Valve
CONNECTING A MASTER VALVE 1. At the Master Valve, attach the common wire to either solenoid NOTE: Complete this section only if you have a wire of the valve. Attach a separate control wire to the remaining master valve installed in your irrigation system. A solenoid wire. -
Page 12: Connecting A Pump Start Relay
CONNECTING A PUMP START RELAY The controller should be mounted at least a 15 ft (4.5 m) away from NOTE: Complete this section only if you have a both the pump start relay and pump to minimize any potential pump start relay installed. A pump start relay is electrical interference. -
Page 13: Connecting A Hunter "Clik" Weather Sensor
CONNECTING A HUNTER “CLIK” WEATHER SENSOR A Hunter weather sensor or other micro-switch type weather When the weather sensor has sensors can be connected to the X-Core. The purpose of this sensor deactivated automatic watering, the is to stop automatic watering when weather conditions dictate. -
Page 14: Connecting A Hunter Solar Sync Et Sensor
CONNECTING A HUNTER SOLAR SYNC ET SENSOR The X-Core is compatible with the Solar Sync and Wireless Solar and the default Water Adjustment setting (5) on the right. Adjust Sync systems. Solar Sync is a sensor system that will automatically the Region as needed by using the buttons . -
Page 15: Region
CONNECTING A HUNTER SOLAR SYNC ET SENSOR Region Use the following table for choosing your region (reference below). You can use methods A, B or C to help you choose which region is For accurate Solar Sync measurements, the controller needs to best for your area: be programmed for the average peak season ET for your region. -
Page 16: Water Adjustment
Water Adjustment The Water Adjustment is a 1 to 10 scale that allows for easy If a Solar Sync sensor has been installed on the X-Core controller, then the seasonal adjust value used by the controller will be adjustment of the Seasonal Adjust value from the Solar Sync ET Sensor. -
Page 17: Calibration/Setup
CONNECTING A HUNTER SOLAR SYNC ET SENSOR Calibration/Setup After Solar Sync has been installed and programmed, it is recommended to allow the system to run for a few days at the initial setting. Because of the variety in site conditions (including sensor location, amount of direct sunlight available to the sensor, reflective heat from surrounding structures, etc), the initial setting may require adjustment in order to arrive at the desired performance. -
Page 18: Solar Sync Delay Feature
SOLAR SYNC DELAY FEATURE To change the existing Delay days setting: Solar Sync Delay for X-CORE® 1. Open the Solar Sync Delay menu by pressing the button and The delay feature is accessible only after the installation rotating the dial to Solar Sync Settings and release the of the Solar Sync. -
Page 19: Connecting A Hunter Remote
(included with all ® controller terminal as shown below: Hunter Remotes) allows for fast and easy use of the Hunter controls. • Red wire to left side “24 VAC” terminal The Hunter remotes make it possible for you to operate the system •... -
Page 20: Programming The Controller
PROGRAMMING THE CONTROLLER The X-Core display shows the time and day when the controller is NOTE: A basic programming rule is that whatever idle. The display changes when the dial is rotated to indicate the symbol or character is flashing will be the item specific programming information to enter. -
Page 21: Setting The Program Start Time(S)
WATER DAYS selected (A, B, or C). You can switch to cycles. Start times may be entered in any order. The X-Core another program by pressing the button. will automatically sort them. -
Page 22: Selecting Odd Or Even Days To Water
Setting Event Day(s) Off This feature uses numbered day(s) of the month for watering The X-Core allows you to program a No Water Day(s). This feature instead of specific days of the week (odd days: 1st, 3rd, 5th, etc.; is useful to inhibit watering on specific day(s). For example, if you even days: 2nd, 4th, 6th, etc.). -
Page 23: Programmable Rain Off
2. Press the button as many times as needed to set the number of days off When using a Hunter “Clik” weather sensor, the Seasonal (up to 7 days). Adjustment value can be adjusted as described. 3. Turn the dial back to the RUN position at... -
Page 24: One-Touch Manual Start And Advance
PROGRAMMING THE CONTROLLER 3. Turn the dial clockwise to the RUN position to run program B or C by pressing the button. the station (only the desig- 3. The station number will be flashing. Press the button to scroll nated station will water, then the MANUAL-ONE STATION through the stations and use the button to adjust station... -
Page 25: Advanced Features
Programmable Sensor Override Test Program of All Stations The X-Core allows the user to program the controller so that the The X-Core allows the user a simplified method for running a sensor disables watering on only desired stations. For example, test program. -
Page 26: Easy Retrieve® Program Memory
Easy Retrieve® Program Memory Programmable Delay Between Stations The X-Core is capable of saving the preferred watering program This feature allows the user to insert a delay between stations when into memory for retrieval at a later time. This feature allows for a one station turns off and the next one turns on. -
Page 27: Clik Delay Instructions
NOTE: Use caution when using the 5. Return the dial to the RUN position. Clik Delay is set. programmable Clik Delay feature with Hunter Wind-Clik®, Freeze-Clik®, Soil- Clik, and freeze After a Clik Event ends (rain sensor changes from wet to dry) the... - Page 28 HIDDEN FEATURES (CONTINUED) Setting the Cycle Time: Cycle and Soak The Cycle and Soak feature allows you to split a station’s run time Initially Station 1 will be displayed. To access other stations, press into more usable, shorter watering durations. This feature is useful button.
- Page 29 HIDDEN FEATURES (CONTINUED) Once the desired station is displayed, the user can use Accessing the Soak Menu: button to increase or decrease the Soak time. Once the desired Cycle times for each station have been pro- The user can set the Soak time from 1 minute to 4 hours grammed, the Cycle time can be accessed by pressing the in 1 - minute increments.
-
Page 30: Troubleshooting Guide
TROUBLESHOOTING GUIDE Problem Causes Solutions The controller is continuously watering Too many start times have been Only one start time is necessary to activate a program programmed (refer to Setting the Program Start Times on page 18) There is no display Check AC power wiring Correct any errors The display reads “No AC”... - Page 31 TROUBLESHOOTING GUIDE Problem Causes Solutions Display shows a station is running but The sensor is interrupting irrigation, Check the sensor override status (see page 23) icons are flashing however the station has been programmed to override the sensor Automatic irrigation does not start at •...
- Page 32 TROUBLESHOOTING GUIDE Problem Causes Solutions Seasonal Adjust seems high • Region too low Decrease the value of the Water Adjustment setting. If you minimize the Water Adjustment scale at 1 and • Water Adjustment setting too high still require reduced seasonal adjustment, move up one Region (from 2 to 3, for example) and start at Water Adjustment setting 5.
-
Page 33: Specifications
• Sensor bypass switch Explanation of Symbols • X-Core-x00i for indoor use. X-Core-x00 for outdoor use = AC • Sea level to 6500 ft (2000 m) at -13˚ F to 140˚ F (-25° C to 60° C) = Consult Documentation... -
Page 34: Certificate Of Conformity To European Directives
CERTIFICATE OF CONFORMITY TO EUROPEAN DIRECTIVES Hunter Industries declares that the irrigation controller Model X-Core complies with the standards of the European Directives of “electromagnetic compatibility” 87/336/EEC and “low voltage” 73/23/EEC. __________________________________ Senior Regulatory Compliance Engineer This product should not be used for anything other than what is described in this document. This product should only be serviced by trained and authorized personnel. - Page 36 Hunter Industries Incorporated © 2017 Hunter Industries Incorporated 1940 Diamond Street San Marcos, California 92078 USA LIT-397 EN 02/17 • www.hunterindustries.com...
Need help?
Do you have a question about the X-CORE and is the answer not in the manual?
Questions and answers
Set to station Manual run according to instructions, turn to run but nothing happens despite box indicating that pump is working. Same for all stations
station doesn't turn off. how do I turn it off -
To turn off a station on the Hunter X-Core controller, you can disable the sensor for that station. Follow these steps:
1. Press and hold the necessary buttons simultaneously to enter Sensor Disabled mode.
2. The LCD screen will display all segments.
3. When the sensor is disabled, the system prevents irrigation for that station in response to rain or other conditions.
4. The display will indicate which stations are programmed to exclude the sensor.
5. A station operating in Sensor Disabled mode will show alternating blinking icons.
If you need to turn off irrigation manually, you can set the station’s run time to zero.
This answer is automatically generated
No me pone El 5 y 6 para programer la hora ,nomas hasta 1 y 4 la que Tengo es de 6 estacion
The Hunter X-CORE does not limit programming to stations 1 through 4; instead, it allows up to 4 start times per program (A, B, or C), not per station. Each start time activates all stations in that program sequentially. The limitation is on the number of start times (4 per program), not the number of stations.
This answer is automatically generated
How do you open the controller box in order to put screws into the wall?