Raymarine AXIOM Basic Operation Instructions
Hide thumbs
Also See for AXIOM:
- Installation instructions manual (114 pages) ,
- Advanced operation instructions (152 pages) ,
- Advanced operation instructions (194 pages)

Related Manuals for Raymarine AXIOM


Summary of Contents for Raymarine AXIOM
- Page 1 Basic operation instructions English (en-US) Date: 03-2017 Document number: 81369-2 © 2017 Raymarine UK Limited...
- Page 2 Important information about this document This document provides an introduction to using your Raymarine multifunction display, covering only basic operations. To obtain the complete “LightHouse 3 Advanced operations” document, visit the Raymarine website. The document is available in 2 di erent formats: 1.
-
Page 3: Table Of Contents
Contents Chapter 1 Important information ..........8 Disclaimers ................8 Chapter 2 Set up ................ - Page 4 3.11 Sidebar ................29 3.12 Data overlays.
- Page 5 Customizing existing Data pages..........51 Chapter 8 Camera app ...............
-
Page 6: Chapter 1 Important Information
Raymarine product. Disclaimers Raymarine does not warrant that this product is error-free or that it is compatible with products manufactured by any person or entity other than Raymarine. This product uses digital chart data, and electronic information from Global Navigation Satellite Systems (GNSS) which may contain errors. -
Page 7: Chapter 2 Set Up
Chapter 2: Set up 2.1 Getting started Powering on the display When power is available to the MFD but the MFD is switched off, the Power symbol will be illuminated. To power on the display: 1. Swipe your finger from left to right across the Power button swipe area. -
Page 8: First Power Up Data Master Selection
Switching on and off at the breaker If you wish to ensure that the MFD is not consuming any power then it must be switched off at the breaker or have the power cable unplugged. When the breaker is switched back on, or the cable is reconnected, the MFD will resume in the same power state that it was in when it was switched off. -
Page 9: First Power Up Limitation On Use Acknowledgement
First power up Limitation on Use acknowledgement After you have completed the Startup wizard the Limitation on Use (LoU) disclaimer is displayed. You must read and agree to the terms in order to use your MFD. Selecting OK means you have accepted the terms of use. Data sources menu When a system includes multiple sources of a data type, such as depth data, the system will choose the most appropriate source for the data. -
Page 10: Identifying Engines
Networked MFDs will automatically be updated to use the Data sources selected on your Data master MFD. Data source types Settings tab Description Depth Enables you to choose a source of data for Depth readings. Speed through Enables you to choose a source of data for water Speed readings. -
Page 11: Configuring Transducer Settings
Configuring Transducer settings For systems set up with Sonar, you should configure your transducer settings. 1. Select Transducer from the Sonar app’s Settings menu: Menu > Settings > Transducer 2. Select how you want your depth to appear: i. Below transducer (default) — No offset required ii. -
Page 12: Inserting A Microsd Card
2.2 Inserting a MicroSD card 1. Pull back the microSD card reader cover as shown above. 2. Insert you microSD card with the contacts facing down. 3. Close the cover and ensure it is seated correctly. Memory card compatibility MicroSD memory cards can be used to back up / archive data (e.g. Waypoints, Routes and Tracks). -
Page 13: Shortcuts
2.3 Shortcuts The Shortcuts menu can be accessed by swiping left to right across the Power button swipe area. The following shortcuts are available: • Take Screenshot • Activate Touchlock • Stop Radar transmitting • Power off • Adjust Brightness Adjusting brightness LCD brightness can be adjusted from the Shortcuts menu. -
Page 14: Activating Touchlock
Raymarine® regularly issues software updates for its products which provide new and enhanced features and improved performance and usability. You should ensure that you have the latest software for your products by regularly checking the Raymarine® website for new software releases. www.raymarine.com/software Note: •... -
Page 15: Updating Software Using A Memory Card
1. Check the software version of your product. The software version can be found on the Getting started tab: (Homescreen > Settings > Getting started). 2. Check the latest available software on the Raymarine website: (www.raymarine.com > Support > Software Updates). 3. Download the software package. -
Page 16: Chapter 3 Homescreen
Chapter 3: Homescreen 3.1 Accepting the Limitations on Use After your MFD has powered up the Homescreen is displayed. 1. Before using the MFD you must accept the Limitations on Use (LoU) disclaimer. To view the full LoU Disclaimer, select ‘more details’. The LoU acknowledgment is displayed each time the display is powered on and for each new user profile. -
Page 17: Homescreen Overview
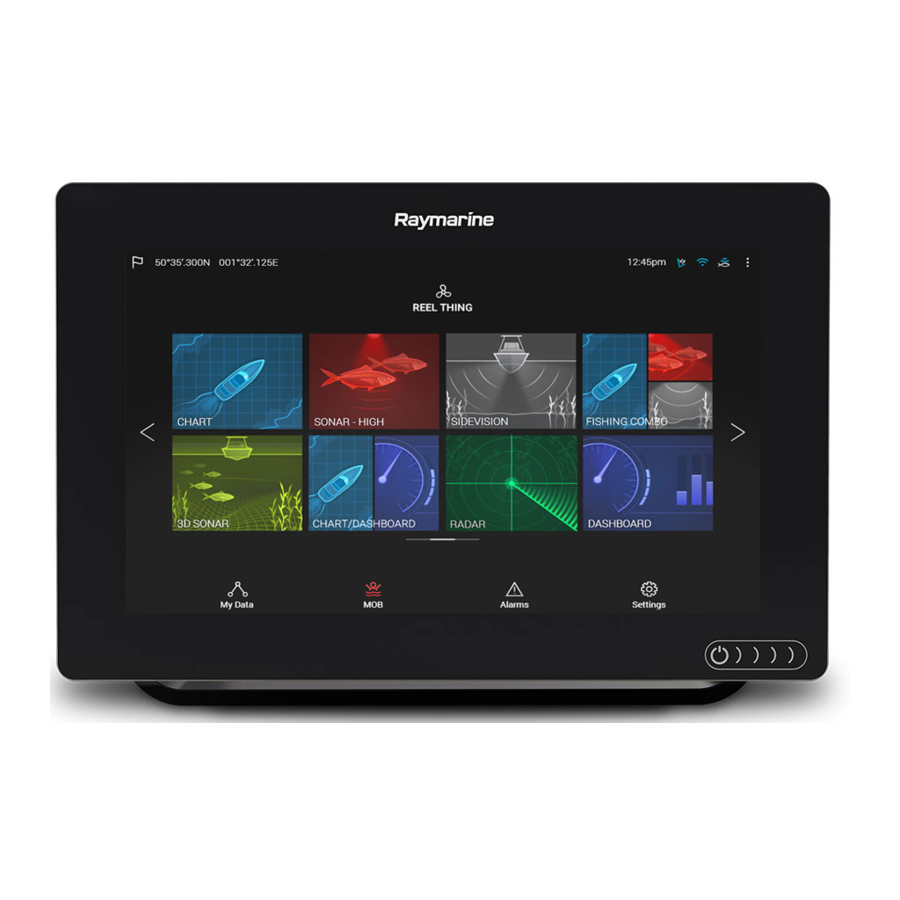
3.2 Homescreen overview All settings and apps can be accessed from the Homescreen. GNSS position/fix details — Select the area to view fix accuracy and access GNSS settings. 2. Profile — Select the area to change the profile in use or to create, edit or delete profiles. -
Page 18: User Profiles
You can Customize, Rename or Delete app pages from the Popover options. 2. Select Customize from the Popover options to change page layout and apps used. To Create a new page press and hold on a blank space on the Homescreen. 3. -
Page 19: My Data
Selecting the Plus (+) icon will create a new profile based on the profile that is currently in use. MFD settings changes are unique to the profile in use and are retained the next time the profile is used. The distance and time that a profile has been active is displayed for each profile. -
Page 20: Settings
Selecting Waypoints, Routes or Tracks will take you to the relevant list where you can manage and customize your data. Selecting Trip will display the trip counters. Selecting Reset man. trip will reset the Trip counter to zero. Selecting Files opens a file browser. Selecting Import/export allows you to back up or restore User data using external storage. -
Page 21: Man Overboard (Mob)
Options • Configure batteries. • Configure fuel tanks. • Configure preferred units of measurement. Units • Configure Bearing mode. • Configure variation. • Configure GNSS system datum. • Assign a Homescreen page or app to start on This display power up. •... - Page 22 The MOB feature requires your vessel to have a valid position fix from a GNSS receiver. Dead reckoning mode also requires Heading and Speed data. When you activate the MOB alarm: • an audible alarm is sounded which is repeated every 30 seconds until the alarm is cancelled.
-
Page 23: Alarms
3.8 Alarms The Alarm manager can be accessed from the Homescreen. Example: Active alarms list Alarms are raised by system functions, and also external equipment connected to your display. When an Alarm is triggered all networked MFDs will display audible and visual warnings. -
Page 24: Satellite Navigation / Positioning
3.9 Satellite navigation / positioning GNSS Status Your vessel’s GNSS position is provided in the top left corner of the Homescreen. You can access fix accuracy and settings by selecting the area. If latitude and longitude is displayed on the Homescreen then you have a valid position fix. -
Page 25: Gnss Settings
GNSS Settings The settings for your GNSS receiver (internal or external) can be accessed from the Satellites menu: Homescreen > GNSS popover > Satellites > Settings. From the GNSS Settings tab you can: • activate and deactivate use of Differential positioning (SBAS) •... -
Page 26: External Devices
3.10 External devices You can view the status of peripheral devices connected to your MFD using the Status area, located at the top right of the Homescreen. You can also connect and disconnect from some devices using the Status area popover menu. Status area icons The following devices’... -
Page 27: Sidebar
3.11 Sidebar The Sidebar is available in all apps and provides quick access to system data. By default the Sidebar is set up to display navigation data. The Sidebar is displayed automatically in the Chart app when a Goto or follow is initiated. It can also be displayed at anytime by sliding your finger from left to right from the left edge of the screen. -
Page 28: Editing The Split Ratio Of A Splitscreen App Page
Data overlays can be customized from: Menu > Settings > Page Settings > Edit data overlays. In edit mode, drag the data overlay to the desired location, then pressing and holding on a Data overlay displays the Popover menu where you can Edit, Move, Resize or Delete the Data overlay Select Add to add another overlay or Done to exit edit mode. -
Page 29: Chapter 4 Chart App
Chapter 4: Chart app 4.1 Chart app overview The Chart app displays a representation of your vessel in relation to land masses and other charted objects, which enables you to plan and navigate to your desired destination. The Chart app requires a GNSS position fix in order to display your vessel at the correct location on a world map. -
Page 30: Chart App Controls
Route Destination waypoint You can plan your route in During a goto, this is advance by creating a Route the current destination using Waypoints to mark waypoint. each route leg. Heading line COG line If Heading data is available If COG data is available then a Heading vector then you can display for your vessel can be... -
Page 31: Chart Ranging And Panning
Chart ranging and panning You can change the range displayed in the Chart app using the onscreen Range controls or by using the pinch-to-zoom multi-touch gesture. You can pan the chart area by swiping your finger across the chart. Selecting a chart card You can use electronic charts from supported vendors to enhance the level of detail provided by the Chart app. -
Page 32: Vessel Details
DETAILED This is the default chart mode. Full menu options are available and any changes made are saved to the user profile in use. FISHING Fishing mode optimizes the Chart app for Fishing and displays more detailed contour lines, if supported by your selected cartography. -
Page 33: Layers
• show/hide range rings • show/hide Tide and Wind graphics Layers Aerial, AIS, Radar and Range rings can be overlaid on the Chart app. The Layers tab from the Chart app Settings menu: Menu > Settings > Layers provides controls for Chart layers. -
Page 34: View And Motion
View and motion The view and motion tab allows you to control how the chart is displayed in relation to your vessel. Chart motion Chart motion controls how the chart and boat are drawn to keep the boat onscreen as you move. Chart orientation The orientation of the chart affects the alignment of the chart relative to your vessel, route or North. -
Page 35: Recording A Track
The location you select will become the first waypoint for your route. 3. Select further locations to create Route legs. 4. When your Route is complete, select Finish route build 5. Select Exit return to normal operation. Recording a Track You can record your vessel’s journey using Tracks. -
Page 36: Chapter 5 Sonar App
Chapter 5: Sonar app 5.1 Sonar app overview The Sonar app displays a visualization of the echoes received from a Sonar module and transducer. The Sonar app is compatible with Traditional, CHIRP, DownVision™, SideVision™ and RealVision™ 3D sonar modules and transducers. The Sonar app builds an underwater view of bottom structure and targets in the water column. -
Page 37: Realvision 3D Controls
Icon Description Action Waypoint / Place waypoint / activate Man overboard (MOB) alarm Image Displays onscreen sensitivity / image adjustment adjustment controls Resume When the Sonar app is paused, scrolling for Waypoint placement, you can recommence scrolling by selecting the Resume scrolling button. -
Page 38: Opening The Sonar App
Homescreen that includes a Sonar app. Pre-requisites: Ensure your Sonar module is compatible (check the latest details available on the Raymarine website). If in doubt please contact an authorized Raymarine dealer for advice. 2. Ensure you have installed your Sonar module in accordance with the documentation that was supplied with the module. - Page 39 Select OK and then choose the Sonar channel you want to use from the list: Sonar on and pinging If your Sonar app has already been set up then when the Sonar app is opened the Sonar image will be displayed and start scrolling. No sonar source available If the ’No sonar source available’...
-
Page 40: Sonar Channels
Check your external sonar module’s network and power connection, check your MFD’s network or transducer connection ensuring the connections and cabling is correct and free from damage, then power cycle your system. If the Sonar module is still not found then refer to your equipment’s installation documentation for further troubleshooting information. -
Page 41: Selecting A Sonar Channel
RealVision™ 3D SideVision™ DownVision™ High CHIRP / High Medium CHIRP / Low CHIRP / Low Frequency Medium Frequency Frequency Selecting a Sonar channel The first time you open a new Sonar app page you will be requested to select a channel, subsequently you can change the sonar channel by selecting a channel icon from the Sonar app menu. -
Page 42: Chapter 6 Radar App
Chapter 6: Radar app 6.1 Radar app overview The Radar app displays a visualization of the echoes received from a connected Radar scanner. The Radar app is an aid used to help enhance collision and situational awareness by enabling target’s distance and speed to be tracked in relation to your vessel. -
Page 43: Opening The Radar App
Homescreen that includes the Radar app. Pre-requisites: Ensure your Radar scanner is compatible, check the latest details available on the Raymarine website, if in doubt please contact an authorized Raymarine dealer for advice. 2. Ensure you have installed your Radar scanner in accordance with the documentation that was supplied with your Radar. - Page 44 Off/Not Connected If the ‘Off/Not Connected’ message is displayed then: • your Radar scanner may be powered down, or • your MFD cannot establish a connection with your Radar scanner Select On to power up your Radar. If the ‘Radar not found’ message is displayed then a connection could not be established, ensure that network and power connections to your Radar and MFD are correct and free from damage and then power cycle your system.
-
Page 45: Radar Modes
Transmitting If your Radar scanner is connected, powered up and transmitting then the Radar image is displayed and echoes/targets are displayed onscreen. Radar modes The Radar app provides preset modes that can be used to quickly achieve the best picture depending on your current situation. Only Radar modes supported by your Radar scanner are shown. -
Page 46: Selecting A Radar Scanner
COASTAL Coastal mode takes into account slightly higher levels of Sea clutter that is encountered out of Harbor, useful when in open water but keeping to the coast. Radar scanners: All. OFFSHORE Offshore mode takes into account high levels of Sea clutter so that targets are still visible, useful when navigating in open water away from the coast. - Page 47 2. Select the Scanner: box on the Transmission tab. A list of available Radar scanners is displayed. 3. Select the Radar scanner that you want to associate with the current instance of the Radar app. 4. Close the Settings page. The current instance of the Radar app will change to display the selected Radar scanner.
-
Page 48: Chapter 7 Dashboard App
Chapter 7: Dashboard app 7.1 Dashboard app overview The Dashboard app enables you to view system data. System data may be generated by your MFD or by devices connected to your MFD via SeaTalkng ® / NMEA 2000 and SeaTalkhs ™. The Dashboard app can also be configured to provide control of your compatible Digital Switching devices. -
Page 49: Switching Data Page
Icon Description Function Waypoint / MOB Place waypoint / activate Man overboard (MOB) alarm. Displays the previous data page. Left arrow Right arrow Displays the next data page. Switching data page 1. Use the Left arrow and Right arrow buttons, located at the bottom of the screen, to cycle through the available data pages. -
Page 50: Chapter 8 Camera App
Chapter 8: Camera app 8.1 Camera app overview IP (Internet protocol) video feeds can be viewed, recorded and played back using the Camera app. Examples of IP video feeds include: IP CCTV camera and IP Thermal imaging camera. It may be possible to view analog video feeds when using a suitable Analog to IP video converter. -
Page 51: Opening The Camera App
Homescreen that includes the Camera app. Pre-requisites: Ensure your camera is compatible, check the latest details available on the Raymarine website against your IP camera’s specification, if in doubt please contact an authorized Raymarine dealer for advice. 2. Ensure you have installed your camera in accordance with the documentation that was supplied with your camera. -
Page 52: Selecting An Ip Video Feed
Camera not yet available The camera ‘xxx not yet available..’ message is displayed if: • a Camera app page is opened before the camera has finished booting up. • connection to the camera is lost. If the camera ‘xxx not yet available..’ message is displayed for more than 2 minutes, then your MFD cannot connect to your camera. -
Page 53: Chapter 9 Audio App
Chapter 9: Audio app 9.1 Audio app overview The Audio app can be used to control a compatible NMEA 2000 entertainment system that is connected to the same SeaTalkng ® network. The Audio app can be displayed in Fullscreen and half screen portrait app pages. -
Page 54: Audio App Controls
Audio app controls Icon Description Function Home icon Takes you to the Homescreen. Menu icon Opens the app menu. Waypoint / MOB Place waypoint / activate Man overboard (MOB) alarm. Power Off Powers off the Entertainment system. Mute All Mutes all audio zones. Volume Down Decreases volume for current zone. -
Page 55: Opening The Audio App
Homescreen that includes the Audio app. Pre-requisites: Ensure your Entertainment system is compatible, check the latest details available on the Raymarine website, if in doubt please contact an authorized Raymarine dealer for advice. 2. Ensure you have installed your Entertainment system in accordance with the documentation that was supplied with the system. - Page 56 Audio app displayed If your Entertainment system is powered up and operational then the Audio app is displayed and can be used to control your system. Entertainment system powered off If the Entertainment system is powered off then the Power icon is displayed, selecting the Power icon will switch your Entertainment system on.
-
Page 57: Selecting An Audio Source
Selecting an audio source 1. Select the audio source you want to listen to from the app Menu. The audio source must be available to your Entertainment system’s head unit for you to be able to select the source from your MFD. - Page 60 Raymarine Marine House, Cartwright Drive, Fareham, Hampshire. PO15 5RJ. United Kingdom. Tel: +44 (0)1329 246 700 www.raymarine.com a brand by...
Need help?
Do you have a question about the AXIOM and is the answer not in the manual?
Questions and answers