Table of Contents
Advertisement
Please dispose of packaging for the product in a responsible
manner. It is suitable for recycling. Help to protect the
environment, take the packaging to the local amenity tip
and place into the appropriate recycling bin.
Never dispose of electrical equipment or batteries in with
your domestic waste. If your supplier offers a disposal facili-
ty please use it or alternatively use a recognised re-cycling
agent. This will allow the recycling of raw materials and help
protect the environment.
FOR HELP OR ADVISE ON THIS PRODUCT PLEASE CONTACT YOUR DISTRIBUTOR,
OR SIP DIRECTLY ON:
TEL: 01509500400
EMAIL: sales@sip-group.com or technical@sip-group.com
www.sip-group.com
Ref:140912
28
10" Table Saw
01930
Please read and fully understand the instructions in
this manual before operation. Keep this manual
safe for future reference
1
Advertisement
Table of Contents

Related Manuals for SIP 01930


Summary of Contents for SIP 01930
- Page 1 This will allow the recycling of raw materials and help protect the environment. FOR HELP OR ADVISE ON THIS PRODUCT PLEASE CONTACT YOUR DISTRIBUTOR, OR SIP DIRECTLY ON: 01930 TEL: 01509500400 EMAIL: sales@sip-group.com or technical@sip-group.com www.sip-group.com...
- Page 2 2006/95/EC Low Voltage Directive 2004/108/EC EMC Directive 2002/95/EC ROHS Directive And the following harmonised standard(s) EN 55014-1/A1:2009 EN 55014-2/A2:2008 EN 61000-3-2/A2:2009 EN 61000-3-11:2000 EN 61029-1:2009 EN 61029-2-1:2010 Signed: Mr P. Ippaso - Director - SIP (Industrial Products) Ltd Date: 05/07/2011.
-
Page 3: Table Of Contents
NOTES CONTENTS Page No. Description General Safety Instructions Specific Safety Instructions Safety Symbols Guarantee Electrical Connection Technical Specifications Getting To Know Your Saw Assembly Instructions Operating Instructions Maintenance Troubleshooting Notes Declaration of Conformity... -
Page 4: General Safety Instructions
Table saw does not start: Circuit breaker has tripped. Reset circuit breaker. SIP recommends that this tool should not be modified or used for any application oth- Mains lead or Switch is dam- Have the Mains lead or er than that for which it was designed. If you are unsure of its relative applications do aged. - Page 5 TROUBLE SHOOTING GENERAL SAFETY INSTRUCTIONS...cont comes to a complete stop. DO NOT ABUSE THE MAINS LEAD: Never carry the tool by the mains lead or pull it to re- Problem Possible cause Possible solution move the plug from the mains socket. Keep the mains lead away from heat, oil and sharp edges.
-
Page 6: Specific Safety Instructions
SPECIFIC SAFETY INSTRUCTIONS MAINTENANCE….cont 1. Use only the blade flange specified for this tool. 2. Be careful not to damage the arbor, flange (especially the installing surface) or NUT. Damage to these parts could result in blade breakage. And / or operator injury. 3. -
Page 7: Safety Symbols
Guarantee: If the angle on the scale of the mitre gauge does not match that of the cut adjust as This SIP 10” Table Saw is covered by a 12 month parts and labour warranty covering follows. failure due to manufacturers defects. This does not cover failure due to misuse or op- erating the machine outside the scope of this manual - any claims deemed to be Set an angle of 90°... -
Page 8: Electrical Connection
ELECTRICAL CONNECTION MAINTENANCE….cont The wires for the plug are coloured in the following way: Fig. 26 Yellow / green Earth Blue Neutral Brown Live As the colours of the wires may not correspond with the markings in your plug, pro- ceed as follows: The wire which is coloured blue, must be connected to the terminal marked with N or coloured black. -
Page 9: Technical Specifications
MAINTENANCE TECHNICAL SPECIFICATIONS Important! Always turn the saw off and remove the plug from the mains supply be- Part number 01930 fore all maintenance and / or adjustments. Input voltage 230v ~ / 50hz Remove dust and dirt regularly from the machine. Cleaning is best carried out with a fine brush or a cloth. -
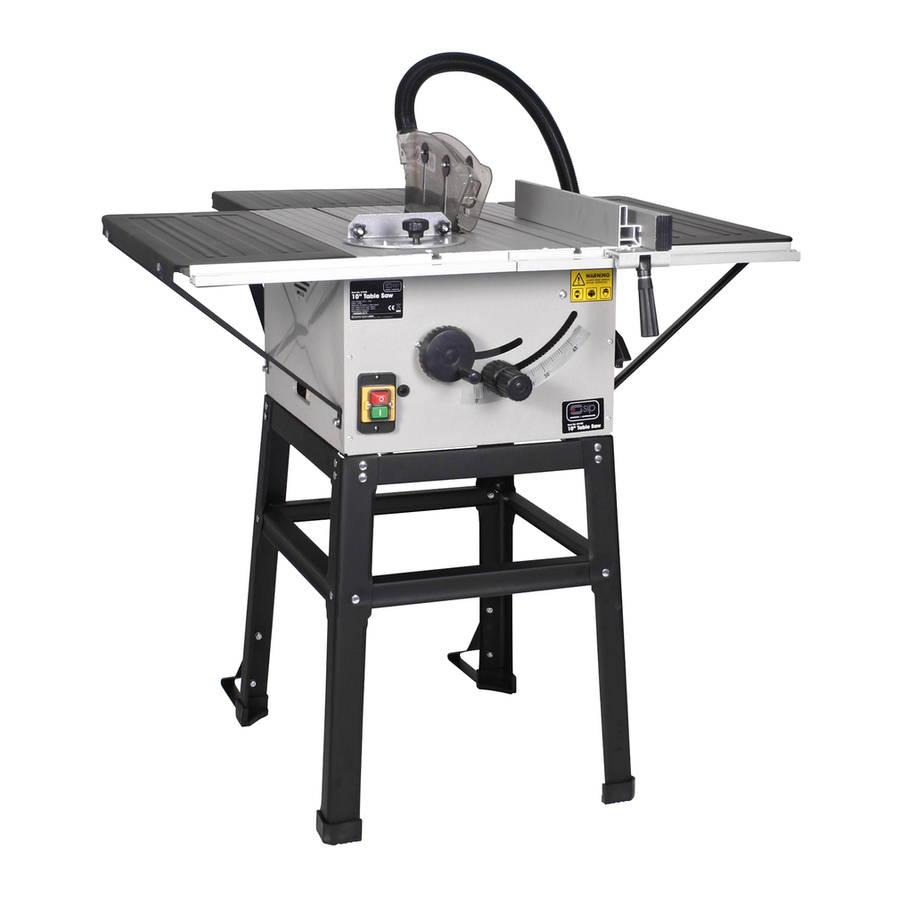
Page 10: Getting To Know Your Saw
GETTING TO KNOW YOUR SAW OPERATING INSTRUCTIONS….cont Fig. 19 Using The Mitre Gauge: Insert the mitre gauge (20) into the slot (I) of the saw table (Fig. 20). Loosen locking knob (30). Turn the mitre gauge (20) until the arrow points to the angle required. Re-tighten locking knob (30). - Page 11 OPERATING INSTRUCTIONS….cont GETTING TO KNOW YOUR SAW….cont Rip-Fence: The Rip-Fence (24) has an auxiliary extrusion (G) which has two different guide faces which should be set according to the thickness of the material to be cut. the extrusion (G) must be used according to Fig. 17 for thick material (over 25mm work-piece thickness), and according to Fig.
-
Page 12: Assembly Instructions
The saw should be set up where it can stand firmly on a flat level surface. Your SIP 10” Table Saw is fitted with a safety NVR (No Volt Release) switch (18). This All covers and safety devices have to be correctly fitted and in full working order be- means that if power is cut to the saw (such as in a power failure);... - Page 13 ASSEMBLY INSTRUCTIONS….cont ASSEMBLY INSTRUCTIONS….cont Turn the saw the correct way up so that it is standing on its legs on a firm and level Hold the 4 legs (16) in place (1 at a time) and secure to the main saw using the bolts surface - 2 persons may be required to do this safely.
- Page 14 ASSEMBLY INSTRUCTIONS….cont ASSEMBLY INSTRUCTIONS….cont Fig. 10 Fig. 7 Fig. 8 Fitting The Extension Tables: Gather together all of the required parts to fit the extension tables (Fig. 9). Fig. 11 Proceed to fit the extension table support brackets (19) Fig. 12 to both the side extensions and the rear extension ta- bles (Fig.
Need help?
Do you have a question about the 01930 and is the answer not in the manual?
Questions and answers