Table of Contents

Related Manuals for Vuly THUNDER


Summary of Contents for Vuly THUNDER
- Page 1 THUNDER TRAMPOLINE ASSEMBLY MANUAL...
- Page 3 THUNDER TRAMPOLINE ASSEMBLY MANUAL...
- Page 4 CONTENTS MAINTENANCE Care Instructions Weather Care Storage Moving the Trampoline Material Lifespan Warnings Trampoline Inspection Checklist Usage Precautionary Advice Basic Skills Hex Vex 2 Specific Use & Safety Limitations Site Planning Safety Checks ASSEMBLY INSTRUCTIONS Trampoline Assembly Leafsprings Leafspring Lever Skirt...
- Page 5 Pack your trampoline in its original packaging in an environment free from humidity. MOVING THE TRAMPOLINE VULY recommends a minimum of eight adults to move the trampoline to ensure the lift is within heavy lifting regulations. Dragging or not sufficiently lifting may cause bending or warping of the joiners and frame tubes.
- Page 6 Use this checklist to inspect the trampoline before each use. Replace any worn, defective, or missing parts to avoid potential hazards. If the following listed issues are discovered, do not continue to use the trampoline. Contact Vuly or your nearest dealer to order and replace any parts.
- Page 7 MAINTENANCE | USAGE PRECAUTIONARY ADVICE User: Start by learning to bounce with small bounces until your confidence and coordination improve. Learn the basic bouncing, landing, and stopping movements to develop a greater control of each bounce before attempting more advanced techniques.
- Page 8 Hex Vex 2 helps jumpers to enhance their balance, increase their memory and learn sequence. Invent new games with Hex Vex 2 and tell Vuly to have them published to the world! Hex Vex 2 Game Icons Trampolines should be used by one person at a time. Some Hex Vex 2 games are designed to be played by more than one person.
- Page 9 Read all instructions before using the trampoline. For further information or additional instructional materials, contact VULY or your nearest trampoline club. SITE PLANNING Adequate overhead clearance is essential. A minimum clearance of 8m / 26ft from ground level is recommended.
- Page 10 TRAMPOLINE | ASSEMBLY INSTRUCTIONS WARNING: MAKE SURE YOU WEAR THE VULY GLOVES WHEN YOU INSTALL THE TRAMPOLINE. STEP Take two frame tubes and connect a joiner to each end. Lay out the frames, joiners and two leafpsrings for each joiner in a circle.
- Page 11 LEAFSPRINGS | ASSEMBLY INSTRUCTIONS STEP Put the mat and net in the centre of the trampoline and line up the vertical net PP belts with the joiner poles. LEAFSPRING LEVER | USAGE Hook the lever over the leafspring directly under the top rivet. Push the handle to bend the leafspring towards the mat.
- Page 12 TRAMPOLINE | ASSEMBLY INSTRUCTIONS STEP Assemble the net poles together with the holes all facing the same side. STEP Insert the net plug at the top of each vertical net seam into the top end of each assembled net pole. The elastic should be on the side of the net pole that curves inwards, opposite to the hole.
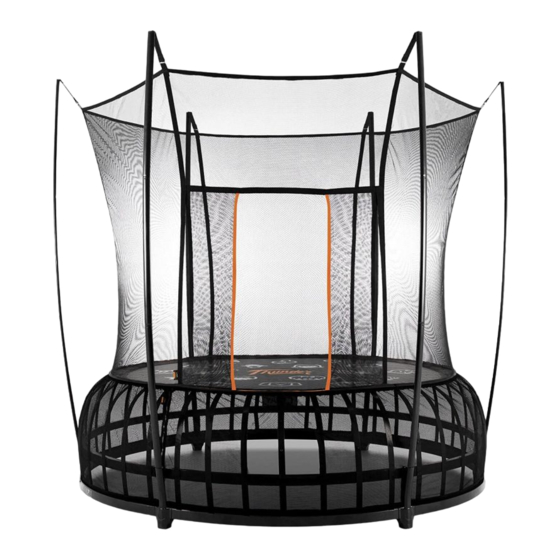
- Page 13 CONGRATULATIONS! You have assembled your new Vuly Thunder. THUNDER NET POLE MAT AND NET LEAFSPRING SKIRT FRAME TUBE JOINER LEAFSPRING LEVER...
- Page 15 PUSH LIMITS...
- Page 16 WARNING ZERBRECHLICH AVERTISSEMENT 告 • 本产品仅供家庭使用 • 本 列产品是供一名 6 岁或以上 儿 个人使用 本产品为户外使用 • 儿 必 在产品 当地安 完成之后才 使用 • 由成人 • 一人使用 撞危 • 产品包含小体 件有 息 危 • 本产品不 合36个月以下儿 使用 • 本产品检测 最大承 150kg تحذير ADVERTENCIA .•...
Need help?
Do you have a question about the THUNDER and is the answer not in the manual?
Questions and answers