
Related Manuals for Allen-Bradley 1769-L30ERM


Summary of Contents for Allen-Bradley 1769-L30ERM
- Page 1 Quick Start CompactLogix 5370 L3 Controllers Catalog Numbers 1769-L30ER, 1769-L30ERM, 1769-L30ER-NSE, 1769-L33ER, 1769-L33ERM, 1769-L36ERM...
- Page 2 IMPORTANT Identifies information that is critical for successful application and understanding of the product. Allen-Bradley, CompactLogix, ControlFLASH, Kinetix, Logix5000, PanelView, POINT I/O, PowerFlex, Rockwell Software, Rockwell Automation, RSLinx, RSNetWorxStratix 6000, Studio 5000, and TechConnect are trademarks of Rockwell Automation, Inc.
- Page 3 Where to Start Follow the path that matches your hardware and network configuration. Prepare the CompactLogix 5370 L3 Controller Hardware Required page 17 Prepare the Computer and Load Controller Firmware Required page 33 Optional ™ ® ® ™ PowerFlex 70 POINT I/O PowerFlex Kinetix...
- Page 4 Where to Start How Hardware Is Connected This quick start, in use with the additional quick starts listed in Table 1 on page 12, describes possible control systems shown in Figure 1 Figure Figure 1 - CompactLogix 5370 L3 Controller in a Star Network Topology CompactLogix™...
- Page 5 Where to Start Figure 2 - CompactLogix 5370 L3 Controllers Using a DeviceNet Network Distributed POINT I/O Modules with 1734-ADN Adapter CompactLogix 5370 L3 PowerFlex 70 Drive with Control System with 20-COMM-D Adapter 1769-SDN Module 1 (Front) 2 (Rear) Computer with 1606-XLDNET4 PowerFlex 40 Drive with 22- 1784-U2DN Cable...
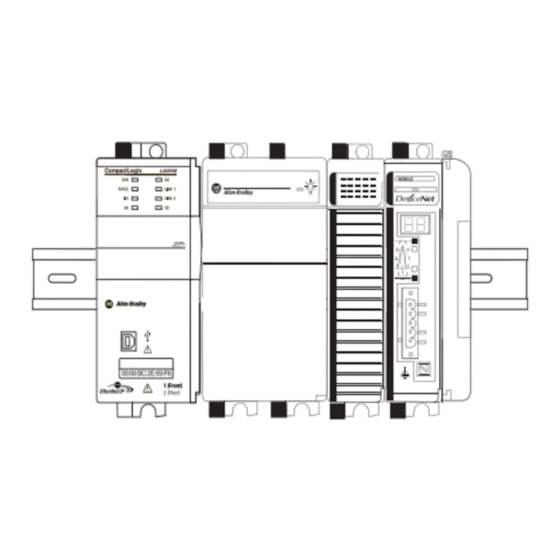
- Page 6 Where to Start Sample Panel Layout The sample panel layout shows the orientation of an example CompactLogix 5370 L3 control system using EtherNet/IP networks and DeviceNet networks. The specific layout of CompactLogix 5370 L3 control systems varies by application. The following graphic is an example IMPORTANT panel layout.
-
Page 7: Table Of Contents
Table of Contents Preface About the CompactLogix L3 Controllers ......10 Choose to Integrate Optional Devices ......12 Studio 5000 Environment . - Page 8 Table of Contents Chapter 4 Configure the DeviceNet Network Before You Begin..........53 What You Need.
- Page 9 Preface This quick start describes how to use CompactLogix 5370 L3 controllers to install a simple CompactLogix 5370 L3 control system and execute a task with a local 1769 Compact I/O output module. The programming examples included are not complex, and offer solutions to verify that devices are functioning and communicating properly.
-
Page 10: About The Compactlogix L3 Controllers
Preface About the CompactLogix L3 Controllers These CompactLogix 5370 L3 controllers are available: • 1769-L30ER • 1769-L30ERM • 1769-L30ER-NSE • 1769-L33ER • 1769-L33ERM • 1769-L36ERM The tasks described in this publication use a 1769-L36ERM controller. IMPORTANT These features are available on CompactLogix 5370 L3 controllers. - Page 11 – Control of distributed I/O modules over a DeviceNet or EtherNet/IP network • Support for Integrated Motion on the EtherNet/IP network with the 1769-L30ERM, 1769-L33ERM, 1769-L36ERM controllers only. For more information on using the 1769-L30ERM, 1769-L33ERM, 1769-L36ERM controller in an application that includes Integrated Motion on the EtherNet/IP network,...
-
Page 12: Choose To Integrate Optional Devices
Preface Choose to Integrate Optional Devices You can integrate multiple optional devices into a CompactLogix 5370 L3 control system. You can use these devices on DeviceNet or EtherNet/IP networks. This table describes optional devices you might use in a CompactLogix 5370 L3 control controller system and what resources to use for each. -
Page 13: Studio 5000 Environment
Preface Studio 5000 Environment The Studio 5000™ Engineering and Design Environment combines engineering and design elements into a common environment. The first element in the Studio 5000 environment is the Logix Designer application. The Logix Designer application is the rebranding of RSLogix™ 5000 software and will continue to be the product to program Logix5000™... -
Page 14: Required Software
Preface Required Software Before attempting to complete any of the tasks described in this publication, verify that your computer meets the following operating system and service pack compatibility requirements: • Microsoft Windows 7 Professional (64-bit) with Service Pack 1 • Microsoft Windows 7 Home Premium (64-bit) with Service Pack 1 •... -
Page 15: Parts List
2 or 3 DIN rail (steel, not aluminum) One of the following: CompactLogix 5370 L3 controllers The tasks described in this publication use a 1769-L36ERM controller. • 1769-L30ER • 1769-L30ERM • 1769-L30ER-NSE • 1769-L33ER • 1769-L33ERM • 1769-L36ERM 1769-PA4 Compact I/O power supply... -
Page 16: Additional Resources
Provides declarations of conformity, certificates, and other certification details. You can view or download publications at http://www.rockwellautomation.com/literature/. To order paper copies of technical documentation, contact your local Allen-Bradley distributor or Rockwell Automation sales representative. Rockwell Automation Publication IASIMP-QS023B-EN-P - December 2012... -
Page 17: Before You Begin
Chapter Prepare the CompactLogix 5370 L3 Controller Hardware This chapter describes how to install the hardware needed for your CompactLogix 5370 L3 control system. Before You Begin Determine which network or networks your control system uses. You can use CompactLogix 5370 L3 controllers on an EtherNet/IP network and on a DeviceNet network. Rockwell Automation Publication IASIMP-QS023B-EN-P - December 2012... -
Page 18: What You Need
Description 1 or more DIN rail (steel, not aluminum) One of the following: CompactLogix 5370 L3 controller • 1769-L30ER The tasks described in this publication use a • 1769-L30ERM 1769-L36ERM controller. • 1769-L30ER-NSE • 1769-L33ER • 1769-L33ERM • 1769-L36ERM 1769-PA4... -
Page 19: Follow These Steps
Prepare the CompactLogix 5370 L3 Controller Hardware Chapter 1 Follow These Steps Install the page 20 Networks Install the Secure page 21 Digital Card Assemble the page 23 System Make Network page 26 Connections Wire Power page 32 Rockwell Automation Publication IASIMP-QS023B-EN-P - December 2012... -
Page 20: Install The Networks
Chapter 1 Prepare the CompactLogix 5370 L3 Controller Hardware Install the Networks Before you install your CompactLogix 5370 L3 control hardware, you must install the network on which it will operate, that is, an EtherNet/IP or DeviceNet network. We recommend that you install both networks. For more information on installing either of these networks, see the publications listed in the following table. -
Page 21: Install The Secure Digital Card
Prepare the CompactLogix 5370 L3 Controller Hardware Chapter 1 Install the Secure Digital Card The secure digital (SD) card provides nonvolatile storage for the CompactLogix 5370 L3 controller. You can store projects to an SD card or load a project from an SD card. There following SD cards are available with for use with your CompactLogix 5370 L3 controller. - Page 22 Chapter 1 Prepare the CompactLogix 5370 L3 Controller Hardware 3. Insert the SD card into the SD card slot. You can install the SD card in one orientation only. The beveled corner should be at the top. An orientation logo is printed on the card.
-
Page 23: Assemble The System
Prepare the CompactLogix 5370 L3 Controller Hardware Chapter 1 Assemble the System CompactLogix 5370 L3 control systems support multiple system configurations, including the optional placement of modules between the controller and the power supply and to the right of the power supply. Complete the following steps to assemble the system. - Page 24 Chapter 1 Prepare the CompactLogix 5370 L3 Controller Hardware 5. Move the power supply’s bus level fully to the left until it locks. 6. Mount the CompactLogix 5370 L3 controller and power supply on the DIN rail. a. Pull locking tabs out b.
- Page 25 Prepare the CompactLogix 5370 L3 Controller Hardware Chapter 1 8. Install the 1769-SDN scanner module. a. Make sure the scanner module’s locking tabs are pulled out. b. Make sure the scanner module’s bus lever is in the unlocked position, that is, leaning to the right.
-
Page 26: Make Network Connections
Chapter 1 Prepare the CompactLogix 5370 L3 Controller Hardware 9. Mount the 1769-ECR end cap terminator. a. Move the end cap terminator’s bus lever to the unlocked position, that is, the right. b. Move the end cap terminator back along the tongue-and- groove slots with the rightmost module in the system until the bus connectors line up with each... -
Page 27: Make Usb Connection
Prepare the CompactLogix 5370 L3 Controller Hardware Chapter 1 Make USB Connection You must use RSLinx Classic software, version 2.59.xx or later, with your CompactLogix 5370 L3 controllers. With this IMPORTANT software version, there is no need to install an RSLinx Classic software driver. The driver appears automatically in the software when a USB cable is connected to the controller and the computer. -
Page 28: Make An Ethernet/Ip Network Connection
Chapter 1 Prepare the CompactLogix 5370 L3 Controller Hardware Make an EtherNet/IP Network Connection This section assumes that you installed a 1783-EMS08T Stratix 6000 Ethernet managed switch on the DIN rail when you IMPORTANT installed your EtherNet/IP network as described on Install the Networks on page 1. -
Page 29: Make A Devicenet Network Connection (Optional)
Prepare the CompactLogix 5370 L3 Controller Hardware Chapter 1 Make a DeviceNet Network Connection (Optional) 1. Attach and lock the 1606-XLDNET8 DeviceNet power supply to the DIN rail. The power supply uses a locking tab at the top that you push down to secure it to the DIN rail. - Page 30 Chapter 1 Prepare the CompactLogix 5370 L3 Controller Hardware 4. Connect the 1769-SDN module’s grounding screw to the panel. Grounding Screw Use 2.08 mm (14 AWG) wire to connect to panel ground. 5. Connect the QD Micro Cordset to a KwikLink sealed microconnector on the network.
- Page 31 Prepare the CompactLogix 5370 L3 Controller Hardware Chapter 1 c. Connect the DeviceNet power tap to the power supply. Connect White Shield Blue Black – For this example, there is no need to connect the DC ok relay on the power supply to anything.
-
Page 32: Wire Power
Chapter 1 Prepare the CompactLogix 5370 L3 Controller Hardware Wire Power 1769-PA4 Power Supply WARNING: Verify that all incoming power is turned off before wiring power. 1. Set the V AC line input power switch behind the clear door to match your 120V or 240V AC power source as directed by the DANGER label on the power supply. -
Page 33: Before You Begin
Chapter Prepare the Computer and Load Controller Firmware In this chapter, you install and configure the necessary programming and configuration software on your computer and load firmware on your controller. Before You Begin Before you begin, complete these tasks: • Verify that your computer meets the software’s system requirements for installation and use of the software listed in Table... -
Page 34: What You Need
Chapter 2 Prepare the Computer and Load Controller Firmware What You Need Table 5 lists the components you use in this chapter. Table 5 - What You Need to Prepare the Computer Component Description Studio 5000 environment Environment that combines engineering and design elements into a common environment. Logix Designer application Application used to create a project the CompactLogix 5370 L3 controller uses in your application. -
Page 35: Follow These Steps
Prepare the Computer and Load Controller Firmware Chapter 2 Follow These Steps Install the Studio 5000 Environment page 36 Configure an EtherNet/IP Driver in RSLinx Classic Software page 38 Set the IP Address for the Computer page 41 Load the Controller Firmware page 44 Optional... -
Page 36: Install The Studio 5000 Environment
Chapter 2 Prepare the Computer and Load Controller Firmware Install the Studio 5000 Environment The Studio 5000 environment, version 21.00.00, installation process is configured so that, among other software applications, RSLinx Classic software, version 3.51.00 and RSNetWorx for DeviceNet software, version 21.00.00, are automatically installed. The automatic installation option is enabled by default. - Page 37 Prepare the Computer and Load Controller Firmware Chapter 2 3. Use the default selections and click Install. 4. Read the license agreement carefully. 5. Click Accept All. The installation process begins. When installation is complete, your computer will have the software necessary required to complete the tasks described in this publication.
-
Page 38: Automatic Installation Of Controlflash Software
Chapter 2 Prepare the Computer and Load Controller Firmware • Rockwell Automation Technical Support Software Activations site http:// www.rockwellautomation.com/support/activations.html Automatic Installation of ControlFLASH Software ControlFLASH software is used to upgrade a CompactLogix 5370 L3 controller’s firmware revision. ControlFLASH software is automatically installed when you install the Studio 5000 environment. - Page 39 Prepare the Computer and Load Controller Firmware Chapter 2 2. From the Communications pull- down menu, choose Configure Drivers. The Configure Drivers dialog box appears. 3. From the Available Driver Types pull-down menu, choose EtherNet/IP Driver or Ethernet devices and click Add New. We recommend that you use EtherNet/IP Driver.
- Page 40 Chapter 2 Prepare the Computer and Load Controller Firmware 5. Select an Ethernet card and click OK. This new driver is available. 6. Verify that the driver’s Status is Running and click Close. Rockwell Automation Publication IASIMP-QS023B-EN-P - December 2012...
-
Page 41: Set The Ip Address For The Computer
Prepare the Computer and Load Controller Firmware Chapter 2 Set the IP Address for the Computer Your computer requires an Internet Protocol (IP) address to operate on an EtherNet/IP network. The IP address uniquely identifies the controller and is in the form xxx.xxx.xxx.xxx where each xxx is a number from 000…254 with some exceptions for reserved values. - Page 42 Chapter 2 Prepare the Computer and Load Controller Firmware 3. Right-click Local Area Connection and choose Properties. 4. On the Networking tab, choose Internet Protocol Version 4 (TCP/IPv4) and click Properties. Rockwell Automation Publication IASIMP-QS023B-EN-P - December 2012...
- Page 43 Prepare the Computer and Load Controller Firmware Chapter 2 5. Select Use the following IP address and enter an IP address and Subnet mask for your computer. 6. Record the IP address and subnet mask. 7. Click OK. 8. Close the Local Area Connection Properties dialog box.
-
Page 44: Load The Controller Firmware
Chapter 2 Prepare the Computer and Load Controller Firmware Load the Controller Firmware This section assumes that you downloaded the controller firmware from the Rockwell Automation technical support IMPORTANT website to install on your CompactLogix 5370 L3 controller. If not, download the firmware before following the steps in this section. - Page 45 Prepare the Computer and Load Controller Firmware Chapter 2 4. Click Next. 5. Select the controller catalog number and click Next. Rockwell Automation Publication IASIMP-QS023B-EN-P - December 2012...
- Page 46 Chapter 2 Prepare the Computer and Load Controller Firmware 6. Expand the USB driver, and choose your controller. 7. Click OK. 8. Verify that your computer’s mode switch is in the REM position. PROG 9. Choose the desired firmware revision and click Next. Consider the following: •...
- Page 47 Prepare the Computer and Load Controller Firmware Chapter 2 10. To start the update of the controller, click Finish and then click Yes. Before the firmware upgrade begins, you see the following dialog box. Take the appropriate action for your application. In this example, the upgrade continues when OK is clicked.
-
Page 48: Install Additional Software
Chapter 2 Prepare the Computer and Load Controller Firmware Install Additional Software Depending on your application, you may need to install additional software. For example, if you are integrating a PanelView Plus terminal into your system, you must install the following: •... - Page 49 Chapter Configure the EtherNet/IP Network In this chapter, you assign an IP address to your CompactLogix 5370 L3 controller. This quick start does not describe how to use other devices on the EtherNet/IP network. It is common, however, to use other devices on an EtherNet/IP network in a CompactLogix 5370 L1 control system.
-
Page 50: Before You Begin
Chapter 3 Configure the EtherNet/IP Network Before You Begin Before you begin, complete these tasks. • The tasks described in Chapter 1, Prepare the CompactLogix 5370 L3 Controller Hardware on page 17, including: – Install the EtherNet/IP network – Install the controller and the local expansion module 1769-OB16 output module –... -
Page 51: What You Need
Configure the EtherNet/IP Network Chapter 3 What You Need Table 6 lists the software components you use in this chapter. Table 6 - What You Need to Configure the EtherNet/IP Network Component Description Studio 5000 environment Environment that combines engineering and design elements into a common environment. Logix Designer application Application used to create a project the CompactLogix 5370 L3 controller uses in your application. - Page 52 Chapter 3 Configure the EtherNet/IP Network 2. From the Communications pull- down menu, choose RSWho. The RSWho dialog box appears. 3. Navigate to the USB connection. 4. Right-click the controller and choose Module Configuration. The Module Configuration dialog box appears. 5.
-
Page 53: Before You Begin
Chapter Configure the DeviceNet Network In this chapter, you configure the DeviceNet node address for the 1769-SDN module. You also create the RSNetWorx for DeviceNet file that stores network configuration. Not all tasks described in this quick start are required to complete the final task, that is, use ladder logic to test a IMPORTANT 1769-OB16 output module as described beginning on page... -
Page 54: What You Need
Chapter 4 Configure the DeviceNet Network • The tasks described in Chapter 2, Prepare the Computer and Load Controller Firmware page 33, including: – Install the Studio 5000 environment and RSLinx Classic software Logix Designer application is installed when you install the Studio 5000 environment. –... -
Page 55: Follow These Steps
Configure the DeviceNet Network Chapter 4 Follow These Steps Apply Power to the DeviceNet Network page 56 Set the 1769-SDN Module’s Node Address page 57 Create a DeviceNet Configuration File page 59 Rockwell Automation Publication IASIMP-QS023B-EN-P - December 2012... -
Page 56: Apply Power To The Devicenet Network
Chapter 4 Configure the DeviceNet Network Apply Power to the DeviceNet Network In this quick start, the CompactLogix 5370 L3 control system uses a 1606-XLDNET8 DeviceNet power supply to power the DeviceNet network. You completed the tasks described in Make a DeviceNet Network Connection (Optional) on page 29 to install the power supply and other components in the DeviceNet network, such as a KwikLink sealed terminator on each end of the KwikLink flat cable. -
Page 57: Set The 1769-Sdn Module's Node Address
Configure the DeviceNet Network Chapter 4 Set the 1769-SDN Module’s Node Address 1. Start the software. 2. From the Tools pull-down menu, choose Node Commissioning. 3. Click Browse. When the Device Selection dialog box appears, you can browse to the 1769-SDN module over an EtherNet/IP network or USB connection. - Page 58 Chapter 4 Configure the DeviceNet Network 4. Under the USB driver, expand the path to the 1769-SDN module as shown in the example graphic. 5. Click OK. 6. If you receive a linking device warning, click Yes. The Node Commissioning dialog box is populated with the 1769-SDN module’s current settings.
-
Page 59: Create A Devicenet Configuration File
Configure the DeviceNet Network Chapter 4 9. Click Close. Create a DeviceNet Configuration File 1. From the File pull-down menu, choose New. 2. Click Who Active to go online. Rockwell Automation Publication IASIMP-QS023B-EN-P - December 2012... - Page 60 Chapter 4 Configure the DeviceNet Network 3. Expand the networks to the appropriate DeviceNet network. In this example, the network is Port 2, DeviceNet. 4. Record the following information about the • Slot number = 2 1769-SDN module: • DeviceNet network node number = 1 •...
- Page 61 Configure the DeviceNet Network Chapter 4 7. Right-click the 1769-SDN module and choose Properties. 8. Click the Module tab. The information for your DeviceNet scanner module may vary from what is shown here. 9. Click Download. All configuration is cleared from the 1769-SDN scanner module, and the software is synchronized with the module.
- Page 62 Chapter 4 Configure the DeviceNet Network 10. From the Platform pull-down menu, choose CompactLogix. 11. Enter the slot number of the 1769-SDN module. 12. Click OK. 13. Save the file and record the file name and path. This quick start uses the example file name New DeviceNet.dnt.
- Page 63 Chapter Create a Logix Designer Project In this chapter you create a Logix Designer project. In the project you use ladder logic to create a push button that controls a light on a digital output module. You learn how to complete the following tasks: •...
-
Page 64: Before You Begin
Chapter 5 Create a Logix Designer Project Before You Begin Before you begin, complete these tasks: • The tasks described in Chapter 1, Prepare the CompactLogix 5370 L3 Controller Hardware on page 17, including: – Install the EtherNet/IP network – Install the controller and the local expansion module –... -
Page 65: Follow These Steps
Create a Logix Designer Project Chapter 5 Follow These Steps Create a Project page 66 Configure the Controller page 68 Add Local I/O Module page 70 Add the 1769-SDN to the Project page 71 Add Ladder Logic to Test the Local 1769-OB16 Module page 73 Download to the... -
Page 66: Create A Project
Chapter 5 Create a Logix Designer Project Create a Project 1. Start the application. 2. Click New Project. The New Project dialog box appears. Rockwell Automation Publication IASIMP-QS023B-EN-P - December 2012... - Page 67 Create a Logix Designer Project Chapter 5 3. Choose your controller and name the project. 4. Click Next. 5. Choose a Security Authority and click Finish. For the purposes of this publication, we recommend that you choose No Protection, as shown.
-
Page 68: Configure The Controller
Chapter 5 Create a Logix Designer Project Configure the Controller 1. Verify that your controller’s mode switch is in the REM position. PROG 2. Click the RSWho button. 3. In the Who Active dialog box, expand the path to the controller and select it. - Page 69 Create a Logix Designer Project Chapter 5 7. Expand the I/O Configuration tree. 8. Right-click the controller and choose Properties. 9. Use the tabs on the Controller Properties dialog box to configure the controller. The IP address is set on the Internet Protocol tab.
-
Page 70: Add Local I/O Module
Chapter 5 Create a Logix Designer Project Add Local I/O Module 1. Right-click 1769 Bus and choose New Module. The Select Module Type dialog box appears. 2. If you have multiple I/O modules to add to the local bus, make sure the Close on Create checkbox is clear. -
Page 71: Add The 1769-Sdn To The Project
Create a Logix Designer Project Chapter 5 4. Use the tabs to create the parameters for the I/O module. For the purposes of this IMPORTANT exercise, make sure you change the Module Definition parameters so Electronic Keying is set to Disable Keying. - Page 72 Chapter 5 Create a Logix Designer Project 3. Select the 1769-SDN scanner module and click Create. The Select Major Revision dialog box appears. 4. Select the Major Revision for your module and click OK. 5. When the New Module dialog box appears, configure the following parameters: •...
-
Page 73: Add Ladder Logic To Test The Local 1769-Ob16 Module
Create a Logix Designer Project Chapter 5 7. On the RSNetWorx tab, click Browse to find the configuration (.dnt) file recorded. Use the configuration file name you saved. This quick start uses New DeviceNet.dnt. 8. Click OK. The module is added to the I/O Configuration. - Page 74 Chapter 5 Create a Logix Designer Project 4. Double-click the ? in the Examine On element. 5. Type PB (for push button). 6. Press Enter. 7. Right-click PB and choose New ‘PB’ . 8. Keep the default settings and click one of the Create options.
- Page 75 Create a Logix Designer Project Chapter 5 9. Double-click the ? in the Output Energize element. 10. Name the Output Energize element OB16_Light. Do not use spaces in the tag IMPORTANT name. Use underscores (_) instead. 11. Press Enter. 12. Right-click the OB16_Light element name and choose New “OB16_Light”.
-
Page 76: Download To The Controller And Test The Logic
Chapter 5 Create a Logix Designer Project 16. The graphic shows the Output Energize after assigning the Alias tag to a point on the output module. 17. Save your changes. Download to the Controller and Test the Logic 1. From the mode pull-down menu, choose Download. - Page 77 Create a Logix Designer Project Chapter 5 5. Select the PB Examine On instruction. 6. Press Ctrl+T to toggle the state from 0 to 1, or Off to On. 7. Verify that the status indicator on the digital output module turns on after you toggle the state to 1 or On.
- Page 78 Chapter 5 Create a Logix Designer Project Notes: Rockwell Automation Publication IASIMP-QS023B-EN-P - December 2012...
- Page 79 Appendix Understanding Other Application Options This chapter describes two application options available with a CompactLogix 5370 L3 controller. • Using the controller in a DLR network topology • Using the controller in an application that includes Integrated Motion on the EtherNet/IP network See the following publications for more information on the application options: •...
-
Page 80: Dlr Network Topology
A DLR network topology is a single-fault-tolerant ring network in which DLR-capable Allen-Bradley devices use embedded technology and dual EtherNet/IP ports to establish a network that is resilient to single points of failure, recovers faster when single faults occur, and does not require switches. -
Page 81: Follow These Steps
Understanding Other Application Options Appendix A Follow These Steps Begin Physical Device Installation Create a Logx Designer Project Complete Physical Device Installation Rockwell Automation Publication IASIMP-QS023B-EN-P - December 2012... -
Page 82: Integrated Motion On The Ethernet/Ip Network
EtherNet/IP network that delivers high performance with lower costs and simpler design or configuration when compared to traditional, multi-network motion applications. The following controllers support Integrated Motion on the EtherNet/IP network: • 1769-L30ERM controller • 1769-L33ERM controller • 1769-L36ERM controller... - Page 83 Index Numerics 1769 Compact I/O power supplies hardware 10 wire 32 connections to other devices 4 optional system devices 12 CompactLogix 5370 L3 controllers I/O support 70 available 10 devices to integrate 12 Integrated Motion on the EtherNet/IP features 10 network 79 ControlFLASH software 14 internal energy storage solution 10...
-
Page 84: Rockwell Automation Publication Iasimp-Qs023B-En-P - December
Index power supplies software wire 32 ControlFLASH 14 PowerFlex 40 drives 12 load firmware 44 install ControlFLASH 38 PowerFlex 70 drives 12 install the Studio 5000 environment 36 Logix Designer application 14 required 14 RSLinx Classic 14 required parts 15 RSNetWorx for DeviceNet 14 RSLinx Classic software 14 Studio 5000 environment... - Page 88 Rockwell Automation Support Rockwell Automation provides technical information on the Web to assist you in using its products. , you can find technical manuals, a knowledge base of FAQs, technical and http://www.rockwellautomation.com/support/ application notes, sample code and links to software service packs, and a MySupport feature that you can customize to make the best use of these tools.
Need help?
Do you have a question about the 1769-L30ERM and is the answer not in the manual?
Questions and answers