Advertisement
Advertisement
Table of Contents

Related Manuals for TESTO 327


Summary of Contents for TESTO 327
- Page 1 327 Flue gas analyser, country-specific version GB Instruction manual...
-
Page 2: Table Of Contents
Contents Contents Contents ....................2 Safety and the environment ..............3 EC declaration of conformity ..............7 Product description ................8 First steps ....................9 Using the product ..................12 Preparing for measurement ..............12 Performing the measurement ..............14 Checking the instrument ................18 Maintaining the product ................19 Tips and assistance ................25 Accessories and spare parts ..............26 Appendix ....................27... -
Page 3: Safety And The Environment
Follow the prescribed steps exactly. Only use original spare parts from Testo. Any additional work must only be carried out by authorised personnel. Testo will otherwise refuse to accept responsibility for the proper functioning of the measuring instrument after repair and for the validity of certifications. ❯... -
Page 4: Specifications
Take faulty rechargeable batteries/spent batteries to the collection points provided for them. ❯ Send the product back to Testo at the end of its useful life. We will ensure that it is disposed of in an environmentally friendly manner. Specifications... -
Page 5: Technical Data
Specifications 5 Warning The testo 327 must not be used in areas at risk of explosion, for long-term measurements or as a safety (alarm) device! The testo 327 with the Bluetooth option may only be operated in countries in which it is type approved (see Technical Data). - Page 6 Columbia, Turkey, El Salvador Directives, standards and tests · EC Directive: 2004/108/EEC · Tests: EN 50379, Part 2 (O2, °C, hPa), Part 3 (CO), testo 327-2 with option COH2 additionally: EN 50379, Part 2 (CO) CO accuracy: independantly tested to BS7967...
-
Page 7: Ec Declaration Of Conformity
EC conformity declaration 7 EC declaration of conformity... -
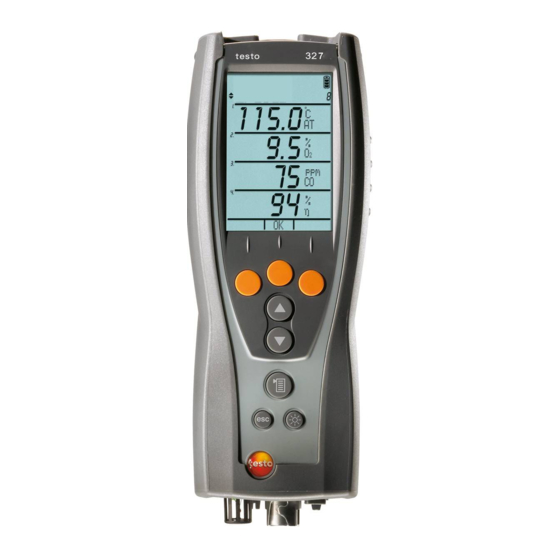
Page 8: Product Description
Product description Product description At a glance: Measuring instrument ➀ Head: IR interface (327-2: IRDA) for connection to Testo protocol printers, ON/OFF switch ( condensate outlet Caution! Risk of injury from infrared beam! ❯ Do not point infrared beam at people's eyes! ➁... -
Page 9: First Steps
First steps 9 At a glance: Flue gas probe ➀ Removable filter chamber with window ➀ and particle filter ➁ Probe handle ➂ Connecting cable ➃ ➁ Connector for measuring instrument ➂ ➃ First steps Charging rechargeable battery Charge the rechargeable battery fully before using the measuring instrument. The rechargeable battery can only be charged at an ambient temperature of 0...+35 °C. - Page 10 First steps Operation with the mains unit If the mains unit is connected, the measuring instrument is automatically powered from the mains unit. It is not possible to charge the rechargeable battery in the measuring instrument during operation. Connect the plug of the mains unit to the mains unit socket on the measuring instrument.
- Page 11 - The selected function is opened and the position number (Displ. seq function only) or parameter which can be set flashes. 5. Bluetooth (327-2 with option Bluetooth only): activate/ deactivate interface. Set the position number (Displ. seq function only)/parameter: ❯...
-
Page 12: Using The Product
Using the product Using the product Preparing for measurement Connecting probes/sensors The instrument needs to detect which probes or sensors are connected, before switch on. If you fail to do this simply turn off instrument connect probe and re-start unit. ➣... - Page 13 Using the product 13 ➣ Aligning the flue gas probe: The flue gas must be able to flow freely past the thermocouple. ❯ Align the probe by turning it as required. The tip of the probe must be in the centre of the flue gas flow. ❯...
-
Page 14: Performing The Measurement
Using the product ➣ Activating measuring function: Press Select Measure using and confirm entry with the OK function key. Select the required measuring function using and confirm entry with the OK function key. Functions 1. Flue gas: flue gas measurement with flue gas probe and central measurement menu for displaying/printing out all readings obtained from the various measuring functions. - Page 15 Using the product 15 highest flue gas temperature), the flue gas temperature measured is shown graphically. Do not measure for longer than 5 minutes, as the readings may fall outside of the tolerances due to a possible drift of the pressure sensor. Smoke/Oild function: Only available if a liquid fuel has been activated.
- Page 16 The values entered are not shown in the central Flue gas measurement menu. However, they can be printed out together with the readings from other functions. Recording values with the smoke tester testo 308 and wireless transfer: - The testo 308 must be in data transfer mode ( lights up).
- Page 17 (Settings → Printer → Select printer) ❯ The printer 0554 0543 can only be selected when the Bluetooth interface is activated.(Option testo 327-2) (Settings → Bluetooth → on/off) ❯ The Print function key is only available if a printout is possible in the instrument's current status.
-
Page 18: Checking The Instrument
To delete the measurement data record: press the Del function. ➣ Transfer data to a Pocket PC (327-2 only): Data can be transferred to a Pocket PC via infrared or Bluetooth. You must also refer to the documentation that comes with the software. -
Page 19: Maintaining The Product
1. Info: displays instrument information: serial number, instrument temperature, operating hours, qA version, last service 2. Error: displays list of errors. 3. Rech. batt: displays the battery capacity. 4. Sens. Diag (327-2 only): performs sensor diagnosis. Key functions for Sens. Diag function (327-2 only) · : select sensor. - Page 20 Maintaining the product Particle filter ➣ Checking the particle filter: ❯ Check the particle filter of the flue gas probe for contamination at regular intervals: check visually by looking through the window of the filter chamber. Replace the filter if there are signs of contamination. ➣...
- Page 21 Used measuring cells must be disposed of as special waste! ➣ Changing the measuring cells (327 CO, 327 O2, 327-1): A slot bridge (0192 1552) must be inserted in slots which do not have a measuring cell. Used measuring cells must be disposed of as special waste! ✓...
- Page 22 - Instrument performs calibration (30s) and is then ready for use again. ➣ Inputting cell coefficients for CO measuring cell (327 CO, 327-1): If you do not enter the correct cell coefficients, you will get incorrect readings! You will find the cell coefficients on the leaflet enclosed with the spare measuring cell.
- Page 23 Maintaining the product 23 CO measuring cell only: Remove shorting jumper Do not remove shorting jumpers of the new measuring cells until immediately before installation. Do not leave the measuring cells without a shorting jumper for longer than 15 minutes. Insert a new measuring cell/bridge in the slot.
- Page 24 Maintaining the product ➂ 3 Unlock halfshell elements and remove ( ➃ 4 Remove adaptor and hose ( ), Push thermo - ➄ couple out of its holder ( ) and disconnect cable ➅ from thermocouple ( 5 Connect lines to the new thermocouple ➆...
-
Page 25: Tips And Assistance
· Gas outlet is blocked: make sure that the gas outlet is clear. Message: ERROR + two-digit no. and service? Device error: switch off the instrument and contact your dealer or Testo Customer Service. Gas cell shutdown-threshold has been exceeded Message appears. -
Page 26: Accessories And Spare Parts
Smoke tester for measuring soot in flue gas 0554 0307 Spare particle filter, 10 pcs. 0554 3385 For a complete list of all accessories and spare parts, please refer to the product catalogues and brochures or look up our website at: www.testo.co.uk... -
Page 27: Appendix
Appendix 27 Appendix Fuel parameters Fuel Knet Qnet MAX (%) [1/K] [1/K] [% by weight][% by weight] [MJ/kg] [MJ/kg] Natural Gas 11.9 0.35 0.39 24.4 53.42 48.16 Light Oil 15.5 0.48 0.51 13.0 45.60 42.80 Heavy Oil 15.8 0.51 0.54 11.5 42.90 40.50... - Page 28 Appendix Efficiency referred to Gross Efficiency: x (FT - AT) O + 9 x H) x (2488 + 2.1 x FT - 4.2 x AT) K1 x CO Effg = 100 - x 1000 + CO Efficiency referred to Nett Efficiency: x (FT - AT) O + 9 x H) x (210 + 2.1 x FT - 4.2 x AT) K1 x Q...
- Page 29 Notes 29...
- Page 30 Notes...
- Page 31 Notes 31...
- Page 32 0977 3270 06 en V01.09 en_GB...
Need help?
Do you have a question about the 327 and is the answer not in the manual?
Questions and answers