Table of Contents
Advertisement
Advertisement
Table of Contents

Related Manuals for Beyerdynamic TG 500


Summary of Contents for Beyerdynamic TG 500
- Page 1 TG 500 –– WIRELESS MICROPHONE SYSTEM User Manual...
-
Page 2: Table Of Contents
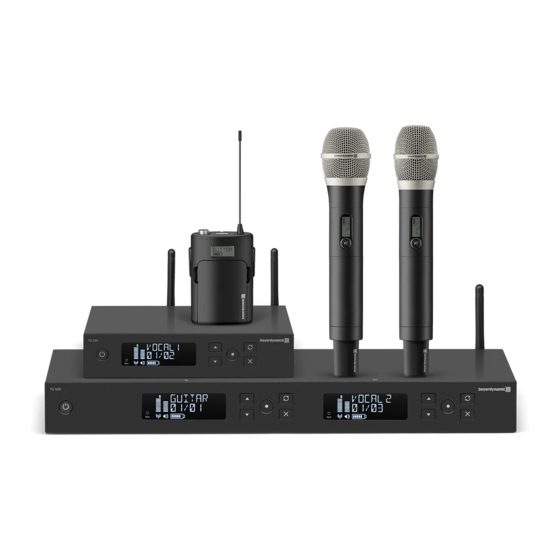
TG 500 handheld and beltpack transmitter system....... . . Page... -
Page 3: Safety Information
Disclaimer • If the device has caused a defective fuse or a short circuit, • Beyerdynamic GmbH & Co. KG will not be liable for any damage disconnect it from the mains and have it checked and repaired. to the product or injury to persons caused by negligent, •... -
Page 4: Tg 500 Handheld And Beltpack Transmitter System
NiMH rechargeable batteries, alkaline batteries • The handheld and beltpack transmitters of the TG 500 system can only be operated with AA (LR6) Mignon alkaline batteries or structurally identical NiMH rechargeable batteries. • Standard alkaline batteries may have length tolerances of 2–3mm. -
Page 5: Tg 500Sr And Tg 500Dr Diversity Receiver
TG 500 – Diversity receiver TG 500SR and TG 500DR diversity receiver Positioning the receiver • Position the receiver in the room in which the transmission is taking place. • Position the receiver as close as possible to the transmitter. For optimum reception, there should be a line of sight between the trans- mitter and the receiver. - Page 6 TG 500 – Diversity receiver Figure 2-3: TG 500SR receiver – back µ ¸ ¹ Figure 2-4: TG 500DR receiver – back ¸ ¹ µ ¸ ¹ Antenna input A or B TG 500SR: DC connector for power adaptor, 12V DC, 500mATG µ...
-
Page 7: Connecting Antennas
TG 500 – Diversity receiver Connecting antennas • Connect the supplied antennas to the antenna inputs A and B Figure 2-6: Connecting antennas and orient them outwards in a V shape (approx. 60° angle). Important: For diversity operation, it is essential to connect both antennas! Evaluation electronics select the antenna that provides the best signal. - Page 8 TG 500 – Diversity receiver • Connect the antenna cables of the antenna front mounting kit Caution! to the antenna inputs A and B • When installing the receiver in a 19” rack or together with • Loosen the nuts and washers of the enclosed adaptors.
-
Page 9: Connecting And Setting Up Remote Antennas
TG 500 – Diversity receiver Connecting and setting up remote antennas If the reception in the location of the receiver is not optimal, we recommend using remote antennas. Figure 2-14: Connecting remote antennas TG 500SR TG 500SR As the TG 500SR receiver does not provide a power supply, only the WA-ATO antennas (optionally available) or the WA-AMP2 antennas with additional power supply can be used. -
Page 10: Connecting/Disconnecting The Receiver To/From The Mains
The currently set frequency or group and channel 794. 0 00 • Once you have turned on a TG 500 transmitter at the same Figure 2-19: Display screen with a valid frequency or synchronised it with the receiver, you can read off... -
Page 11: Menu Settings
TG 500 – Diversity receiver Menu settings • You can change the settings for the name, frequency group, frequency, gain, etc. in the various menus on the receiver. • Press the enter button to open the menu. Press the down or up button to scroll through the menu. - Page 12 TG 500 – Diversity receiver • Frequency group (GR) / Channel (CH) In the “GR/CH” menu, you can select a predefined (intermodulation-free) frequency group and a channel from this group. Figure 2-23: Selecting the “Frequency group (GR) / Channel (CH)” submenu Press the enter button to open the submenu.
- Page 13 TG 500 – Diversity receiver • SCAN In the “SCAN” menu, you can select a channel or a frequency from a predefined group in accordance with the particular frequency band. Press the enter button to open the submenu. Figure 2-29: Selecting the “Scan” submenu...
-
Page 14: Synchronisation
TG 500 – Diversity receiver • Gain Figure 2-36: Selecting the “Gain” submenu In the “GAIN” menu, you can adjust the receiver output level to gain the input level of the amplifier or mixing console. In other words, if the signal received through the transmitter is very quiet, it can be amplified using the “Gain”... - Page 15 TG 500 – Diversity receiver • TX Lock In the “TX LOCK” menu, you can set whether the transmitter Figure 2-42: Selecting the “TX Lock” submenu can be switched off at its on/off switch or if it is protected from TX lock switching off by mistake.
- Page 16 TG 500 – Diversity receiver • Audiomix – ONLY ON TG 500DR! If you wish to emit both audio signals (e.g. vocals and guitar), Figure 2-49: Selecting the “Audiomix” submenu mixed across both outputs, set the “Audiomix” function to AudiomiX “ON”.
- Page 17 TG 500 – Diversity receiver • Restoring factory settings In the “Factory reset” menu, you can reset the receiver to the Figure 2-53: Selecting the “Factory reset” submenu factory settings. factory reset Figure 2-54: Restore factory settings: no restore Press the enter button to open the submenu.
- Page 18 TG 500 – Diversity receiver • Display system info In the “System info” menu, you can display information about Figure 2-58: Selecting the “System info” submenu the receiver and the system. system Press the enter button to open the submenu.
-
Page 19: Tg 500H Handheld Transmitter
TG 500 – Handheld transmitter TG 500H handheld transmitter Operation and controls Figure 3-1: Transmitter base Figure 3-2: Front view Figure 3-3: Battery compartment On/off button, lit Charging contacts Microphone head (fixed) Antenna Battery compartment Colour ring, interchangeable Two-stage sensitivity switch (gain) 0 dB and 12 dB... -
Page 20: Initial Operation Of The Handheld Transmitter
TG 500 – Handheld transmitter • The current battery status is shown on the display on the transmitter and the receiver . Please ensure the correct battery type is selected in the channel menu on the receiver and that synchronisation is carried out. -
Page 21: Using The Sensitivity Switch
TG 500 – Handheld transmitter Figure 3-16: Figure 3-17: Power lock message Switching off in spite of power lock • If the “Tx lock” function is activated, the handheld transmitter can still be switched off. Press the on/off button until the message “PW Lock”... -
Page 22: Care Instructions
TG 500 – Handheld transmitter Care instructions • Protect the handheld transmitter from moisture, falling and Figure 3-23: Unscrewing the microphone head grille impacts. • Use a soft cloth moistened with spirit or alcohol to clean metallic surfaces. • Once you start noticing sound changes, you should clean the integrated pop shield: –... -
Page 23: Tg 500B Beltpack Transmitter
TG 500 – Beltpack transmitter TG 500B beltpack transmitter Operation and controls Figure 4-1: Upper side Figure 4-2: Underside Figure 4-3: Figure 4-4: Figure 4-5: Front view Battery compartment Rear view 4-pin mini XLR connector (male) for connecting microphones or instruments... -
Page 24: Inserting The Batteries
TG 500 – Beltpack transmitter Inserting the batteries • Grip the battery compartment cover at the top right and left Figure 4-6: Figure 4-7: side indentations. Battery Battery • Flip down the battery compartment cover compartment compartment • Insert two alkaline AA 1.5V batteries or NiMH rechargeable... -
Page 25: Fastening The Belt Clip
TG 500 – Beltpack transmitter Figure 4-17: • To switch off the transmitter, press and hold the on/off button Switching off transmitter until the “Off” message is displayed. Figure 4-18: Figure 4-19: • If the “Tx lock” function is activated, it is still possible to switch... -
Page 26: Synchronisation
TG 500 – Synchronisation Synchronisation • The receiver can transfer the frequency and other settings such Figure 5-1: Synchronising the transmitter with the receiver as power lock of a particular channel to a transmitter via an infrared interface. user • To transfer to the transmitter, press the synchronisation button 800. -
Page 27: Components
TG 500 – Components Components Diversity receiver TG 500SR Single-channel diversity receiver, including power cable, 2 x WA-ATS standard omnidirectional antennas, 1 x WA-CKF connection cable for antenna front mounting, Rack Mount Kit and Quick Start Guide, 518–548 MHz............. Order # 712.272 TG 500SR same as above, but 606 - 636 MHz. -
Page 28: Optional Accessories
Charger WA-CD Charger for TG 500 beltpack transmitter and TG 500 handheld transmitter as well as Quinta TH with 4 charging compartments and Ethernet control; charges up to 2 handheld and 2 beltpack transmitters or 2 handheld transmitters and 4 NiMH rechargeable batteries at the same time..Order # 711.144... -
Page 29: Technical Specifications
TG 500 – Technical specifications Technical specifications System Frequency ranges....518 – 548 MHz 606 – 636 MHz 794 – 832 MHz 1780 – 1810 MHz Operating range. -
Page 30: Service
Current information about regulations regarding the operation of wireless systems in Germany can be found at: www.bundesnetzagentur.de The components of the TG 500 system are licensed in accordance with EU Directive 2014/53/EU as follows: “TG 500B Beltpack Transmitter” “TG 500H Handheld Transmitter”... - Page 31 GmbH & Co. KG . Theresienstr. 8 . 74072 Heilbronn . Germany Tel. +49 7131 617 - 0 . Fax +49 7131 617 - 204 . info@beyerdynamic.de For further distributors worldwide, please go to www.beyerdynamic.com Illustrations are non-contractual. Subject to change without notice.
Need help?
Do you have a question about the TG 500 and is the answer not in the manual?
Questions and answers