Table of Contents
Advertisement
Advertisement
Table of Contents

Related Manuals for Datecs DPP-250


Summary of Contents for Datecs DPP-250
- Page 1 DPP-250 Thermal Printer User Manual...
- Page 2 The information in this document cannot be reproduced in any mechanical, electrical or electronic way and under any circumstances without the written consent from Datecs Ltd. 1784 Sofia, Bulgaria, tel: +359 2 974 00 55, fax: +359 2 974 11 00 e-mail: sales@datecs.bg...
-
Page 3: Table Of Contents
Contents Technical Data ..............4 Box Contents ..............5 Compatible Devices ............6 Getting Started ............... 7 About Your DPP-250 ............8 Charging the DPP-250............9 Status & Operating Modes ..........10 Loading Paper ............... 11 Diagnostic Information ........... 12 Self-test ............... -
Page 4: Technical Data
350 g (with paper) Thermal paper 58mm +0/-1mm X 45mm diameter, thickness 60 µm Table 1 ....DPP-250 User Manual Page 4... -
Page 5: Box Contents
Drivers & SDK are distributed online and is available for download at our website indicated below. For details on using the DPP-250 Drivers & SDK, please refer to the SDK’s documentation. For the latest DPP-250 SDK’s, visit our developer web site at: http://www.datecs.bg... -
Page 6: Compatible Devices
) portable thermal printer is designed specifically for use with most PDA & Smartphone devices. The DPP-250 can be used in a variety of applications where Printing/Card Reading is required. User Notes: Compatibility depends on the type of communication method ®... -
Page 7: Getting Started
Getting Started The DPP-250 allows you to printer information from your PDA & Smartphone. Before using the DPP-250 thermal printer the battery should be properly charged. The following Quick Start guide will help to get your DPP-250 ready for use. -
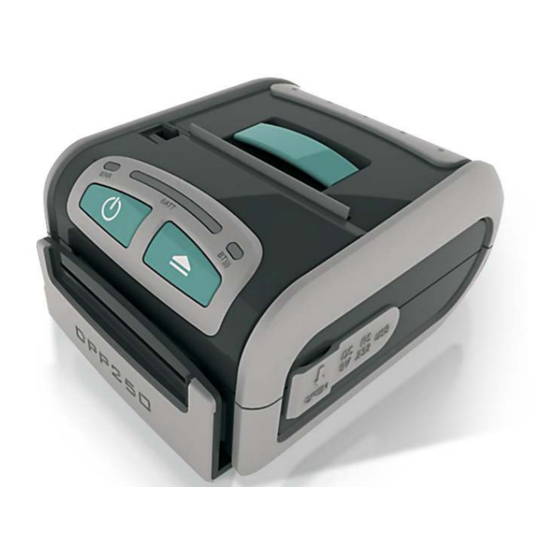
Page 8: About Your Dpp-250
About Your DPP-250 ♦ DPP-250 right view Paper Cover Lever Paper Cover Latch Mini USB Port Online / Error LED (ERR) Charger Input Power On/Off Switch Paper Feed (LF) Figure 1 ♦ DPP-250 right view Bluetooth Connection LED (BT) Battery Level LED... -
Page 9: Charging The Dpp-250
Charging the DPP-250 The DPP-250 uses a Lithium Ion rechargeable battery pack. Before first use, the DPP-250 battery pack should be charged for at least 12 hours. To prevent electrical damage to the DPP-250 and/or battery pack, please use approved AC Charger only. -
Page 10: Status & Operating Modes
Status & Operating Modes The DPP-250 uses LEDs to indicate various conditions of operation. This may be charging, active or online, battery low conditions. The following explains these conditions and LED indication. Function 1. It lights in green – the printer power is on. -
Page 11: Loading Paper
Loading Paper The DPP-250 uses a drop-and-load design making paper loading easy and trouble free. To load paper, simply lift up the paper cover latch and drop in the new roll as shown in the steps below. 1. Slide the paper cover latch to unlock the paper cover as shown in the figure on the right. -
Page 12: Diagnostic Information
Diagnostic Information The DPP-250’s LF switch/button is used for entering various printer modes. These modes can be used to assist developers in debugging problems related to programming and communication. The following explain how to access the various operating modes. Step #1: Make sure the printer is OFF (On-line LED is OFF) before performing step #2. -
Page 13: Self-Test
Self-test The DPP-250 has a built-in test pattern that shows the printer’s current configuration as well as the various resident printer fonts. The self-test can also be used as a troubleshooting tool to determine printing problems or battery level. The steps below show how the self-test is printed activated. -
Page 14: Dip Switch Settings
Continuous Paper mode Black Mark mode Hardware protocol Xon/Xoff protocol Normal operation mode Protocol mode Table 6 ....DPP-250 User Manual Page 14... -
Page 15: Dip Switch Location
# 1 - Remove battery cover # 2 - Remove battery Figure 9 DIP Switch Figure 10 ....DPP-250 User Manual Page 15... -
Page 16: Memory Switch Settings
Memory Switch Settings The DPP-250 uses nonvolatile memory for storing some of the printer default configuration. The following table shows the available options. Memory Switch Options Memory Switch 1000000010 (see command reference GS command) BAUD RATE 115200 bps POWER OFF TIME... -
Page 17: Setting Memory Switch
The pressing ON/OFF (No) – cancels changes. Note: Care must be taken when changing factory preset configuration information..... DPP-250 User Manual Page 17... -
Page 18: Memory Switch Details
Disable/Enable USB. Allow the use of USB port for communications. ♦ SW10: (OFF) set USB as the host mode. Host/Device ....DPP-250 User Manual Page 18... -
Page 19: Pairing Info Details
Turn on the printer and pair the new Bluetooth device to the printer. The printer will prompt user for a passkey on every printer initialization..... DPP-250 User Manual Page 19... -
Page 20: Communication Configuration
* - depending on user requirements can be 1 or 0 Notes: When not using Driver/SDK developer tools, set DIP Switch 4 to OFF..... DPP-250 User Manual Page 20... -
Page 21: Connecting Device
The figures below show how to attach the different device to the DPP-250. ♦ Serial / USB ( Cabled ) Version: • Connect the DPP-250 using Mini USB or Serial cable is shown in the figure below. USB Port Serial Port Figure 11 ®... -
Page 22: Bluetooth ® Setup
Bluetooth manager. Image on the right shows a typical ® Blackberry Bluetooth manager. When adding / pairing the DPP-250, use the [0000] pairing key when prompted. Windows Mobile Devices: Creating a New Partnership or Pairing ® Bluetooth... -
Page 23: Loading Drivers
Loading Drivers Loading DPP-250 drivers on your PDA or Smartphone. BlackBerry Devices: Blackberry Desktop Manager shown in the figure on the right is used to load third party software on to your device. Please review your device’s documentation on how to use the Application Loader Option to load software on to your device. -
Page 24: Magnetic Card Reader (Ms Version Only)
Magnetic Card Reader (MS Version only) The DPP-250 has a built-in magnetic card reader. The card reader incorporates a (3)-track magnetic read head requiring a single swipe to read field data from all three tracks. Magnetic Strip (Face this direction) -
Page 25: Smart Card Reader (Sc Version Only)
Smart Card Reader (SC Version only) The DPP-250 has a built-in smart card reader (optional). The smart card reader is designed to read information stored embedded on smart chips and process the information using device side software. Smart Chip (Face this direction) -
Page 26: Replacing Battery
Replacing Battery To replace the battery in the DPP-250 thermal printer follow the steps below. Steps: 1. Turn over the DPP-250 and place on a flat surface. Rotate the (2) locking levers as shown in the figure on the right. -
Page 27: Developing Solution
Mobile C Sharp Microsoft Visual Studio 2005 (.Net) Table 11 For details on using the DPP-250 SDK, please refer to the SDK’s documentation. For the latest DPP-250 SDK’s, visit our developer web site at: http://www.datecs.bg .... -
Page 28: Troubleshooting
Mechanism jarred loose. Contact technical print width. support. Table 12 ....DPP-250 User Manual Page 28... -
Page 29: List Of Commands For Esc/Pos Mode
Selecting user character set ESC ! Specifying printing mode of text data ESC * Printing graphical data ....DPP-250 User Manual Page 29... - Page 30 ESC _ Loading factory settings ESC ` Reading the Battery Voltage and Thermal head temperature ....DPP-250 User Manual Page 30...
- Page 31 Setting the print area width Drawing a rectangular box with selected thickness in page GS X mode ....DPP-250 User Manual Page 31...
- Page 32 Specifying character spacing for two-byte text mode FS S FS W Selecting double size characters for two-byte text mode ....DPP-250 User Manual Page 32...
Need help?
Do you have a question about the DPP-250 and is the answer not in the manual?
Questions and answers