Mira Platinum User Manual
Wireless controller
Hide thumbs
Also See for Platinum:
- Installation manual (81 pages) ,
- Installation and user manual (64 pages) ,
- User manual (28 pages)
Table of Contents
Advertisement
Advertisement
Table of Contents

Related Manuals for Mira Platinum


Summary of Contents for Mira Platinum
- Page 1 Mira Platinum Wireless Controller User Guide...
-
Page 2: Table Of Contents
Contents Introduction ................. 4 Safety Information .............. 5 Control layout ..............6 Display symbols ..............7 Using the Shower ............... 8 Switch on/off ..............8 Adjust Temperature ............10 Adjust Flow ................11 Functions ................12 Function Menu ..............14 Enter the Function Menu ..........14 Exit the Function Menu .......... - Page 3 Flow Range ..............24 Control Frequency ............26 Replacing the Batteries............ 27 Fault Diagnosis ..............28 Error Codes ..............28 Error During Function Change ........29 General Faults .............. 30 Cleaning ................32 Disposal and Recycling ........... 32 Guarantee of Quality ............34 What to do if something goes wrong ......
-
Page 4: Introduction
Introduction Thank you for purchasing a quality Mira product. To enjoy the full potential of your new product, please take the time to read this guide thoroughly and keep it handy for future reference. The Mira Platinum Wireless Controller is a remote user interface and controls the following functions: •... -
Page 5: Safety Information
Safety Information 1. Make sure that you fully understand how to operate this shower and make sure that it is properly maintained in accordance with the instructions given in this manual. 2. Sunburn or skin conditions can increase your sensitivity to hot water. Make sure that you set the shower to a cooler temperature. -
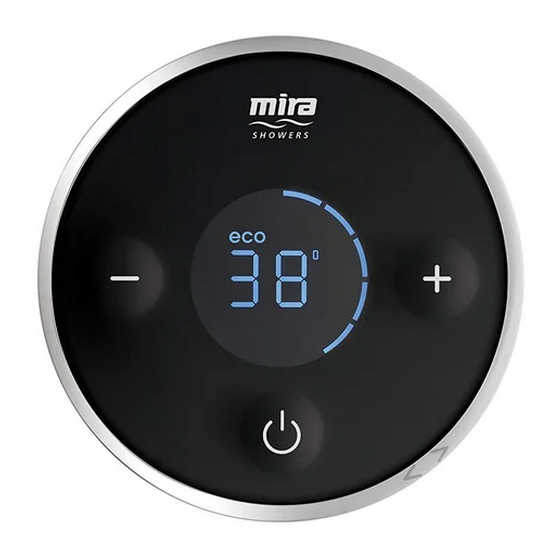
Page 6: Control Layout
Control Layout Turn Outer Ring Showering Water Flow Adjustment Decrease Increase Flow Flow Decrease Increase Temperature Temperature Start/Stop Display... -
Page 7: Display Symbols
Display Symbols Low Battery Display Economy Flow Display Temperature Display Flow Display Control Out Of Range Clock Display... -
Page 8: Using The Shower
Using the Shower Switch on/off Press “ ” to start or stop shower. Temperature and flow settings will be same as when last used. After a short period, display will dim to help extend battery life. Approximately 10 minutes after shower has stopped, display will turn off automatically. Shower will not run continuously for more than 30 minutes before stopping automatically (5 minutes when “ECO”... -
Page 10: Adjust Temperature
Adjust Temperature While shower is running, press “ + ” or “ - ” to adjust temperature. Showering temperature appears on display in degrees Celsius (°C). -
Page 11: Adjust Flow
Adjust Flow Turn outer ring clockwise or anticlockwise to adjust flow. Showering flow level appears on display in white bars. -
Page 12: Functions
Functions The following functions can be altered individually to adjust how the shower operates: F1 - Maximum Showering Water Temperature. This is the temperature the shower cannot go beyond when in use. F2 - Eco. The shower will stop automatically after 5 minutes. When this setting is “on”, maximum available showering flow is limited to half the flow normally produced. “ECO”... - Page 13 When “Warm-Up” setting is “off”, temperature display will not flash and shower operates as normal. Note! When used with some combination boilers, the warm-up function may be impaired. This is due to the functional nature of combination boilers. F4 - Clock Setting. To set the time. F5 - Clock Display.
-
Page 14: Function Menu
Function Menu Enter the Function Menu Press “+” and “ ” b u t t o n s simultaneously until “End” is displayed on the unit. Use “+” or “-” buttons to cycle through functions and press “ ” to enter setting. (See following sections in this guide for details on each function and how to alter their settings.) -
Page 15: Exit The Function Menu
Exit the Function Menu When finished, use “+” or “-” buttons to cycle back through functions until “End” appears. Press “ ” to exit. Control is ready to use. If necessary, test shower to see if functions are working as expected. -
Page 16: Changing Functions/Settings
Changing Functions/Settings Maximum Showering Water Temperature Factory default “45°C”. Cycle menu to “F 1” and press “ ”. P r e s s “ + ” o r “ - ” t o a d j u s t temperature. Maximum = 48°C Minimum = 35°C Press “... -
Page 17: Eco
Factory default “off”. Cycle menu to “F 2” and press “ ”. Press “+” or “-” to change setting “on” or “off”. Press “ ” to set. Press “ ” to exit back to Function Menu. See section “Exit the Function Menu”. -
Page 18: Warm-Up
Warm-Up Factory default “off”. Note! Function will not work with combination boilers. Cycle menu to “F 3” and press “ ”. Press “+” or “-” to change setting “on” or “off”. Press “ ” to set. Press “ ” to exit back to Function Menu. -
Page 19: Clock Setting
Clock Setting Factory default “10:43”. Note! Can also be activated by disconnecting and reconnecting battery. Cycle menu to “F 4” and press “ ”. P r e s s “ - ” t o c h a n g e h o u r setting. - Page 20 Press “ ” to set time and exit back to Function Menu. See section “Exit the Function Menu”.
-
Page 21: Clock Display
Clock Display Factory default “on”. Cycle menu to “F 5” and press “ ”. Press “+” or “-” to change setting “on” or “off”. Press “ ” to set. - Page 22 Press “ ” to exit back to Function Menu. See section “Exit the Function Menu”.
-
Page 23: Calibration No
Calibration No. “F 6” This setting is protected and for use by Service Engineer only. Any alteration may result in a loss of showering performance. -
Page 24: Flow Range
Flow Range For use with High Pressure/Combi Valve version only. Factory default “1 - 99” Cycle menu to “F 7” and press “ ”. “on” is displayed, press “ ” to start shower. Lower limit is displayed, e.g. “L 1”. Adjust flow to desired lower limit 1-99. - Page 25 Press “ ” to set and exit back to Function Menu. See section “Exit the Function Menu”.
-
Page 26: Control Frequency
Control Frequency Factory default “1”. Cycle menu to “F 8” and press “ ”. Press “+” or “-” to change channel “1-6”. Press “ ” to set. Press “ ” to exit back to Function Menu. See section “Exit the Function Menu”. -
Page 27: Replacing The Batteries
Replacing the Batteries To access the batteries, the control unit must be removed from the wall. Make sure control unit is dry before removing. Press button to release and remove control from wall. Turn unit over to access batteries. Remove and replace all batteries. Only use new batteries of same make and type. -
Page 28: Fault Diagnosis
Fault Diagnosis Error Codes A specific problem relating to the electronic function of the shower will result in an error code being displayed on the control. Over Temperature at Control Sensor 1. Turn Digital Mixer off for 10 seconds. Turn back on and allow 10 seconds to reset. 2. Make sure hot and cold inlets are not reversed. 3. Make sure inlet filters and check valve cartridges are clean. -
Page 29: Error During Function Change
Replace batteries. Control out of range. Error During Function Change Displayed if there is a signal loss between the Wireless Control Unit and the Digital Mixer whilst a function setting is being altered. Press “ ” to clear the display and retry the function change. -
Page 30: General Faults
General Faults Malfunction Cause Remedy Shower will not Water supply isolated. Check water supply. operate. Electrical supply Check electrical isolated or fuse supply. blown. Reset and No connection to recommission. Digital Mixer. Control out of range. Replace batteries. Flat batteries. Digital Mixer Isolate electrical malfunction. - Page 31 Malfunction Cause Remedy Digital Mixer Contact our malfunction. Customer Services Team. Drip from A small amount This is normal. showerhead. of water may Changing position be retained in of showerhead may showerhead after vary draining time. showering. This may drain over a few minutes.
-
Page 32: Cleaning
Cleaning Many household cleaners contain abrasives and chemical substances, and should not be used for cleaning chrome plated or plastic fittings. These finishes should be cleaned with a mild washing up detergent or soap solution, and then wiped dry using a soft cloth. Disposal and Recycling End of Product Life When the appliance has reached the end of its serviceable life, it should be disposed of in a safe manner and in accordance with current local authority recycling or waste disposal policy. -
Page 34: Guarantee Of Quality
Within the guarantee period we will resolve defects, free of charge, by repairing or replacing parts or modules as we may choose. To be free of charge, service work must only be undertaken by Mira Showers or our approved agents. -
Page 35: What To Do If Something Goes Wrong
Service / Repairs Our Service Force is available to provide a quality service at a reasonable cost. You will have the assurance of a Mira trained engineer/agent, genuine Mira spare parts and a 12 month guarantee on the repair. Payment should be made directly to the engineer/agent who will accept most... -
Page 36: To Contact Us
Fax: Dublin 01 459 2329 Post: Otter House, Naas Road, Clondalkin, Dublin 22 Mira is a registered trade mark of Kohler Mira Limited. The company reserves the right to alter product specifications without notice. www.mirashowers.co.uk 1105041-W2-B (N86A) (1666) Kohler Mira Ltd. September 2009... - Page 37 Pdf Supplied By http://www.plumbworld.co.uk/...
Need help?
Do you have a question about the Platinum and is the answer not in the manual?
Questions and answers