Table of Contents
Advertisement
Advertisement
Chapters
Table of Contents

Related Manuals for Huawei HA35


Summary of Contents for Huawei HA35
-
Page 1: User Guide
HA35 Hybrid Access Gateway User Guide Version 2.1 (May 2016) -
Page 2: Table Of Contents
1.3. Indicators ..................8 Hardware Installation ............. 11 2.1. Selecting an Installation Location ..........11 2.2. Installing the HA35 on a Hybrid Broadband Network ....12 2.2.1. PSTN or Broadband Telephone Line with one voice channel and a 3G/4G connection ........12 2.2.2. - Page 3 4.2. Manually Setting Up a Wireless Connection ......34 4.2.1. On Windows 7 ..............34 WLAN Configuration ............35 5.1. Enabling and Disabling the WLAN on the HA35 ....... 35 5.1.1. Using the WLAN Button ............ 35 5.1.2. Using the Web Management Page ........35 5.2.
- Page 4 8.3. Placing a VoIP Call ..............58 USB Device ..............59 9.1. USB Storage Device ..............59 9.2. You can connect a USB storage device to your HA35 and access the USB device from your computer........59 9.3. Connecting a USB Device ............59 9.3.1.
- Page 5 12.1. What Can I Do If I Cannot Open the Web Management Page? ....................77 12.2. What Can I Do If the HA35 Cannot Access the Internet through a Wireless Network Adapter Sometimes or If the WLAN Connection Is Unsteady? ............77 12.3.
-
Page 6: Product Overview
The HA35 supports multiple WLAN protocols, including 802.11b/g/n (2.4 GHz). Adopting 802.11n multiple-input multiple-output antennas (MIMO) technology, the HA35 delivers a wireless transmission rate of up to 300 Mbps with its dual antennas. In addition, the HA35 supports multiple wireless encryption modes to provide a secure, reliable, and high-speed WLAN. -
Page 7: Ports And Buttons
(STBs), and switches. RESET Restores the HA35 to its default settings after you press and hold this button for 6 seconds or more while the HA35 is powered on. A reset will result in all custom data and settings being lost. -
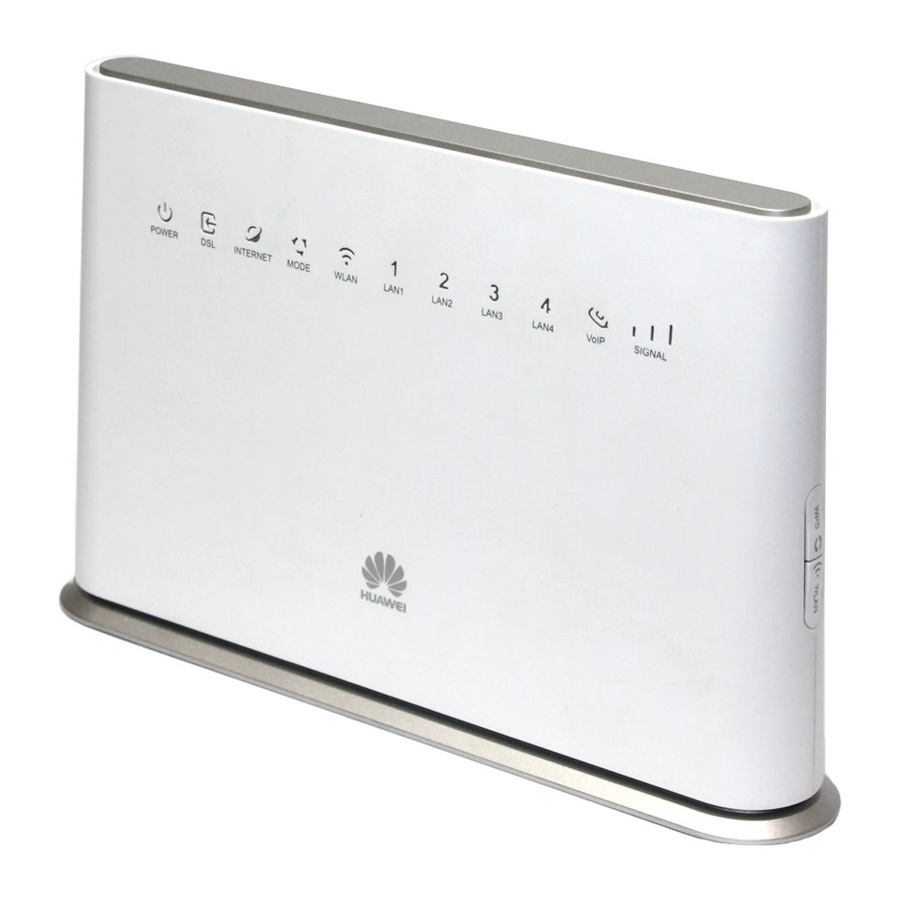
Page 8: Indicators
Description POWER Green on The HA35 is powered on. Red Blinking Self-checking failed after the HA35 is powered on. The HA35 is powered off or faulty. Green on The HA35 is activated through DSL. Green Blinking The HA35 is being activated through DSL. - Page 9 The HA35 is working in routing mode. No data is being transmitted. Green Blinking The HA35 is connected to the Internet, and data is being transmitted. The HA35 is working in routing mode, but the connection has not been set up.
- Page 10 Indicator Status Description The HA35 is not registered with a SIP server. The HA35 is powered off. SIGNAL Green on Indicates the WCDMA/LTE signal strength of the HA35. There is no WCDMA/LTE signal. The HA35 is powered off. Table 1-2 indicators...
-
Page 11: Hardware Installation
Hardware Installation 2.1. Selecting an Installation Location Place the HA35 on a well-ventilated even surface without exposure to direct sunlight. For the best possible performance, take note of the following: Make sure there are no obstacles, such as concrete or wooden walls, between the computer and HA35. -
Page 12: Installing The Ha35 On A Hybrid Broadband Network
Set-top Box Power adapter Laptop computer 10 Smart Phone 11 Pad LINE port PHONE port MODEM port When configuring the HA35 for the first time, use an Ethernet cable to connect the HA35 to a computer. Version 2.1 (May 2016) -
Page 13: Isdn Line And 3G/4G Connection
Desktop computer Set-top Box Power adapter 10 Laptop computer 11 Smart Phone LINE port PHONE port MODEM port When configuring the HA35 for the first time, use an Ethernet cable to connect the HA35 to a computer. Version 2.1 (May 2016) -
Page 14: Broadband Telephone Line With The Intervention Of An Electrician In The Internal Home Wiring (I.e. Legacy Isdn Wiring) And A 3G/4G Connection
(i.e. legacy ISDN wiring) and a 3G/4G connection Picture 2-3 connect devices in hybrid broadband network (intervention of an electrician in the internal home wiring) HA35 Telephone wall jack SIM card Telephone Desktop computer... -
Page 15: Installing The Ha35 On A Dsl Broadband Network
2.3. Installing the HA35 on a DSL Broadband Network 2.3.1. PSTN or Broadband Telephone Line with one voice channel In some communities, Internet service providers use telephone lines to provide broadband access services. If you have subscribed to digital subscriber line (DSL) broadband, you can connect the HA35 to a telephone port for Internet access. -
Page 16: Isdn Line
2.3.2. ISDN Line Picture 2-5 connect devices in DSL broadband network (ISDN Line) HA35 Telephone wall jack Splitter ISDN (NT1) Device Telephone Desktop computer Set-top Box Power adapter Laptop computer 10 Smart Phone 11 Pad LINE port PHONE port MODEM port... -
Page 17: Broadband Telephone Line With The Ntervention Of An Electrician In The Internal Home Wiring (I.e. Legacy Isdn Wiring)
2.3.3. Broadband Telephone Line with the ntervention of an electrician in the internal home wiring (i.e. legacy ISDN wiring) Picture 2-6 connect devices in DSL broadband network (with the intervention of electrician in the internal wiring) HA35 Telephone wall jack Telephone Desktop computer Set-top Box... -
Page 18: Installing The Ha35 On A 3G/4G Network
• Insert and remove the SIM card when the HA35 is powered off. • Do not connect the HA35 to the telephone wall outlet (or any Public Switched Telephone Network), because doing so could damage the HA35 due to excessive heat. -
Page 19: Powering On
2.5. Powering On To power on the HA35, press the POWER button. After the HA35 is powered on, the POWER indicator turns on. If the indicators do not behave as expected, ensure that everything is plugged in correctly. Version 2.1 (May 2016) -
Page 20: Setting Network Parameters
Setting Network Parameters 3.1. Setting the Computer IP Address Before logging in to the HA35 web management page, set the IP address of the computer that will be used for the login. 3.1.1. Obtain an IP address automatically Click in the lower right corner of your desktop. Choose Open Network and Sharing Center. -
Page 21: Picture 3-2 Wireless Network Connection Properties
Double-click Internet Protocol Version 4 (TCP/IPv4). Picture 3-2 wireless network connection properties Select Obtain an IP address automatically and Obtain DNS server address automatically. Click OK. Picture 3-3 internet protocol version 4 properties Version 2.1 (May 2016) -
Page 22: Set A Static Ip Address
3.1.2. Set a static IP address Click in the lower right corner of your desktop. Choose Open Network and Sharing Center. Choose Change adapter settings. Right-click Local Area Connection and choose Properties. Picture 3-4 local area connection Double-click Internet Protocol Version 4 (TCP/IPv4). Picture 3-5 wireless network connection properties Version 2.1 (May 2016) -
Page 23: Logging In To The Web Management Page
Before you log in to the HA35 web management page, ensure that the computer used for the login is connected to the HA35 and has been configured to automatically obtain an IP address or assigned with a static IP address. -
Page 24: Setting Network Access Parameters
3.3. Setting Network Access Parameters 3.3.1. Accessing the Network through the Hybrid gateway When you install the HA35 for the first time, you need to configure the HA35. To configure the HA35 through the setup wizard, do as follows: Log in to the web management page. -
Page 25: Picture 3-10 Set Internet Connection
PIN from the operator), skip step 5 - step 9. Just jump to step 10. Insert a SIM card into the HA35's SIM card slot. Choose Internet tab, click Internet Settings.The different usage scenarios will appear, as shown in Picture 3-12 internet settings. -
Page 26: Picture 3-12 Internet Settings
Picture 3-12 internet settings Scroll down to find the INTERNET_R_UMTS1 usage scenario, as shown in Picture 3-13 internet settings 2. Picture 3-13 internet settings 2 Choose INTERNET_R_UMTS1 tab, click Edit. Version 2.1 (May 2016) -
Page 27: Picture 3-14 3G/4G Vlan
Enter the PIN that was provided by your SIM card operator in the PIN text box. Click Save. Picture 3-15 set PIN Choose Home tab, click Internet > Bonding Tunnel. If LTE\DSL\Bonding all displayed UP, it means that your HA35 is working in Hybrid mode. Picture 3-16 bonding tunnel Version 2.1 (May 2016) -
Page 28: Accessing The Network Through Dsl
3.3.2. Accessing the Network through DSL When you install the HA35 for the first time, you need to configure the HA35. To configure the HA35 through the setup wizard, do as follows: Log in to the web management page. Choose Home tab, click Start Wizard. -
Page 29: Accessing The Network Through The Sim Card
Picture 3-19 set SSID and key 3.3.3. Accessing the Network through the SIM card Insert the SIM card to the HA35 so that your device can access the Internet through the 3G/4G uplink service. If your SIM card does not need to verify the PIN for Internet access, skip this section (in the case where the customer does not receive any PIN from the operator). -
Page 30: Picture 3-21 Internet Settings 2
Picture 3-21 internet settings 2 Choose INTERNET_R_UMTS1 tab, click Edit. Picture 3-22 3G/4G vlan Enter the PIN that was provided by your SIM card operator in the PIN text box. Click Save. Picture 3-23 set PIN After you complete the preceding settings, check the status of the Internet indicator light. When the Internet indicator light turns steady green, you can start browsing the Internet. -
Page 31: Configuring A Wireless Account
3.4. Configuring a Wireless Account After you Log in to the web management page, you will see a configuration wizard page used to configure the wireless account. Log in to the web management page. Choose Home tab, click Set Up WLAN, enter your desired SSID (WLAN name) and key and click Save. -
Page 32: Picture 3-25 Home
The HA35 is disconnected from the Internet. Device icon (WLAN Device/Ethernet color The device is connected to the HA35. Device/Phone Device/USB Device) gray The device is disconnected from the HA35. Table 3-1 connected devices to the HA35 router Version 2.1 (May 2016) -
Page 33: Wireless Connection Setup
Within 2 minutes, press and hold the WPS button on the HA35 for 1 second or more. When the WPS indicator of the HA35 is on and then off, a connection between the HA35 and wireless device has been set up. -
Page 34: Manually Setting Up A Wireless Connection
You can also use the tool built into the network adapter to set up a wireless connection. For details, see the network adapter's user guide. Before setting up a wireless connection, record the WLAN name and password of the HA35. The default WLAN name and password are printed on the HA35 cover label. -
Page 35: Wlan Configuration
The following two methods are available to enable and disable the WLAN on the HA35. 5.1.1. Using the WLAN Button Press the WLAN button in the HA35 to enable or disable the WLAN. To ascertain whether the WLAN is enabled, view the WLAN indicator. -
Page 36: Wlan Advanced Settings
Picture 5-2 WLAN Encryption After the SSID and key had been changed, your computer should use the new ones to establish a wireless connection to the HA35. 5.3. WLAN Advanced Settings You can see the Advanced Settings page in WLAN Settings tab, though you can, usually, keep the default values. -
Page 37: Network Security
Network Security 6.1. Improving WLAN Security 6.1.1. Hiding the WLAN Name After you hide the WLAN name or SSID, anyone who wishes to connect to the WLAN must enter the correct WLAN name. This measure helps improve WLAN security. Log in to the web management page. Choose Home Network tab. -
Page 38: Using High Security Encryption Modes
6.1.2. Using High Security Encryption Modes Adopting high security encryption modes protects against unauthorized access as well as data interception on networks. To improve WLAN security without sacrificing working efficiency, use WPA-PSK/WPA2– PSK and TKIP+AES. This step also prevents WLAN unavailability caused by network adapters' incompatibility with the selected security mode. -
Page 39: Picture 6-3 Wps By Push Button
Picture 6-3 WPS by push button WPS by push button (PBC) Enable the WPS function by pressing the WPS button on the HA35. WPS by client PIN (PIN) Get the pin code from a pin client and then enter it in the PIN code text box. -
Page 40: Picture 6-5 Wps By Ap-Pin
Picture 6-5 WPS by AP-PIN Click Save. Version 2.1 (May 2016) -
Page 41: Allowing Only Specified Computers To Access Your Wlan
Set Only allow specific computers in the WLAN to enable the parameter. In Managed LAN devices, click Select all to apply the settings to all connected devices to the HA35. Or click Add device, to select a specific device. Click Save. -
Page 42: Controlling Computer Internet Access
6.3. Controlling Computer Internet Access You can prohibit certain PCs from accessing the Internet or allow only certain PCs to access the Internet. In addition, you can set the period during which the PCs are not allowed to access the Internet. Log in to the web management page. -
Page 43: Filtering Out Inappropriate Websites
In Apply to, click Select all to apply the settings to all connected devices to the HA35. Or click Add device, to select a specific device. Picture 6-10 time rules Click Save. 6.4. Filtering Out Inappropriate Websites Use URL filtering to prevent certain websites from being accessed. -
Page 44: Picture 6-12 Url Filter
Click Manually specify devices to enable the parameter. In Apply to, click Select all to apply the settings to all the connected devices to the HA35. Picture 6-12 URL filter Or click Add device, to select a specific device where access will be denied to the blocked Web site address. -
Page 45: Configuring The Firewall
HA35. 6.5.2. Configuring the Firewall The HA35 provides a firewall to help secure its WLAN and any devices connected to it. Set the firewall level based on site requirements to quickly configure the firewall. Log in to the web management page. -
Page 46: Configure An Acl
Picture 6-14 firewall ICMP Flood: The attacker sends plenty of ICMP packets to the specific target within a short time period to request responses, causing the target system unduly burdened and unable to process legitimate transmissions. SYN Flood: The TCP/IP protocol stack only permits a limited number of TCP connections due to resource restrictions. -
Page 47: Picture 6-15 Acl
Click the Choose devices parameter to select the device or devices where the ACL will be applied. In Block for, click Select all to apply the settings to all connected devices to the HA35. Or click the device that you want to activate the ACL. Click Add device, to select another device. -
Page 48: Configure Dmz
6.7. Configure DMZ After DMZ is enabled, the computer that is configured as a DMZ host is exposed to the Internet. For example, when building a server, you can configure the computer providing external services as a DMZ host, which helps protect other computers on the home network. -
Page 49: Picture 6-18 Application Filter
In Block, select the application you want to filter, or click Add application to add a new port application. In Block for, click Select all to apply the settings to all connected devices to the HA35. Or click the device that you want to activate the Application filter. Or click Add device, to select a specific device. -
Page 50: Configure Port Forwarding
Picture 6-20 application filter 3 6.9. Configure Port Forwarding You can set forwarding rules on the HA35 so that users can easily access server resources provided by your computer (such as personal websites and FTP servers) from the Internet. 6.9.1. Configure Port Mapping By setting a port forwarding rule, you can let an Internet user to access a local computer. -
Page 51: Picture 6-21 Port Mapping
Picture 6-21 port mapping Picture 6-22 port mapping 2 shows the Mapping name text box, to enter a name for the port forwarding rule. In Application, select the application type you want to set, or click Add port mapping application to add a new application type. In Internal host, select a local computer you want to set, or click Add device to add a new local computer. -
Page 52: Configure Port Trigger
By setting port triggering, when the LAN has client-initiated requests from an Internet server, the application triggers a port or ports to initiate a connection, thereby triggering HA35 to open the appropriate ports to ensure the normal use of the application. -
Page 53: Internet Services
The Dynamic Domain Name System (DDNS) dynamically maps an IP address to a domain name. After DDNS is enabled, the HA35 sends the dynamic IP address of your computer to the DDNS server. The DDNS server then maps the updated IP address to a fixed domain name. -
Page 54: Simple Network Time Protocol
7.2. Simple Network Time Protocol The Simple Network Time Protocol (SNTP) synchronizes clocks of computers on the Internet. After SNTP is enabled, the HA35 obtains the standard time from an Internet time server to synchronize to the system time. Log in to the web management page. -
Page 55: Multicast Management
Picture 7-3 simple network time protocol After this function is enabled, the HA35 corrects the system time according to your settings. 7.3. Multicast management After multicast management is enabled, the HA35 receives multicast data on the Internet through the configured multicast proxy and forwards multicast data only to the terminal devices that want to receive the multicast data, such as an IPTV STB. -
Page 56: Ip Telephony
Internet. This makes full use of broadband resources. 8.2. Configuring VoIP The HA35 supports VoIP. You can place VoIP calls after your phone is connected to the Phone port on the HA35. To use the HA35 to place VoIP calls, ask your network service provider to activate VoIP services for you. -
Page 57: Picture 8-1 Voip Providers
Picture 8-1 VoIP providers Click on “View” in Picture 8-1 VoIP providers to see the information of the VoIP provider as shown in Picture 8-2 VoIP providers 2. This information is filled in automatically by the system and cannot be changed by the user. Picture 8-2 VoIP providers 2 To configure voice services, do as follows: Configure a VoIP number. -
Page 58: Placing A Voip Call
VoIP account, which is also your VoIP call number. Before placing a VoIP call, ensure that the HA35 has connected to the network. When the call is established, your VoIP call number is displayed on the called party's phone. -
Page 59: Usb Device
HA35 network can access and share the data or applications provided by the USB device. If you connect a USB device to the HA35, verify that the input voltage and current of the USB device do not exceed 5 V/0.5 A. Otherwise, the HA35 may malfunction. -
Page 60: Picture 9-1 Share Service Settings
b. Choose Share > Storage Share. Picture 9-1 share service settings c. In Service Settings, select Enable FTP for the FTP server. d. Click Save to save the settings. Picture 9-2 share service settings 2 Set the user name and password of the portable storage device. a. -
Page 61: Accessing A Usb Storage Device Using Ftp
Open a browser on your computer. In the address box, enter ftp://192.168.1.1. Press Enter. In the Login dialog box, enter the login user name and password you set in the HA35's Storage Share page, as shown in Picture 9-1 share service settings and Picture 9-4 share user settings 2 (Anonymous users select the anonymous directly). -
Page 62: Picture 9-5 Ftp Service Settings
Enable the samba server. a. Log in to the web management page. b. Choose Share > Storage Share. c. In Service Settings, select Enable SAMBA for samba server. d. Click Save to save the settings. Picture 9-5 FTP service settings Set the user name and password of the portable storage device. -
Page 63: Accessing Data Using Samba
Using Samba, you can securely and easily access data stored in USB devices by accessing shared network directories. You have connected a USB device to the HA35 and set its access permission. If the access permission of the USB device is set, your identity will be authenticated. During the authentication, follow the onscreen instructions. -
Page 64: Sharing A Usb Printer
Picture 9-8 multimedia sharing 9.5. Sharing a USB Printer HA35 supports USB printers. After you connect a USB printer to your HA35 through the USB port, you can access the printer from the Internet or internal network. Connect the USB cable of the printer to the USB port on the HA35. -
Page 65: Maintenance Guide
10.1. Changing the IP Address Used to Log In to the Web Management Page The IP address used to log in to the HA35 web management page is the HA35 IP address. For security or other purposes (for instance, if the default HA35 IP address conflicts with that of another device on the same network), you can change the HA35 IP address. -
Page 66: Ra Settings
Picture 10-2 set the DHCP server IP addresses 10.3. RA Settings Router Advertisement (RA) enables a neighboring computer to quickly determine whether there is an available router. Log in to the web management page. Choose Home Network tab. In the navigation tree, choose LAN Interface. Select RA Settings configuration page. -
Page 67: Ipv6 Dhcp Server
10.4. IPv6 DHCP Server If your computer supports IPv6, it can be assigned an IPv6 address by the IPv6 DHCP Server. Log in to the web management page. Choose Home Network tab. In the navigation tree, choose LAN Interface. Select IPv6 DHCP Server configuration page. Set IPv6 DHCP Server to enable. -
Page 68: Rebooting Device
If you forget the password, you can restore the default settings by pressing and holding the Reset button on the rear panel of the HA35 for over 6 seconds. The user name and password used for logging in to the web management page are then restored to their default values. -
Page 69: Restoring Default Settings
HA35 to its default settings. Perform this operation with caution. After the HA35 is restored to its default settings, all custom data and settings will be lost, and the password will be restored to its default value. -
Page 70: Using Ping Tool Diagnose Network
After the firmware is upgraded, the login page is displayed. Reenter to log in. 10.9. Using Ping Tool Diagnose Network HA35 supports the Ping function. You can check the connection between the HA35 and other hosts (including network equipment) connection, such as the connectivity or delay between the HA35 and other hosts. -
Page 71: Using Tracert Tool Diagnose Network
Picture 10-9 ping tool 10.10. Using Tracert Tool Diagnose Network Tracert function is used to detect the number of other routers that passed when the HA35 is connected to the test host. Log in to the web management page. Choose Maintain tab. -
Page 72: Reference Operations
Reference Operations 11.1. Setting Dial-Up Connection Parameters When the HA35 works in Bridge mode you need to perform this operation. Otherwise you do not need to perform this operation. Before setting dial-up connection parameters, verify that the HA35 is correctly connected to your computer and you have the dial-up connection account name and password provided by your Internet service provider (ISP). -
Page 73: Picture 11-3 Set Up A Connection Or Network
Picture 11-3 set up a connection or network Click Broadband (PPPoE). Picture 11-4 connect to internet Version 2.1 (May 2016) -
Page 74: Picture 11-5 Connect To Internet 2
In User name and Password, enter the dial-up connection account name and password provided by your ISP. In Connection name, name the dial-up connection. Select or deselect Allow other people to use this connection. Then click Connect. Picture 11-5 connect to internet 2 Return to the Network and Sharing Center page. -
Page 75: Enabling Wireless Configuration On Windows
11.2. Enabling Wireless Configuration on Windows If the setup of the wireless connection between your computer and the HA35 failed, verify that wireless configuration is enabled on Windows. On Windows 7 or Windows Vista Right-click Computer and choose Manage from the shortcut menu. - Page 76 Click Details. Picture 11-8 local area connection details In Network Connection Details, find the line similar to Physical Address 70-F3–95– 0C-49–4E. The 70-F3–95–0C-49–4E string is your computer's MAC address. Picture 11-9 physical address Version 2.1 (May 2016)
-
Page 77: Faqs
The HA35 is in an open area, and there are no obstacles, such as concrete or wooden walls, between the HA35 and the computer. The HA35 is close to the computer. - Page 78 Check that you can use the PPP dial-up software to set up dial-up connection. If the dial-up connection fails, perform further checks as follows: a. Close the PPP dial-up software, and power off the HA35. After 5 minutes, power on the HA35, and use the PPP dial-up software to dial again.
-
Page 79: I Often Need To Restart The Ha35 To Display Web Pages. What Can I Do
Use a proxy server for your LAN (These settings will not apply to dial-up or VPN connections). check box is cleared. Try to access more websites to check whether the HA35 can access these websites. If the problem persists, contact your network service provider. -
Page 80: Appendix
Appendix 13.1. Technical Specifications Item Specifications Power supply 12 V DC, 2.5 A Power consumption < 13 W Ambient operating 0°C to 40°C temperature Ambient humidity 5% to 95% RH (non-condensing) Dimensions (H x W x D) 160.8 mm x 255.5 mm x 50 mm (6.33 in. x 10.06 in. x 1.97 in.), antenna excluded Weight About 512 g... -
Page 81: Default Settings
13.2. Default Settings Parameter Default Value LAN port IP address 192.168.1.1 LAN port subnet mask 255.255.255.0 User name to log in to the web admin configuration page Password to log in to the web Labeled on the product cover configuration page WLAN name Labeled on the product cover WLAN password... -
Page 82: For More Help
For More Help Please visit http://consumer.huawei.com/en/support/hotline for recently updated hotline and email address in your country or region. Version 2.1 (May 2016) -
Page 83: Legal Notice
No part of this manual may be reproduced or transmitted in any form or by any means without prior written consent of Huawei Technologies Co., Ltd. and its affiliates ("Huawei"). The product described in this manual may include copyrighted software of Huawei and possible licensors. - Page 84 Privacy Policy To better understand how we protect your personal information, please see the privacy policy at http://consumer.huawei.com/privacy-policy. Version 2.1 (May 2016)
-
Page 85: Acronyms And Abbreviations
Acronyms and Abbreviations Access Control List ADSL Asymmetrical Digital Subscriber Line ADSL2+ Asymmetrical Digital Subscriber Line 2 plus Address Resolution Protocol Direct Current DHCP Dynamic Host Configuration Protocol Demilitarized Zone Domain Name System Digital Subscriber Line File Transfer Protocol HTTP Hyper Text Transport Protocol IEEE Institute of Electrical and Electronics Engineers... - Page 86 UMTS Universal Mobile Telecommunications System Uniform Resource Locator Universal Serial Bus VDSL2 Very High Speed Digital Subscribe Line 2 VoIP Voice over IP Wide Area Network WCDMA Wideband Code Division Multiple Access WLAN Wireless Local Area Network Wi-Fi Protected Access Wi-Fi Protected Setup Version 2.1 (May 2016)
-
Page 87: List Of Pictures
List of Pictures Picture 1-1 ports and buttons ............. 7 Picture 1-2 front side ..............8 Picture 2-1 connect devices in hybrid broadband network (PSTN Line) ................12 Picture 2-2 connect devices in hybrid broadband network (ISDN Line) ................13 Picture 2-3 connect devices in hybrid broadband network (intervention of an electrician in the internal home wiring) .. - Page 88 Picture 3-11 set SSID and key ..........25 Picture 3-12 internet settings ........... 26 Picture 3-13 internet settings 2 ..........26 Picture 3-14 3G/4G vlan ............27 Picture 3-15 set PIN ..............27 Picture 3-16 bonding tunnel ............. 27 Picture 3-17 home ..............28 Picture 3-18 set internet connection ........
- Page 89 Picture 6-5 WPS by AP-PIN ............. 40 Picture 6-6 WLAN access rules ..........41 Picture 6-7 WLAN access rules 2 ..........41 Picture 6-8 parental control ............42 Picture 6-9 time rules ............... 42 Picture 6-10 time rules ............. 43 Picture 6-11 URL filter ..............
-
Page 90: Version 2.1 (May 2016)
Picture 8-3 VoIP accounts ............58 Picture 8-4 telephone ............... 58 Picture 9-1 share service settings ........... 60 Picture 9-2 share service settings 2 ........60 Picture 9-3 share user settings ..........60 Picture 9-4 share user settings 2 ..........61 Picture 9-5 FTP service settings .......... - Page 91 Picture 11-7 local area connection ........... 75 Picture 11-8 local area connection details ....... 76 Picture 11-9 physical address ..........76 Version 2.1 (May 2016)
-
Page 92: List Of Tables
List of Tables Table 1-1 ports and buttons ............8 Table 1-2 indicators ..............10 Table 3-1 connected devices to the HA35 router..... 32 Table 6-1 firewall ..............45 Table 13-1 technical specifications .......... 80 Table 13-2 default settings ............81...