Samsung HT-J5150 User Manual
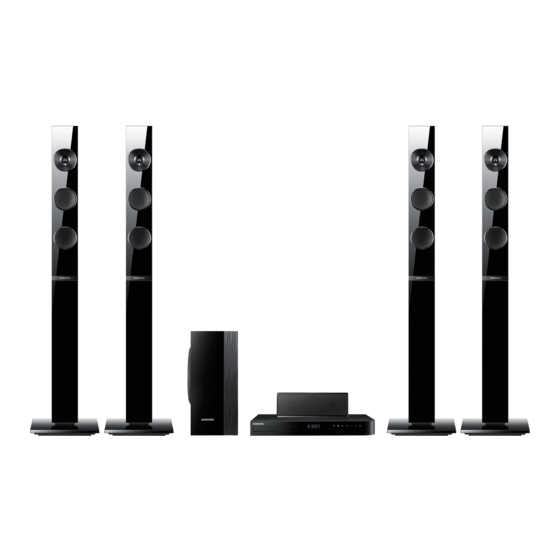
5.1ch blu-ray home entertainment system
Hide thumbs
Also See for HT-J5150:
- User manual (190 pages) ,
- User manual (153 pages) ,
- User manual (38 pages)
Table of Contents
Advertisement
Advertisement
Table of Contents

Related Manuals for Samsung HT-J5150


Summary of Contents for Samsung HT-J5150
- Page 1 HT-J5150 User manual 5.1CH Blu-ray™ Home Entertainment System imagine the possibilities Thank you for purchasing this Samsung product. To receive more complete service, please register your product at www.samsung.com/register This Nanum Gothic Eco font is provided by NAVER.
-
Page 2: Safety Information
Safety Information This symbol indicates that high voltage CAUTION is present inside. It is dangerous to make any kind of contact with any RISK OF ELECTRIC SHOCK. DO NOT OPEN internal part of this product. CAUTION: TO REDUCE THE RISK OF ELECTRIC SHOCK, DO This symbol indicates that important NOT REMOVE THE COVER (OR BACK). - Page 3 Do not allow children to hang on the product. ● Store the accessories (battery, etc.) in a location safely ● out of the reach of children. Do not install the product in an unstable location such ● as a shaky self, a slanted floor, or a location exposed to vibration.
-
Page 4: Table Of Contents
Contents GETTING STARTEd pLAyING CONTENT Accessories 19 Switching the Source Device Speaker Components 19 Playing Commercial Discs Front Panel 19 Playing a Disc with User Recorded Content Rear Panel 20 Playing Files on a USB Device Remote Control 21 Controlling Video Playback 23 Playing a Pre-Recorded Commercial Audio Disc CONNECTIONS 23 Controlling Music Playback... -
Page 5: Getting Started
Getting Started Figures and illustrations in this User Manual are provided for reference only and may differ from actual ■ product appearance. An administration fee may be charged if either ■ a. an engineer is called out at your request and there is no defect in the product (i.e. where you have failed to read this user manual) b. -
Page 6: Front Panel
MIC 1 5V 0.5A MIC 1 MIC 2 5V 0 MIC 1 MIC 2 Getting Started 5V 0.5A MIC 1 MIC 2 5V 0.5A MIC 1 MIC 2 5V 0.5A MIC 1 MIC 2 Front Panel dISpLAy ICONS FUNCTION STOp pLAy/pAUSE VOLUME OpEN/CLOSE... -
Page 7: Remote Control
Remote Control Tour of the Remote Control Press to select Home Cinema's Turn the product on and off. mode. (BD/DVD, D. IN, AUX, FUNCTION etc.). To open and close the disc tray. VOLUME MUTE Adjust the volume. Cut off the sound temporarily. RDS DISPLAY Press numeric buttons to PTY -... -
Page 8: Connections
Connections This section describes various methods of connecting the product to other external components. Before moving or installing the product, be sure to turn off the power and disconnect the power cord. Connecting the Speakers position of the product Place it on a stand or cabinet shelf, or under the TV stand. -
Page 9: Installing The Speakers On The Tallboy Stand
Installing the Speakers on the Tallboy Stand Turn the Stand Base upside-down and connect Stand Base it to the Stand. Use the driver to combine the screws on the 3 marked holes. Stand Straighten a supplied speaker wire and put in the hole on the centre of Stand Base. - Page 10 Connections Surround Speaker (L) Front Speaker (L) SURROUND SURROUND Centre Speaker Surround Speaker (R) SURROUND SURROUND Front Speaker (R) Subwoofer If you place a speaker near your TV set, the screen colour may be distorted because of the magnetic ✎ field.
-
Page 11: Connecting To A Tv And External Devices
Connecting to a TV and External Devices SURROUND SURROUND White Method 1 Method 2 External devices AUDIO OUT OPTICAL OUT HDMI IN (ARC) Connecting to a TV Connect an HDMI cable (not supplied) from the HDMI OUT jack on the back of the product to the HDMI IN jack on your TV. -
Page 12: Settings
If you use an HDMI cable to connect the ✎ The Initial Settings Procedure product to an Anynet+ (HDMI-CEC)-compliant Samsung TV and 1.) You have set the Anynet+ The Home menu will not appear if you do not (HdMI-CEC) feature to On in both the TV ●... -
Page 13: Accessing The Settings Screen
Buttons on the Remote Control Used for Bd Wise is Samsung’s latest inter-connectivity the Settings Menu feature. When you connect a Samsung product and a Samsung TV with Bd Wise to each other SUBTITLE HOME REPEAT via HDMI, and Bd Wise is on in both the product and TV, the product outputs video at the video resolution and frame rate of the Blu-ray/DVD Disc. - Page 14 Settings Movie Frame (24 fps) Speaker Selection Setting the Movie Frame (24 fps) feature to Auto Lets you select which speakers you want active, lets the product adjust its HDMI output to 24 either the TV's speakers or the home cinema's frames per second automatically for improved speakers.
- Page 15 Support control those products with one Samsung TV remote. To operate this function, you must Software Upgrade connect this product to an Anynet+ Samsung TV using an HDMI cable. For more information about this function, see page 18. Bd data Management...
-
Page 16: Radio Setup
Settings Press the button again TUNER MEMORy Reset within about 5 seconds. The station is stored in memory. Reverts all settings to their defaults. Requires that you enter your security PIN. The default security If you press the button ✎ TUNER MEMORy PIN is 0000. -
Page 17: About Rds Broadcasting
If you remove the USB device or Power Cable ✎ To show the RdS signals during the recording process, the portion of You can see the RDS signals the station sends on the the file which has already been recorded may display. -
Page 18: Upgrading Software
TUNING TV SOUND DSP/EQ DOWN Visit Samsung's website on a computer and download the update package to a USB device. Save the update package in the USB device's ✎ top-level folder. Otherwise, the product will not be able to locate the update package. -
Page 19: Playing Content
Playing Content Your home cinema can play content located on disc Storage & Management Blu-ray/DVD/CD discs and USB devices. Holding Discs ● - Fingerprints or scratches on Switching the Source Device a disc may reduce sound and picture quality or cause skipping. If two or more external devices are connected to the - Avoid touching the surface of a disc where data main unit, you can use any of the three methods... -
Page 20: Playing Files On A Usb Device
Playing Content A screen appears listing the contents of the If necessary, use the ▲▼◀▶ buttons to select disc. Depending on how the contents are a folder, and then press the v button. arranged, you will see either folders, individual Select a file to view or play, and then press the files, or both. -
Page 21: Controlling Video Playback
Controlling Video Playback 2 Using the disc menu, title menu, popup menu, and title list You can control the playback of video content located on a Blu-ray/DVD disc or USB device. dISC MENU FUNCTION Depending on the disc or contents, some of the VOLUME MUTE During playback, press this button to display the... - Page 22 Playing Content Using the TOOLS Menu Menu selections that appear only when a Bd/dVd disc plays During playback, press the button. TOOLS Title Chapter If there is more than one title on a disk or device, Lets you move to a chapter that you want to lets you move to or select a desired title.
-
Page 23: Playing A Pre-Recorded Commercial Audio Disc
Creating a Video playlist Buttons on the Remote Control used for FUNCTION Music playback You can create a playlist of video files in nearly the VOLUME MUTE same way you create a playlist of music files. See RDS DISPLAY page 24 for instructions. Select video files instead of music files. - Page 24 Playing Content Creating a Music playlist Ripping If you are playing music from a commercial CD Insert a USB device into the USB jack on the or DVD, press the 5 or button. The front of the product. RETURN Music List Screen appears. If you are creating With the Playback screen displayed, use the a playlist from music on a user created disk or ▲▼...
-
Page 25: Playing Photo Content
Creating a photo playlist Playing Photo Content You can create a photo playlist in nearly the same You can play photo contents located on a DVD or way you create a music playlist. See page 24 for USB. instructions. Select photo files instead of music files. Using the Tools Menu Using the Special Effects Remote During playback, press the... - Page 26 Playing Content TV SOUNd ON/OFF support specifications: Ğ Anynet+ (HdMI-CEC) TV Sound ON TV Sound OFF Setting HTS Speaker HTS Speaker Output Mute TV Speaker TV Speaker Mute Output HTS Speaker HTS Speaker Output Mute TV Speaker TV Speaker Output Output HTS Speaker HTS Speaker...
-
Page 27: Appendix
This function is not available if the HDMI cable ● TV Aspect Ratio does not support CEC. If your Samsung TV has an Anynet+ logo, then it Depending on the disc type, some aspect ratios ● ● supports the Anynet+ function. -
Page 28: Disk And Format Compatibility
Appendix playing Content Audio Return Channel When Anynet+ (HdMI-CEC) is Off, the Audio Using the TOOLS button while playing pictures ● Return Channel function is not available. If the home cinema is connected to a BD Wise ● Using an HDMI cable not certified for ARC (Audio ●... -
Page 29: Logos Of Discs The Product Can Play
Please note that this is not a defect in the America, South America, Korea, product. Japan, Taiwan, Hong Kong and Samsung cannot guarantee that this product ✎ South East Asia. will play every disc bearing the Blu-ray Disc, DVD, or CD logo because disc formats evolve,... -
Page 30: Supported Formats
Some AVCHD format discs may not play, ✎ socket. If the problem continues, contact the USB depending on the recording conditions. HDD manufacturer. AVCHD format discs need to be finalised. SAMSUNG is not responsible for any data file damage ✎ ● or data loss. - English... - Page 31 Video File Support File Extension Container Video Codec Audio Codec Resolution DivX 3.11/4/5/6 MP3, Dolby Digital, DTS, *.avi MP4v3 WMA, PCM H.264 BP/MP/HP VC-1 AP, DivX 5/6 *.mkv MP3, Dolby Digital, DTS H.264 BP/MP/HP VC-1 AP *.wmv 1920x1080 (wmv9) VC-1 SM MP4 (mp4v) *.mp4 H.264 BP/MP/HP...
- Page 32 Appendix digital Output Selections Bitstream Bitstream Bitstream Setup (Re-encoded (Unprocessed) (Re-encoded dTS) dolby d) Connection HdMI supported AV receiver Up to PCM 7.1ch Dolby Digital Up to PCM 5.1ch Dolby Digital Dolby Digital Up to PCM 5.1ch Dolby Digital Plus Plus Audio Dolby TrueHD...
-
Page 33: Troubleshooting
Refer to the table below when this product does not function properly. If the problem you are experiencing is not listed below or if the instructions below do not help, turn off the product, disconnect the power cord and contact the nearest authorized dealer or Samsung Electronics Service Centre. Symptom... - Page 34 Appendix Symptom Check/Remedy Is there "Dolby Digital 5.1 CH" mark on the disc? Dolby Digital 5.1 CH Surround dolby digital 5.1 CH ● Sound is produced only if the disc is recorded with 5.1 channel sound. Surround Sound is not produced.
- Page 35 Symptom Check/Remedy The feature is unavailable or the action cannot be completed at this time "Not Available" appears on ● because: screen. 1. The Blu-ray/DVD disc's software restricts it. 2. The Blu-ray/DVD disc's software doesn’t support the feature (e.g., angles) 3.
-
Page 36: Specifications
Subwoofer 20Hz ~ 200Hz 168.0 x 350.0 x 285.0 3.67 Samsung Electronics Co., Ltd reserves the right to change the specifications without notice. ✎ Weight and dimensions are approximate. ✎ Design and specifications are subject to change without prior notice. -
Page 37: Licences
Licences Manufactured under licence from Dolby Laboratories. Dolby and the double-D symbol are trademarks of Dolby Laboratories. For DTS patents, see http://patents.dts.com. Manufactured under licence from DTS Licencing Limited. DTS, DTS-HD, the Symbol, & DTS and the Symbol together are registered trademarks, and DTS-HD Master Audio | Essential is a trademark of DTS, Inc. - Page 38 EIRE EIRE s Samsung product is warranted for the period of twelve (12) months from the origi- Samsung product is warranted for the period of twelve (12) months from the origi- This Samsung product is warranted for the period of twelve (12) months from the origi- beyond the control of Samsung.
- Page 39 © 2015 Samsung Electronics Co., Ltd. All rights reserved. Contact SAMSUNG WORLD WIDE If you have any questions or comments relating to Samsung products, please contact the SAMSUNG customer care centre. Area Contact Centre Web Site Area Contact Centre ...