
Related Manuals for Disc Makers Reflex 1


Summary of Contents for Disc Makers Reflex 1
- Page 1 User Manual For Discmakers Reflex Disc Duplicator V 3.5.4 © 2011 All Rights Reserved...
- Page 2 WARNING! THIS CD/DVD/BLU-RAY/LIGHTSCRIBE DUPLICATOR IS MEANT FOR BACK UP AND DISTRIBUTION OF ORIGINAL DATA AUTHORED OR OWNED BY THE USER. ANY DUPLICATED DISCS MADE FROM THIS CD/DVD/BLU-RAY/LIGHTSCRIBE DUPLICATOR IS THE COPYRIGHTED PROPERTY OF THE AUTHOR OR COMPANY WHICH OWNS THE SOURCE DISC. ANY UNAUTHORIZED COPYING, EDITING, OR ANY PART THEREOF OF A COPYRIGHTED DISC IS STRICTLY PROHIBITED.
-
Page 3: Table Of Contents
Table of Contents Title Page Chapter 1: Introduction & Manual Overview………………………………..……… Before You Start………………………………………………………….……. Package Content……………………………………………………………… Chapter Overview……………………………………………………….……. Chapter 2: Getting to Know Your System….…..….….….….….….….….…..…… System Overview………………………………………………….………….. LCD Front Panel………………………………………………………………. Input Characters/Numbers…………………………………………..………. Chapter 3: Basic Operations………………………………………………………..... -
Page 4: Chapter 1: Introduction & Manual Overview
Chapter 1: Introduction & Manual Overview This system is a reliable, high performance, high speed, standalone manual tower system. With its professional industrial design and simple user interface, it will make your duplicating experience easier than ever. Before you start: Before you start using this system, please read the following to ensure proper operation: 1. - Page 5 5. Maintenance: It is of the utmost importance to operate and maintain the system in a clean, dust-free environment. Dust is recognized as the most common contributing factor to optical drive failure. We strongly suggest you place an air purifier next to the system and frequently use an air duster (canned air) to clear off any dust on the surface of the system.
-
Page 6: Package Content
Package Contents: Quick Start Guide Power Cord Cable Standard Operation User Manual Booklet or CD Chapter Overview: Chapter 2: Getting to Know Your System This chapter describes the physical features of the Reflex duplicator and introduces how it is operated. Chapter 3: Basic Operations Guide This chapter describes how to perform basic operations such as Making Copies, Changing Burn Speed, etc. -
Page 7: Chapter 2: Getting To Know Your System
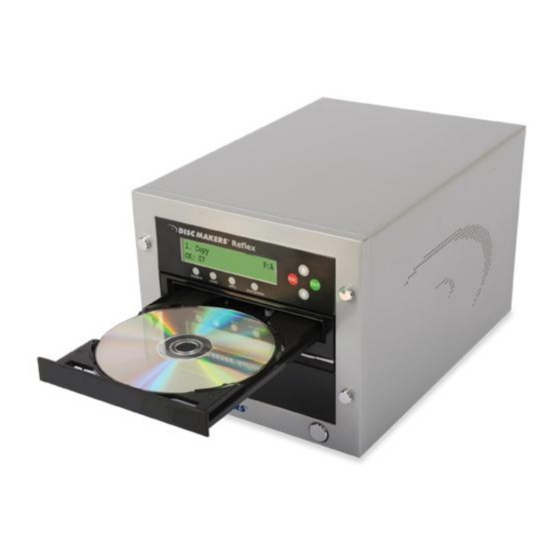
Chapter 2: Getting to Know Your System System Overview The below image is one representation of the duplicator casing. Your case’s appearance may vary but will have similar characteristics. Figure 1-1 System Controls and Display The components shown in Figure 1-1 are: 1. -
Page 8: Lcd Front Panel
LCD Front Panel *The below image is for reference only. Your key assignment and appearance may differ. : Up (Menu/Option Scroll Up) : Down (Menu/Option Scroll Down) : Forward; Enter; OK; Execute the selected function : Backward; Escape; go back to the previous function - 5 -... -
Page 9: Input Characters/Numbers
Input Characters/Numbers When operating the system, certain functions may require the user to enter a name or value. Such cases could be entering the Counter quantity. To enter an alpha numeric character, use the up or down button to scroll through the numbers or letters, using the “ENT”/Enter or “ESC”/Escape button to move the cursor position right or left. -
Page 10: Chapter 3: Basic Operations
Chapter 3: Basic Operations Make Disc-to-Disc Copies This process will copy a master disc onto one blank disc. A good condition master disc and a lower (than maximum) recording speed are recommended for higher success rates and better quality duplications. Section1: Making Copies from the Reader (when the Reader is selected as the source drive). - Page 11 Alternately, the following procedure is used to specify a quantity for when controlled duplication is required or desired: a) Press the up or down button to the following screen: Counter: Specify Counter b) Press the “ENT”/Enter button to submit. The screen will display Specify Counter: Specify Counter: ] OK? c) Please refer to the “Input Name and Number”...
- Page 12 Step 4: After several seconds of processing time, one of the following Copy progress screens will appear. The left-hand screen is shown when “Specify Counter” is selected and the right-hand screen is shown when “No Counter” is selected. “Specify Counter” “No Counter”...
-
Page 13: Select The Duplication Speed
Duplication Quality. Overall, the lower the recording speed, the higher the quality of completed duplicates. If time permits, Disc Makers recommends lowering the recording speed by several degrees in ensure the highest quality of duplicated discs. - Page 14 Depending on the type of duplication job(s) and individual system restrictions, it is necessary to select the correct speed type in order for this setting to take effect. To select speed types, press the up or down button to adjust and press the “ENT”/Enter button to submit the selection.
-
Page 15: Mix Audio Tracks
Mix Audio Tracks The Reflex duplicator system provides several ways to mix audio CDs from several sources. The user inserts a source audio disc and selects the desired tracks for compilation, repeating this process for each source disc as necessary. When the user is satisfied with the selections, the duplicator will write the tracks to disc in the order they were loaded. - Page 16 Step 4: When you see the above screen, you can press the up or down button to display the playtime of each track on this audio CD and press the “ENT”/Enter button to select the track you wish to be mixed. Selected tracks are marked with a * to the left of the track number on the 2nd line as shown in the below screen.
- Page 17 When you’re finished adding tracks, you can choose to finalize the job (mark the completion) by performing the following steps: a) Press the “ENT”/Enter button when you see “Finish Mixing?” on the 2 line of the screen as below: Mixing Complete! Finish Mixing? b) Press the “ENT”/Enter button to submit, and you should see the following confirmation screen:...
- Page 18 Example of Mixing Audio Tracks directly to Blank CD For the example below, we will mix a new Audio CD from 2 different Audio CD’s. From CD1: song 2, and song 4 From CD2: song 3, song 4 and song 5 DISCMAKERS X.xx 1.
- Page 19 15. Press down button until you see Total: 2 Trk 9m:47s “Track 3” on the 2 line. Track 3: 4m:47s Total: 3 Trk 14m:34s 16. Press “ENT”/Enter button once. *Track 3: 4m:47s 17. Press down button until you see Total: 3 Trk 14m:34s “Track 4”...
-
Page 20: Change The Setup Settings
Change the Setup settings Most of the internal settings and information is stored inside the Setup menu. To explore and modify them is simple. Below is an example how to modify the “Auto Start” setting. Please note that the default setup is set for optimal performance of the system, it is unnecessary to change if you are satisfied with the outcome. - Page 21 Step 7: Press “ESC”/Escape button to go back to the main menu. DISCMAKERS X.xx 5.Setup This change will only be effective for the current usage until you power off the system unless you perform the Save function under the Utilities menu, or perform the Shutdown function under the main menu.
-
Page 22: Chapter 4: Menu Overview
Chapter 4: Menu Overview 1. COPY This menu will guide you to make copies of discs. For more information, please refer to “Make Disc-to-Disc Copies”. 2. ADVANCED COPY OPTIONS This menu will guide you to make a simulation of the copying process. During this simulation process, all write once recordable discs such as (DVD-R, CD-R) will be reusable. - Page 23 4.2. Select Source This menu will guide you to select a Reader/Writer drive as the source drive (the drive which will read the master disc) for Copy related operations. For more information, please refer to section 1 of “Make Disc-to-Disc Copies”. 4.3.
- Page 24 4.7.4. Language This setting will allow you to choose which language you prefer to navigate the controller system of the duplicator. 4.8. Counter This option will allow you to enable/disable the Counter feature by turning this feature ON or OFF. This feature will notify you how many discs have been copied and how many discs are left to go.
- Page 25 5.4. Update Firmware This function will update the software for your system. To update, you need to insert a manufacturer Certified Update CD into the Reader and select this function by pressing the “ENT”/Enter button. We strongly suggest you do not upgrade your system’s firmware unless recommended by the manufacturer.
- Page 26 5.6.4. Delete User This menu allows you to delete existing user accounts. During this process, you will be asked to select the existing account to be removed. User “Admin” is the administrative account, you can NOT change the user name for this account, but you will be able to change the password for this account.
-
Page 27: Appendix A: External Device (Usb 2.0/Firewire 1394) Setup Guide (Optional)
Appendix A: External Device (USB 2.0/Firewire 1394) Setup Guide (Optional) *This only applies if you have USB 2.0 or Firewire connections installed If there’s a switch next to the USB/Firewire Port: 1. Power off your system 2. Set the USB2.0/Firewire switch to “ON” position at the back of your system (away from the LED lights) 3. -
Page 28: Appendix B: Troubleshooting
Appendix B: Troubleshooting Frequently Asked Questions No display on the LCD or the unit does not operate when the power switch is on. Check the power cable connection and that the environment for the power outlet is normal. Make sure the power voltage on the duplicator matches the voltage of your power outlet. - Page 29 Why won’t some writers copy? If those writers are associated with USB 2.0 or Firewire IEEE 1394 connections, please make sure the USB 2.0 or Firewire connection is off and restart your system. For more information, please refer to “Appendix A: External Device (USB 2.0/Firewire 1394) Setup Guide”.
- Page 30 Error Code Typically the system will show an error message and error code if a problem occurs. Please reference the below diagram for a description of the error codes and the recommend solution: Error Error Message Description & Recommended Solutions Code Description: The intended master disc is detected and identified successfully, but...
-
Page 31: Error Codes
Error Error Message Description & Recommended Solutions Code Description: When the error code occurs during the Compare process, the size of the master disc and the successfully copied disc(s) do not match. When the error code occurs during a Copy related process, the capacity of the blank disc(s) is less than the data size of the master disc. - Page 32 Error Error Message Description & Recommended Solutions Code Description: Your system does not support the DVD format. DVD is not supported! Solution: Purchase a system that supports DVD. Description: Your system does not support the DVD-RAM format. DVD-RAM is not supported! Solution: Purchase a system that supports DVD-RAM.
- Page 33 Error Error Message Description & Recommended Solutions Code Description: The password entered is not correct Wrong Possible Solution: Password! Confirm the correct password was entered or try a different password. Description: An incorrect password was entered 3 times consecutively Login Failed Possible Solution: Wait for 5 minutes, then try to use the correct password for next the attempt.
- Page 34 Error Error Message Description & Recommended Solutions Code 3. Make sure there are no other discs in the system and try to insert the update disc into another tray to perform the operation. Description: The Firmware Update File is not compatible with your system or the Firmware Update File is corrupted.
-
Page 35: Appendix C: Safety & Regulatory Information
Appendix C: Safety & Regulatory information Safety Introduction Notices and Safety Please read the following instructions carefully before operating this device and refer to them as needed to ensure the continued safe operation of your machine. These products and supplies have been designed and tested to meet strict safety requirements. - Page 36 Safety Information Operational Safety Information This equipment and related supplies have been designed and tested to meet strict safety requirements. These include safety agency examination, approval, and compliance with established environmental standards. To ensure the continued safe operation of your equipment, follow these safety guidelines at all times: Do These: Always follow all warnings and instructions that are marked on or supplied with the...
- Page 37 Electrical Safety Information 1. The power receptacle for the machine must meet the requirements stated on the data plate on the rear of the machine. If you are not sure that your electrical supply meets the requirements, please consult your local power company or an electrician for advice.
- Page 38 Emergency Power Off If any of the following conditions occur, turn off the machine immediately and disconnect the power cable(s) from the electrical outlet(s). Contact an authorized Service Representative to correct the problem: The equipment emits unusual odors or makes unusual noises. The power cable is damaged or frayed.
- Page 39 Regulatory Information Certifications in Europe: CE Mark (European Union) The CE mark applied to this equipment symbolizes the manufacturer’s declaration of conformity with the following applicable Directives of the European Union as of the dates indicated: 2006/95/EC December 12, 2006 Council Directive 2006/95/EC as amended. Approximation of the laws of the member states related to low voltage equipment.
-
Page 40: Appendix D: Technical Support Information
Appendix D: Technical Support Information Website Please visit our website at http://www.discmakers.com/techsupport/techsupport.asp for videos, manuals and quick start guides for your duplicator. If you require further assistance with this unit, our technical support staff will be happy to assist you. There may be a cost associated with any repairs if your warranty has expired. Email Please contact us by email at techsupport@discmakers.com...
Need help?
Do you have a question about the Reflex 1 and is the answer not in the manual?
Questions and answers