Nokia CK-300 User And Installation Manual
Nokia car kit user guide
Hide thumbs
Also See for CK-300:
- Carmenu user manual (29 pages) ,
- Quick manual and safety information (21 pages) ,
- Installation manuallines (19 pages)
Table of Contents
Advertisement
Advertisement
Table of Contents

Related Manuals for Nokia CK-300


Summary of Contents for Nokia CK-300
- Page 1 Nokia Car Kit CK-300 User and Installation Guide 9202247 Issue 1 EN...
- Page 2 Nokia operates a policy of ongoing development. Nokia reserves the right to make changes and improvements to any of the products described in this document without prior notice. Under no circumstances shall Nokia be responsible for any loss of data or income or any special, incidental, consequential or indirect damages howsoever caused.
-
Page 3: Table Of Contents
Contents For your safety... 4 Quick start... 5 Set up... 5 Input device ... 5 Operation without CarMenu ... 6 Voice dialing key ... 6 Mute key... 6 Mode key ... 6 Call key... 6 End key... 6 Navi wheel ... 6 Operation with CarMenu ... -
Page 4: For Your Safety
F o r y o u r s a f e t y For your safety Read these simple guidelines. Not following them may be dangerous or illegal. Read the complete guide for further information. Your device and its enhancements may contain small parts. Keep them out of reach of small children. -
Page 5: Quick Start
Quick start Thank you for choosing the Nokia Car Kit CK-300. With the car kit, you can conveniently make and receive hands-free calls and listen to music stored on your mobile device through your car stereo system. This chapter describes the basic features of the car kit. For details, refer to the respective sections in this guide. -
Page 6: Operation Without Carmenu
Q u i c k s t a r t ■ Operation without CarMenu You can operate the car kit with or without the CarMenu application. This section describes how you can use the input device when CarMenu is not installed on your mobile device. Voice dialing key Press and hold the voice dialing key to activate voice dialing on a compatible mobile device when no call is in progress. -
Page 7: Operation With Carmenu
Nokia website, and install the application on your compatible mobile device. Also read the CarMenu user guide on the CD-ROM. You can use the Nokia Maps application with CarMenu if Nokia Maps is installed on your mobile device. Install CarMenu For the installation, you may need the administrator rights for your PC. -
Page 8: Use Carmenu With The Input Device
(if the CD-ROM autorun feature is set to on in Windows). Follow the displayed instructions to download the CarMenu installation file from the Nokia website to the PC, and copy the file from the PC to your mobile device or the memory card inserted in it. - Page 9 • Stop playing the displayed track in the main screen of the music player mode • In Nokia Maps, pressing the end key performs the same function as when you press the right selection key on your mobile device Q u i c k s t a r t...
-
Page 10: Charge The Connected Device
(such as a menu function), or to clear a calendar note from the screen • In Nokia Maps, pressing the Navi wheel performs the same function as when you press the middle selection key or the middle of the scroll... -
Page 11: Introduction
Read this guide carefully. Also read the user guide for your mobile device, which provides important safety and maintenance information, and the user guide for CarMenu and Nokia Maps. If you use a separate music player with the car kit, read its user guide as well. -
Page 12: Get Started
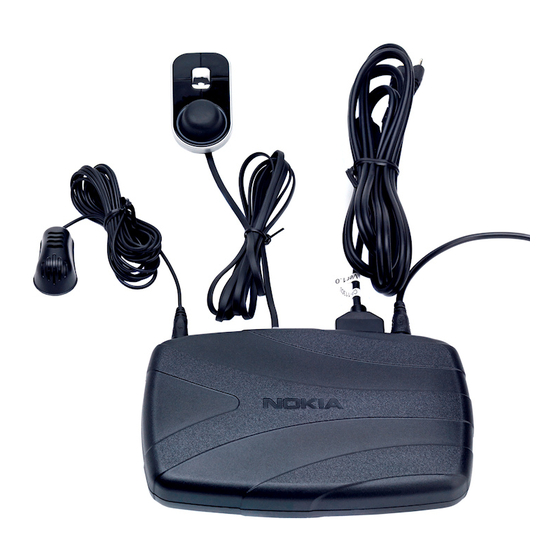
G e t s t a r t e d 2. Get started ■ Parts The car kit contains the following parts: 1. Hands-free unit HF-21W 2. Loudspeaker SP-3 (not included in all sales packages) 3. Connectivity cable CA-113CU. The sales package may also contain other connectivity cables. -
Page 13: Switch On
G e t s t a r t e d Switch on If the ignition sense wire is connected, turn on the car ignition. When the car kit is switched on, the CarMenu application installed on your mobile device starts up, and the indicator light of the input device turns If the ignition sense wire is not connected, press and hold the Navi wheel. - Page 14 Bluetooth wireless technology, you can keep it, for example, in a bag, while using the car kit. To charge the battery in your compatible Nokia device while using the car kit, connect the device through the supplied connectivity cable to the car kit.
-
Page 15: Connect Your Music Player To The Car Kit
Connect the car kit automatically You can set your paired device to allow an automatic connection with the car kit when the car kit is switched on. To do this in Nokia devices, change your paired device settings in the Bluetooth menu. -
Page 16: Use Without Carmenu
U s e w i t h o u t C a r M e n u 3. Use without CarMenu ■ Answer a call To answer a call, press . To reject an incoming call, press . ■ End a call To end an active call, press . -
Page 17: Switch A Call Between Car Kit And Mobile Device
U s e w i t h o u t C a r M e n u ■ Switch a call between car kit and mobile device To switch a call between the car kit and your compatible mobile device, press ■... -
Page 18: Troubleshooting
T r o u b l e s h o o t i n g 4. Troubleshooting ■ Connection issues I cannot connect the car kit to my mobile device through a Bluetooth connection. • Ensure that the car kit is switched on and paired with your device. •... - Page 19 If you use the music player feature of your mobile device, check that your device model is shown on the compatibility list in the support area of the car kit at www.nokia.com. I cannot hear music played with the music player when the mobile device or music player is connected to the car kit.
-
Page 20: Other Issues
T r o u b l e s h o o t i n g ■ Other issues The car kit does not switch on when I turn on the car ignition. Ask the technician who installed the car kit to ensure that the ignition sense wire is properly connected. -
Page 21: Installation
Observe the following safety guidelines when installing the car kit. • Only a qualified service technician should install or service the car kit using the approved original Nokia parts supplied in the sales package. Faulty installation or service may be dangerous and may invalidate any warranty which may apply to the car kit. -
Page 22: Connection Options
I n s t a l l a t i o n car kit and any of its components are not installed where you might come in contact with it in the event of an accident or collision. When mounting a mobile holder, ensure that the phone display is clearly visible for the user. -
Page 23: Cable Connection
I n s t a l l a t i o n Cable connection The car kit is supplied with a connectivity cable that has a 2.0-mm (0.08 inch) charging plug and a 3.5-mm (0.14 inch) audio plug. For more information, see “Connectivity cable CA-113CU,”... - Page 24 I n s t a l l a t i o n Setup option 1 For phone calls, use the ISO system cable CA-139 (if supplied with the car kit), or a cable specific to the car radio, to connect the car kit to the car radio and its speakers.
- Page 25 I n s t a l l a t i o n 1. Disconnect the two ISO connectors from the car radio for power and loudspeakers, and replace them with the two connectors of the system cable CA-139. Connect the wire labeled "Mute" of the system cable to one of the wires labeled "Mute 1", "Mute 2", or "Mute 3"...
- Page 26 (this cable is not supplied with the car kit). 4. To charge a compatible Nokia mobile device through the car kit, connect one end of the connectivity cable CA-113CU to the hands- free unit and the other end to the 2.0-mm (0.08 inch) charging connector of the mobile device.
- Page 27 Setup option 2 If the car radio has a mobile phone input and an AUX input for music devices, you can connect your mobile device to the speakers of the car radio. 1. Connect the respective wires of the power cable PCU-4 to the car battery and ignition sense (if available).
- Page 28 (this cable is not supplied with the car kit). 4. To charge a compatible Nokia mobile device through the car kit, connect one end of the connectivity cable CA-113CU to the hands- free unit and the other end to the 2.0-mm (0.08 inch) charging connector of the mobile device.
- Page 29 Setup option 3 You can use the external loudspeaker SP-3 and the power cable PCU-4 as follows (if supplied with the car kit): 1. Connect the respective wires of the power cable PCU-4 to the car battery and ignition sense (if available). Connect the car radio mute signal (if available) to the car radio.
-
Page 30: Install The Car Kit In A Vehicle
I n s t a l l a t i o n 4. To charge a compatible Nokia mobile device through the car kit, connect one end of the connectivity cable CA-113CU to the hands- free unit and the other end to the 2.0-mm (0.08 inch) charging connector of the mobile device. -
Page 31: Hands-Free Unit Hf-21W
Hands-free unit HF-21W The hands-free unit has the following connectors. The symbols are printed at the bottom of the unit. —Power —Loudspeaker output for phone calls; for connections, see “Integration with a car stereo system,” p. 23 —System connector for connectivity cable CA-113CU to charge a mobile device and play music over a cable connection —Connector for the input device CU-10 —Stereo music output... -
Page 32: Input Device Cu-10
I n s t a l l a t i o n 3. Attach the pad with the hooks: peel off the protective sheet from the adhesive side, and attach the pad to the underside of the hands-free unit. 4. Press the hands-free unit firmly onto the loop pad, and check that the hands-free unit stays securely in place. -
Page 33: Connectivity Cable Ca-113Cu
The 3.5-mm (0.14 inch) stereo plug is compatible with music players that have the respective audio connector. The 2.0-mm (0.08 inch) charging plug is compatible with Nokia mobile devices that have the respective charging connector. With the cable you can connect the car kit to a music player to listen to... -
Page 34: Mobile Holder
I n s t a l l a t i o n “Integration with a car stereo system,” p. 23). For details, see the user guide of the car radio. Mobile holder If the mobile device is connected to the car kit with a cable or the car kit is used through the CarMenu application, you need to mount a mobile holder designed for the mobile device that is used with the car kit. -
Page 35: Antenna Coupler And External Antenna
Antenna coupler and external antenna An antenna coupler can be used to connect an external antenna to the car kit. The external antenna improves the reception of the mobile device in a car. For availability, contact your dealer. Note: In order to comply with RF exposure guidelines, install the external antenna so that a minimum distance of 20 centimeters (8 inches) can be maintained between the external antenna and all persons, with external antenna gain not exceeding 3 dBi. -
Page 36: Care And Maintenance
C a r e a n d m a i n t e n a n c e Care and maintenance Your car kit is a product of superior design and craftmanship and should be treated with care. The suggestions below will help you protect your warranty coverage. -
Page 37: Additional Safety Information
A d d i t i o n a l s a f e t y i n f o r m a t i o n Additional safety information ■ Vehicles RF signals may affect improperly installed or inadequately shielded electronic systems in motor vehicles such as electronic fuel injection systems, electronic antiskid (antilock) braking systems, electronic speed control systems, and air bag systems.
Need help?
Do you have a question about the CK-300 and is the answer not in the manual?
Questions and answers