
Related Manuals for Sanyo W52SA


Summary of Contents for Sanyo W52SA
- Page 1 Basic Manual Contents/ Before Use Phone Call Inputting Text Address Book/ Pair Function Mail Camera EZweb EZ Navi EZ Television (1Seg) Remote Ctrl Lock W52SA by SANYO Other Features/ Troubleshooting Index...
- Page 2 Preface Thank you for choosing W52SA. Before using your W52SA, be sure to read the W52SA "Basic Manual (this PDF manual)" to ensure proper use of your W52SA. After you have finished reading, keep this PDF manual and the printed manuals (Japanese) in a safe place for your reference whenever you need.
-
Page 3: Manners For Using Cellphones
Manners for Using Cellphones A cellphone always generates weak electric waves while its power is ON. ■ Be considerate of others around you to use your cellphone enjoyably ■ and safely. In some places, the use of Consider where to use your ●... -
Page 4: What You Can Do With W52Sa
Basic of Cellphone What You Can Do with W52SA Mail EZweb ® You can send mails to other You can download Chaku-Uta ® cellphones or personal computers. Chaku-Uta-Full , and wallpapers, etc. Page 42 Page 59 → → EZ Navi You can search various location information with the functions of "EZ Navi... -
Page 5: Manner Mode And Answer Phone
Manner Mode and Answer Phone Manner Mode Answer Phone ■ ■ With Manner Mode, you can set the The caller can leave a ringer not to sound so as not to message when you cannot bother the people around you. answer the phone. -
Page 6: Do Not Use Your W52Sa While Driving
Do not Use Your W52SA While Driving Holding a cellphone in your hand to make phone calls ■ and/or watching the screen to view E-mails etc., while driving shall be subject to penalties. (The implementation of the revised Road Traffic Law on November 1, 2004) ×... -
Page 7: Beware Of Junk Mails And One-Ring Calls
Beware of Junk Mails and One-ring Calls! If you receive junk mails... ■ Using the mail filter function, you can reject mails sent from specific addresses or mails that bear " (Unsolicited 未承諾広告※ Ad)" in the title, which is the biggest source of junk mails. The following mail functions are available for preventing arrival of junk mails. -
Page 8: Making Side Key Operation Invalid
Making Side Key Operation Invalid Making Side Key Operation Invalid ■ Prevent side key from misoperation when carrying your W52SA closed in the bag. Press for more than one second while the standby screen is displayed. To release from the locked status... -
Page 9: Disaster Message Board Service
Disaster Message Board Service When a big scale disaster occurs, you can register your safety information through EZweb. The registered safety information can be referred from anywhere in Japan through EZweb or Internet. When a big scale disaster occurs, you can register your ◆... -
Page 10: Table Of Contents
Manner Mode and Answer Phone............ 3 Cellphone Check the Power, Reception and Battery! ........3 Do not Use Your W52SA While Driving ........... 4 Beware of Junk Mails and One-ring Calls! ........5 Making Side Key Operation Invalid ..........6 Disaster Message Board Service ............. - Page 11 What You Can Do with EZ Navi ............. 64 EZ Navi What You Can Do with EZ Television (1Seg) ........ 66 EZ Television Watching EZ Television (1Seg)............68 (1Seg) Ending EZ Television (1Seg)............69 In Case You Lose Your W52SA............. 70 Remote Ctrl Lock Other Features Troubleshooting Index...
-
Page 12: Confirming The Package Contents
Before Use Confirming the Package Contents The W52SA phone and accessories are included in the package. W52SA Phone Battery Pack Desktop Holder Stereo Earphones SANYO Round-type USB Cable (Sample) Earphone Jack Conversion (Sample) Adapter 01 MDR- E0931 by Sony Basic Manual (Japanese) -
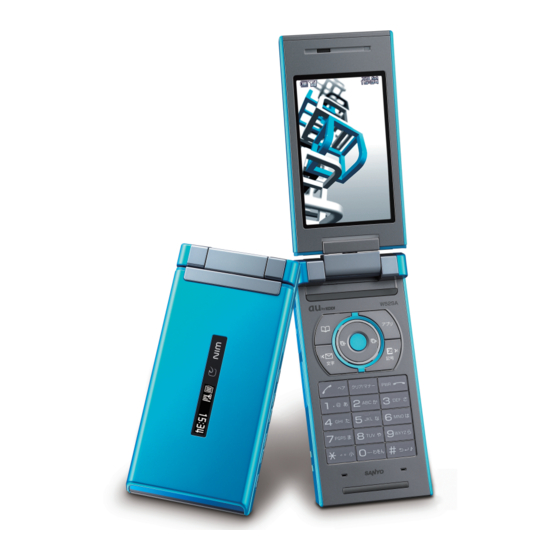
Page 13: Name Of Parts
Name of Parts Infrared Port Earpiece Optical Sensor Main Display Incoming Illuminator Center Key Cursor Key EZ apps Key Address Book Key EZ Key Mail Key Clear/Manner Key Call/Pair Key Power/End Key Dial Keys Recording Microphone Recording Microphone (Mouthpiece) Sub Display microSD Memory (Back-panel) Card Slot... -
Page 14: Charging The Battery Pack
Charging the Battery Pack The battery pack is not fully charged at the time of purchase. Charge the battery pack before using your W52SA for the first time. How to Charge the Battery Pack ■ Connect the Common AC Adapter 01 to Desktop holder. -
Page 15: Setting To Front Style Or Recording Oneself Style
Setting to Front Style or Recording Oneself Style W52SA allows you to use in Front Style or Recording Oneself Style other than usual open style. Open to the partially- Rotate the display 180 degrees opened position clockwise. (about 120 degrees). -
Page 16: Turning The Power On/Off
Turning the Power ON/OFF Press for more than one second. <Standby Screen> Check the battery level. High Medium Zero Charging Check the radio wave reception. Out of Very Strong Medium Weak service weak area When " " appears, you cannot make or receive calls. When "... -
Page 17: Basic Usage
Basic Usage How to Use the Keys ■ Center Key Cursor Key Viewing Main Menu/ Moving the cursor Defining the item : Selecting the EZ News Flash Ticker Display or increasing the volume Pressing for more than : Viewing Incoming Calls one second: Setting the side key operation valid/ : Displaying the notification screen, calling up... -
Page 18: Using The Main Menu
Items in the Underpart of the Display and the ■ Operation Use the assigned key to operate the item indicated in the underpart of the display. The displayed items may differ depending on the screen. For the case illustrated on the Mail Rec... -
Page 19: Icons
Icons <Main Display> <Sub Display> Standby Screen 1 Standby Screen 2 * The display will switch between standby screen 1, standby screen 2, and full clock display each time is pressed. Description Description ™ microSD Memory Card inserted Unread mail exists During a call*/Running EZ Television Side key operation invalid (1Seg) (... -
Page 20: Initializing E-Mail And Ezweb Settings
Initializing E-mail and EZweb Settings Application to the EZweb service is required in advance to use the E-mail and EZweb services. Contact au shops or the au Customer Service Center if you did not apply to the service at the time of purchase. Perform the EZweb initialization before using this service. -
Page 21: Confirming Your Phone Number And E-Mail Address
Confirming Your Phone Number and E-mail Address Press while the standby screen is displayed, and press The Profile screen appears, and you can confirm your phone number and E-mail address. Information While the standby screen is displayed, your phone number and E-mail •... -
Page 22: Changing Your E-Mail Address
Changing Your E-mail Address E-mail Address Example: △△△ @ezweb.ne.jp Customizable Part Domain Press while the standby screen is displayed. to select "E-Mail Setup" and press (Select). to select "Other" and press (Select). to select "E メールアドレス (Change E-mail Address)" の変更 and press (Select). - Page 23 Enter your Security Code and press (OK). Use to select " 送信 (Send)" and press (Select). Security Code is a 4-digit number you have filled in the application form at the time of purchase. If you enter a wrong Security Code 3 times in a row within the same day, you will not be allowed to perform setup operations until the following day.
-
Page 24: Making A Call
Phone Call Making a Call Use the keys to enter the receiver's phone number, then press To make a call to a regular telephone, enter the phone number starting with the area code. How to make a call: Adding "184" before Your phone number is not displayed on the receiver's display. -
Page 25: Answering A Call
001 KOKUSAI MOBILE TALK ■ Application required. For inquiries, contact KDDI Customer Service Center at 0077-7160 (Toll-free; open 9:00 to 20:00 every day including weekends and national holidays). 123-XXXX ー ー ー ー KDDI Country code Area code Phone number International (USA) access code... -
Page 26: Calling Back (Outgoing Calls/Incoming Calls)
Icon as Countermeasure for One-ring Calls ■ On the W52SA, One-ring Calls (the ringer time is 3 seconds or less) are displayed as in Incoming Calls. Be careful when you call back to an unfamiliar number. -
Page 27: Adjusting The Other Party's Voice Volume
Adjusting the Other Party's Voice Volume to adjust volume during a call. Press to increase the volume. Press to decrease the volume. The voice volume can be adjusted to any one of 9 levels or "LOUDEST". You can adjust to a louder volume than Level9 even during a call by pressing (Loudest). -
Page 28: Playing Back Messages On Answer Phone
Playing Back Messages on Answer Phone When a message is recorded on Answer Phone: (Answer Phone) and the number of messages appears. to select " " and press (Check). Icons : Unchecked Answer Phone message : Checked Answer Phone message to select the recorded message to play back and press... -
Page 29: Changing Ringer Type And Volume
Changing Ringer Type and Volume Press while the standby screen is displayed. to select "Basic Settings" and press (Select). to select "Sound/Vib/Lamp" and press (Select). to select "Incoming Setup" and press (Select). to select "Call Notice" and press (Select). to select " "... - Page 30 to select a melody and press (Set). to select " " and press (Select). to adjust the volume and press (Set). Press to increase the volume. Press to decrease the volume. The ringer volume can be adjusted in 5 levels. Set the volume to "OFF"...
-
Page 31: Setting Manner Mode
Setting Manner Mode The vibrator of the W52SA notifies you of the incoming call. Press for more than one second while the standby screen is displayed. " " and " " appear on the standby screen. Answer Phone is turned ON at the same time and "... -
Page 32: Switching Input Mode
Inputting Text Switching Input Mode On the character input screen, press to display the input mode selection screen. to select an input mode and press (OK). Entering Single-byte Alphanumeric Characters You can use the key to enter characters. The characters appear as shown in the following table each time the indicated key is pressed. - Page 33 Consecutively Entering Characters Assigned ■ to the Same Key After entering the first character, press and the next key. Example: Entering "ab" Press once. Press Press twice. Erasing Characters ■ Press to erase a character. Press for more than one second to erase all characters after the cursor ( ).
-
Page 34: Entering E-Mail Address
Entering E-mail Address Example: To enter "taro@sanyo.ne.jp" using Phrase Enter "taro@sanyo". Press once. : Press once. : : Press 3 times. Press 3 times. : Press twice. : Press 4 times. : Press once. : Press twice. : Press 3 times. - Page 35 to select ".ne.jp" and press (Select).
-
Page 36: Entering Pictograph
Entering Pictograph Press on the character input screen. to select " " and press (OK). Press (Category) or to switch between the pictograph lists by category. to select a pictograph to enter and press (Select). You can consecutively enter pictographs by pressing (Continue) instead of (Select). -
Page 37: Registering Data In Address Book
Address Book Registering Data in Address Book You can register data up to 1000 in the address book. Press for more than one second while the standby screen is displayed. to select " " (Name) and press (Select). Enter a name and press (OK). - Page 38 Enter a phone number and press (OK). to select a type of phone number and press (Select). Enter the area code when registering a regular telephone number. When you do not enter an E-mail address, go to step 8. to select " "...
-
Page 39: Making A Call From Address Book
Making a Call from Address Book Press while the standby screen is displayed. to select the person to call. Press (Detail) to display the detail screen where you can confirm registered contents such as phone numbers and E-mail addresses. Press A call is made to the selected phone number. -
Page 40: Editing Address Book Data
Editing Address Book Data Example: To change a phone number Press while the standby screen is displayed, and use to select the data to edit. Press (Detail) and (Edit). to select " " (Phone No.), and press (Select). Edit data and press (OK). -
Page 41: Registering Data From Outgoing/Incoming Calls
Registering Data from Outgoing/Incoming Calls Press while the standby screen is displayed. The Outgoing Calls screen appears. Press to display the Incoming Calls screen while the standby screen is displayed. to select the phone number to register and press (Menu). to select "Reg to Adrs Book"... -
Page 42: Registering Data As Popular Contact
Pair Function You can register the frequent contacts (up to 5 entries) as Popular Contacts to make calls, send mails or use Hello Messenger easily. Registering Data as Popular Contact Press while the standby screen is displayed. to select a tab of the number to register. -
Page 43: Making A Call To The Popular Contact
Making a Call to the Popular Contact Press while the standby screen is displayed. to select the person to call. to select "Dial" and press (Select). Sending a Mail to the Popular Contact ■ to select "E-Mail" or "C-Mail" in step 2 and press (Select). -
Page 44: E-Mail
Mail Application to the EZweb service is required to use E-mail. Contact au shops or the au Customer Service Center if you did not apply to the service at the time of purchase. Perform the EZweb initialization before using this service. If you have not performed initialization yet, see page 18. -
Page 45: Creating And Sending E-Mail
Creating and Sending E-mail Press while the standby screen is displayed. to select "Create New" and press (Select). to select " " (Address) and press (Select). to select "Use Address Book" and press (OK). You can also select the address from "Use Records", or enter the address directly from "Address Entry". - Page 46 to search the address book and press (Detail). to select a desired E-mail address and press (Select). to select " " (Subject) and press (Select). Enter the subject and press (OK). to select " " (Body) and press (Select). Enter the body and press (OK).
- Page 47 Press (Send). After your E-mail has been sent, the screen shown on the right appears.
-
Page 48: Reading Received E-Mail
Reading Received E-mail When you receive an E-mail: (New E-Mail) and the number of messages appears. to select " " and press (Check). to select the folder in which the new E-mail is stored and press (Select). Icons Unread mail :... - Page 49 Viewing Received Photos ■ Perform steps 1 to 3 on page 46 to display Attached data the received E-mail. to select " " and press (Select). The Attachment List is displayed. to select the attached data and press (Receive). Press (Play).
-
Page 50: Replying To Received E-Mail
Replying to Received E-mail Perform steps 1 to 3 on page 46 to display the received mail. Press (Reply). "Re:" is attached to the beginning of the subject and the body of the original E-mail is quoted. to select " "... -
Page 51: Blocking Junk Mails
Blocking Junk Mails To block junk mails, it is recommended to set (Mail Filter). メールフィルター By selecting " (supportive settings)", you can set サポート設定 メールフィ (Mail Filter) easily by answering the Inquiry on the screen. ルター Setting (Mail Filter) ■ メールフィルター... -
Page 52: C-Mail
C-mail C-mail is a service using phone numbers for sending/receiving mails to/from "C-mail" compatible au cellphones. Each message of C-mail can include up to 50 two-byte (100 one-byte) characters. Phone numbers are used for sending/receiving C-mail. Example : 090- -XXXX Via au C-mail can be sent All you have to do is to... -
Page 53: Creating And Sending C-Mail
Creating and Sending C-mail Press for more than one second while the standby screen is displayed. to select "Create New" and press (Select). Enter the body and press (OK). to select " " (Address) and press (Edit). to select "Use Address Book" and press (OK). - Page 54 to search the address book and press (Detail). to select a desired phone number and press (Select). Press (Send). After the C-mail has been sent, the screen shown on the right appears.
-
Page 55: Reading Received C-Mail
Reading Received C-mail When you receive C-mail: (New C-Mail) and the number of messages appears. to select " " and press (Check). The received C-mail is usually stored in the " (Main folder)". メインフォルダ to select the folder in which the new C-mail is stored and press (Select). -
Page 56: What You Can Do With Camera
Camera What You Can Do with Camera W52SA has 1.99-megapixel camera that allows you to shoot photos or movies. The camera has built-in auto focus function. The auto focus function works when you press the shutter key. Photos and movies which you shot can be sent by E-mail. - Page 57 Open your feet to the breadth of your shoulders and maintain your back and sides firm. To Prevent Jiggling Hold W52SA firmly with both hands. Do not move your W52SA after • pressing the shutter key until you hear the shutter sound and the preview screen appears.
-
Page 58: Shooting Photo
The Photo Size is set to "Wallpaper Size" at the time of purchase. Photo Size Title of a photo Where to save year + month + date + time Mobile/Wallpaper/ "Photo Folder" of W52SA Wide Wallpaper Size + minute + serial number "DSC Folder" in microSD™ 0.3M/1M/2M Size SA3A + serial number... -
Page 59: Viewing Photos
Viewing Photos Press while the standby screen is displayed. to select "Data Folder" and press (Select). to select "Photo Folder" and press (Select). to select a folder containing your desired image and press (Select). to select an image and press (Select). -
Page 60: Attaching Photo To E-Mail Message
Attaching Photo to E-mail Message Perform steps 1 and 2 on page 56 to shoot a photo. Press (Mail). to select "Attach to E-Mail" and press (OK). The Create Mail screen appears with the image attached. For the subsequent procedure, see steps 3 to 11 of "Creating and Sending E-mail"... -
Page 61: Ezweb
EZweb subscription required EZweb Application to the EZweb service is required to use the service. Contact au shops or the au Customer Service Center if you did not apply to the service at the time of purchase. Perform the EZweb initialization before using this service. If you have not performed initialization yet, see page 18. -
Page 62: Displaying Ez Top Menu
Displaying EZ Top Menu Press while the standby screen is displayed. Use to select "Top Menu" and press (Select). It may take some time to display the top menu. キーワード検索機能 (Keyword search function) Provides a search engine for information available by the keyword entry. (Search by category) カテゴリで探す... -
Page 63: Bookmarking Frequently-Accessed Site
Bookmarking Frequently-Accessed Site Display the site to bookmark and press (Browser Menu). to select "New bookmark" and press (Select). Press (Reg). Some sites cannot be bookmarked. Information Up to 100 sites can be bookmarked. •... -
Page 64: Accessing Bookmarked Site
Accessing Bookmarked Site Press while the standby screen is displayed. to select "Bookmark(s)" and press (Select). to select a site and press (Jump). Viewing Charge Approximate charges for your calls and transmission can be viewed on EZweb. Press while the standby screen is displayed and press twice. -
Page 65: Downloading Chaku-Uta
® ® Downloading Chaku-Uta /Chaku-Uta-Full Perform step 1 on page 60. to select " (Search カテゴリで探す by category)" and press (OK). to select " 着うた (Chaku-Uta)" or " 着うたフル・ (Chaku-Uta- ビデオクリップ Full and Video Clip)" and press (Select). Select the content (information site) to use and download data. -
Page 66: What You Can Do With Ez Navi
EZweb subscription required EZ Navi What You Can Do with EZ Navi EZ Navi offers convenient location information services (GPS). to select "EZnavi". <Standby Screen> <EZ Service menu> "Passenger Seat Navi (EZ )" for Person on Passenger Seat 助手席ナビ "Passenger Seat Navi (EZ )"... - Page 67 Z06A-2137 Directions Home or to a Shelter During a Disaster: "Evacuate Navi" The area map data that is included in your W52SA can be used to find out the directions to the nearest shelter or to your home (Evacuate Area Map)* You can also download a variety of content from the "Evacuate Navi"...
-
Page 68: What You Can Do With Ez Television (1Seg)
EZweb subscription required EZ Television (1Seg) You can watch the Digital Terrestrial Broadcasting for Mobile Television Service "1Seg" with W52SA. (Broadcasting within Japan is only available.) In addition to the television programs, you can enjoy data broadcasting programs. What You Can Do with EZ Television (1Seg) Watching television programs/data broadcasting programs テレビ操作... - Page 69 ・ FM) to locate the direction for the best reception. When you are indoors, take your W52SA as close to a window as possible. ・ • See the websites below for more detailed information on 1Seg. The Association for Promotion of Digital Broadcasting ...
-
Page 70: Watching Ez Television (1Seg)
Watching EZ Television (1Seg) Press while the standby screen is displayed. Use to select "TV/Radio" and press (Select). Use to select "EZ Television" and press (Select). to select "EZ TV(1Seg)" and press (Select). (Precautions) screen appears. 注意事項 to confirm 注意事項 (Precautions). -
Page 71: Ending Ez Television (1Seg)
to select "OK". Press (Select)) and 選択 press (Select)). 選択 The data reception area and channels are automatically set and one of the broadcast programs appears on the screen. ©KDDI powered by If you select "OK ( 以降確認しない (No further NANO Media Inc. -
Page 72: In Case You Lose Your W52Sa
Setting Remote Ctrl Lock Activation Conditions ■ The Auto Lock, FeliCa Lock and Address Book Restriction functions are activated when your W52SA receives the specified number of calls from the registered phone number within the specified period of time. c414 Press while the standby screen is displayed. - Page 73 (You can apply for the service even after you have lost your phone.) Information Remote Ctrl Lock cannot be activated if your W52SA is not powered on or • in an area with bad reception, or Emission OFF is set to "Valid".
-
Page 74: Ez News Flash
・ You can listen to FM radio with your W52SA. The audio on the FM radio can be recorded. PC Site Viewer This feature enables you to view Internet Web Sites created for PC display. - Page 75 The volume other party's voice. volume setting high of the other party is increased. enough? For detailed information, visit the website of SANYO Electric Co., Ltd. as below. ・ From W52SA : Press for more than one second. (SANYO Keitai Planet, in Japanese only) ...
- Page 76 Index ....E-mail Address 18, 19 ........Change ..............Confirm Accessories ........Enter ......Address Book ......Evacuate Navi ........Edit ...... ® ......EZ apps (BREW Make a Call .............. EZ Navi Walk Register .... EZ Television (1Seg) 17, 66 Register Data from Outgoing Calls/ ........
- Page 77 ... Recording Oneself Style ..Remote Ctrl Lock Setting Mail Ringer ..........Change Type and Volume C-mail ........E-mail ......Mail Filter 5, 49 ........ Main Menu ......Security Code Make Side Key Operation ....Security Lock Service ........ Invalid 6, 17 ......
- Page 78 Pressing zero will connect you to an operator, after calling 157 on your au cellphone. Sales : KDDI CORPORATION • OKINAWA CELLULAR TELEPHONE COMPANY SANYO Electric Co., Ltd. Manufactured by : May 2007 Edition Access the au online manual from here.