Table of Contents
Advertisement
index
manuals
kodak.3106.net >
T h e R e t i n e t t e G u i d e
These web-pages have been scanned and converted from a photocopy of the "Focal
Press" publication "Retinette Guide", 1965 edition. There may be reference to "current"
and "discontinued" models. Obviously all Retinette cameras are now long discontinued,
but For ease of editing if nothing else, all the original text has been retained.
The original book was divided into two sections, effectively an overview and a "green
pages" section covering specific models in more detail. I've not bothered with a green
background to these pages, but hopefully I will have included links where appropriate to
the relevant text.
Table of Contents
The Retinettes
The Retinettes
The Retinettes are miniature cameras producing a negative 1 in. x 1½ in. (24 x 36 mm.) on 35 mm. film. A single
load of film in a standard cassette will take up to 36 exposures. The film can be loaded and unloaded in daylight. The
Retinettes are snapshot cameras for all general photography, especially candid action and other life subjects.
The Retinettes owe their mechanical qualities to the fact that they use the same die-cast body unit and transport
mechanism as their more expensive sister, the Retina series of cameras. The body has a hinged-on back, the lock of
which is covered by a protecting safety latch to prevent accidental opening of the camera. The body itself is rigid
(bellowless), the lens and shutter unit being mounted on the front panel.
The Retinette film track is specially designed to keep the film really flat without risk of scratching the emulsion. The
film is wound on by a transport lever, which with one full swing advances the film to the next frame, and also moves
the film counter and re-tensions the shutter. That system provides an efficient double exposure lock, which can,
however, be circumvented by special deliberate procedures. The film lock, which arrests the film after each frame,
can also be released for advancing the film without exposing it (e.g., when reloading a partly-used film).
The viewfinder in the latest models of all Retinettes is a large bright line-frame reflecting eye-level finder, showing
the image almost in natural size. Previous models of the Retinettes have an optical direct vision finder, showing the
image about three-quarters natural size. The finder is placed centrally above the lens, thus avoiding lateral parallax
errors.
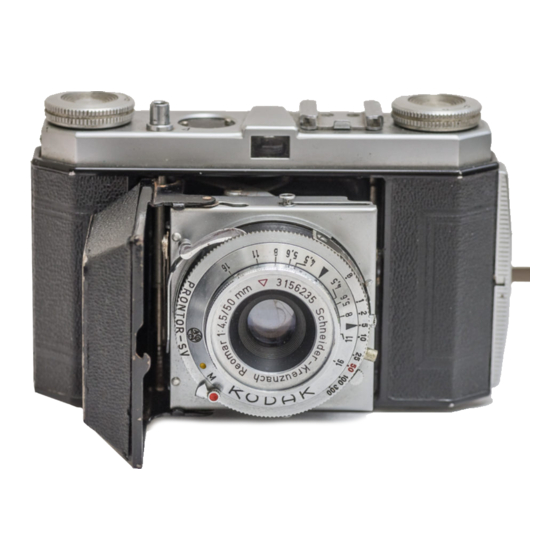
The Reomar f2.8 lens (made by Schneider and by Rodenstock) is fitted on the latest Retinette IA, IB, II, IIA and IIB
cameras, while the Retinette I and earlier IA have an f3.5 Reomar. It is a 3-element triplet with a focal length of 1¾
in. (45 mm.), covering an angle of 51°. It has a front cell focusing mount which can be focused down to 3½ ft.
Definition and colour correction are very good. The optimum performance is reached at f6.3. A depth of field
indicator is fitted.
EARLY RETINETTE CONTROLS
Lens: L1, lens; L4, aperture speed index. Focusing: F1,
focusing mount; F2, distance scale. Shutter: S2, shutter
release; S4, shutter speed scale; S6, light value control;
S8, shutter speed ring; S9, flash socket; S10, cable
release socket (in release button); S13, self-timer lever.
information
b y
m i s c h a
k o n i n g
Advertisement
Table of Contents

Related Manuals for Kodak retinette


Summary of Contents for Kodak retinette
- Page 1 The Reomar f2.8 lens (made by Schneider and by Rodenstock) is fitted on the latest Retinette IA, IB, II, IIA and IIB cameras, while the Retinette I and earlier IA have an f3.5 Reomar. It is a 3-element triplet with a focal length of 1¾...
- Page 2 B3, back lock; B7, tripod bush; B8, accessory shoe with second flash socket. Top: Top view of the Retinette IB, Upper centre: Front view of the Retinette IB, Lower Centre: Rear view of upper part of the Retinette models. Bottom:Front view of top section of the Retinette IA.
- Page 3 Reomar. *RETINETTE II(1958) is similar to the model I, but has a 1¾ in. (45 mm.) Reomar f2.8 lens, automatic depth of field indicator and a film counter built into the body itself (instead of being mounted on top).
- Page 4 Note, however, that only settings from 3½ to 18 are possible in spite of the fact that the scale shows figures down to 2. On the Retinette II and IIB the light values are engraved on the same ring which carries the lever and are set opposite a red arrow head on the shutter speed ring.
- Page 5 On the Retinette II and IIB the light value scale is on the top of the shutter (left) together with the shutter speed settings. The aperture settings are underneath the shutter. On the Retinette and Retinette I the aperture-speed combinations are paired off opposite each other, and the light value scale is at the side of the shutter (right).
- Page 6 Third row: Set the film counter to the diamond mark (Retinette I, IB, left; Retinette II and IIB, centre), press the film release and work the transport lever repeatedly.
- Page 7 On the Retinette II and IIB push the film counter setting button at the right of the viewfinder in the direction of the engraved arrow while pressing the film release button behind the exposure counter window. Keep pushing the setting knob until the diamond mark beside the number 36 in the exposure counter is opposite the notch in the window.
- Page 8 The tripod or ball-and-socket head top screw has to be screwed into the tripod bush in the bottom of the Retinettes. HOLDING Left: Holding the camera for horizontal shots. Right: Holding the Retinette for vertical shots. See also page 18.
- Page 9 Left: To be ready for action all the time, carry the Retinette round the neck on a short strap, preferably in it's ever-ready case. Below: Whenever possible, support your body against something solid, or prop your arms on a fence, railing, or even on your knees when sitting on the ground.
- Page 10 Second row: Select the aperture-speed combination (Retinette I, left; Retinette IB, II and IIB, centre and right). Third row: Set the distance (Retinette and Retinette I, IB, left; Retinette II and IIB, centre), sight the subject in the finder (right).
- Page 11 2. Determine the light value from an exposure meter (built-in on the Retinette IIB) or find it from an exposure table or calculator. Set this on the light value scale of the shutter (see page 10). On the Retinette IB and IIA use the meter as shown on page 51.
- Page 12 6. Close camera back or insert new film. 7. Depress the reversing button in the bottom of the camera. (On pre-1952 Retinette models move the reversing lever below the winding knob to "R".) Wind the rewind knob in the direction of the engraved arrow until all the film is wound back;...
- Page 13 Press film release and wind the rapid wind lever until the required number (the next unexposed frame) appears in the film counter. Early Retinette models and also the latest, have no film release, and you have to cover the lens while advancing the film, exposure by exposure, as you release the shutter each time.
- Page 14 Retinette Films The film for the Retinette cameras is the standard perforated cine film of 35 mm. width, as used in the majority of other 35 mm. cameras. It may be obtained as: DAYLIGHT CASSETTES. These are the simplest form of Retinette film packings. The ready cut and trimmed films for 36 exposures are supplied in cassettes (also called "cartridges or patrones"), which can be loaded in daylight into the...
- Page 15 Loading Retinette Cassettes The Retinette cassette consists of a flanged centre spool which is in a one-piece shell; the film leaves the shell by a light-trapped slot. The centre spool can be removed from the shell by lifting either top or bottom of the cassette according to the construction of the particular make of cassette.
- Page 16 6. Insert centre spool into shell; the first 2 in. of film must extend from the light trap. 7. Close cassette. 2. In the case of bulk film prepare the length to be used as described on page 26. When using darkroom refill remove its wrappings.
- Page 17 CONVERSION OF SPEED SYSTEMS ASA & BS Arith. (New)* (New) 16º 1º 19º 2º 22º 3º 25º 4º 28º 5º 28º 6º 31º 7º 37º 8º 40º 1600 9º 43º * Also Weston III and later meters. The above speed figures are based on the latest ASA Standard for film speeds (and on the BS and DIN Standards under revision).
- Page 18 Some of these conversion filters for reversal film (Wratten) are supplied in the original filter range for the Retinettes. There is also a Kodak Skylight haze filter for daylight-type film which is used to reduce the blue haze in distant landscape shots.
- Page 19 Agfacolor CT18 Daylight Agfacolor CK20 Artificial light Anscochrome 50 Daylight Anscochrome T100 Artificial light Anscochrome 100 Daylight Anscochrome 200 Artificial light Ektachrome E2 Daylight Ektachrome X Daylight H.S. Ektachrome Daylight H.S Ektachrome B Artificial light Ferraniacolor Daylight Ferraniacolor Artificial light Ferraniacolor Dia 28 Daylight Fujicolor...
- Page 20 There remains the interplay of aperture and focusing distance. Their effect can be read off a depth of field calculator engraved on the front of the shutter of the Retinette I, IA, IB and earlier models.
- Page 21 8 ft. it only extends from about 6 to 11 ft. The Retinette II and IIB models have an automatic depth of field indicator, consisting of two pointers coupled to the aperture setting.
- Page 22 Close-Up Work with the Retinette While the Retinette cameras focus down to 3½ ft. you can work at still shorter distances with the aid of close-up supplementary lenses or the Kodak close-up rangefinder with supplementary Kodak N-lenses. Thus it becomes possible to cover small objects such as blossoms, insects, coins, etc., and also to copy documents, drawings and the...
- Page 23 Right: The close-up rangefinder fits into the accessory shoe of the camera and is used with a set of N supplementary lenses (page 44). Left: The table stand is a useful camera support for close-ups. The height of the column is adjustable in the sleeve. A right-angle head can replace the ball-and-socket head to direct the camera rigidly downwards for copying.
- Page 24 CLOSE-UP FOCUSING FOR +1, +2, +3, DIOPTER LENSES With +1 Diopter With +2 Diopter With +3 Diopter Set Distance on Lens, the Distance Lens, the Distance Lens, the Distance Focusing Mount from Front of Lens from Front of Lens from Front of Lens to subject is: to subject is: to subject is:...
- Page 25 PHOTO-ELECTRIC EXPOSURE METERS. They are the most accurate and dependable means available for arriving at the right exposure time. A photo-electric exposure meter is built into the Retinette IIA and IIB cameras. The Built-in Meter of the Retinette IB and IIA...
- Page 26 The exposure meter of the Retinette IB and IIA is coupled to the speed and aperture setting of the shutter (p. 12). 1. Set film speed. 2. Set shutter for daylight operation. 3. Aim camera and set exposure. 1. Set the film speed on the shutter in ASA or DIN.
- Page 27 1/500 1/250 1/125 The Built-in Exposure Meter of the Retinette IIB The Retinette IIB is fitted with a built-in exposure meter which gives the correct light value (see page 10). To use the meter: 1. Set film speed. 2. Point camera to subject.
- Page 28 THE EXPOSURE METER OF THE RETINETTE IIB Left: The Retinette IIB has a photo-electric exposure meter built- In. On the top is a setting knob with an inner disc for setting film speeds. Next to it, a meter needle is visible in a window, together with a setting pointer operated by the setting knob.
- Page 29 Filter factor compensation on Retinette IIA The filter factor is allowed for on the Retinette IIA by reducing the film speed setting before taking the measurement with the exposure meter (page 51), by the number of graduations indicated in the table above.
- Page 30 With electronic flash units any speed up to 1/500 sec. can be set. With the Retinette IIA Prontomat, ordinary flash bulbs and electronic flash may be used. For setting see page 12. The Prontor SV and S shutter fitted to Retinette models made between 1951 and 1953 has adjustable synchronization, controlled by a lever next to the flash socket.
- Page 31 To find the correct aperture to use, divide the guide number by the distance between the flash and the subject. For instance, suppose you find that the guide number of the bulb with the film in use is 160. If you then want to take a photograph at a distance of 10 ft.
- Page 32 Mischa Koning. Such republication includes inclusion of this work in other Web sites, Web pages, FTP archives, books, magazines or other periodicals, CD-ROM and DVD-ROM compilations or any other form of publication or distribution. kodak.3106.net copyright © mischa koning 2006...
Need help?
Do you have a question about the retinette and is the answer not in the manual?
Questions and answers