
Related Manuals for Melitta CAFFEO LATTEA


Summary of Contents for Melitta CAFFEO LATTEA
- Page 1 Version 2.0 09/2011 Bedienungsanleitung Gebruiksaanwijzing Melitta Haushaltsprodukte Operating Instructions Manual de Instrucciones GmbH & Co. KG Guide d’utilisation Istruzioni per l‘uso D-32372 Minden...
- Page 3 ® ® ® experience plenty of special coffee moments. Enjoy your favourite coffee specialities and indulge yourself with all your senses. In order that you and your guests can enjoy the Melitta CAFFEO LATTEA ® ® ®...
-
Page 4: Table Of Contents
Adjusting the dispensed quantity.............. 50 Adjusting the coffee strength ..............50 5 Switching on and off ................51 Switching on the appliance............... 51 Switching off the appliance ............... 51 6 Inserting the Melitta Claris water filter ..........52 ® ® 7 Preparing espresso or café crème ............54 Preparing one cup of espresso or café... - Page 5 10 Function settings ...................58 10.1 Water hardness ..................58 10.2 Energy-saving mode ................59 10.3 Auto-OFF function ..................60 10.4 Brewing temperature ................61 10.5 Resetting the appliance to the default settings......... 62 10.6 Grinding fineness ..................63 11 Care and maintenance................64 11.1 General cleaning ..................
-
Page 6: Information About These Operating Instructions
For a clearer overview, unfold the fold-out pages on the front and back of these operating instructions. Symbols in the text of these operating instructions The symbols in these operating instructions indicate specific hazards associated with operating your Melitta CAFFEO LATTEA , or provide you with useful tips. -
Page 7: Intended Use
LATTEA within the operating ® ® ® conditions specified in these operating instructions. Non-intended use Non-intended use is defined as using the Melitta CAFFEO LATTEA in a manner ® ® ® that differs from the use described in these operating instructions. -
Page 8: General Safety Instructions
– Only use this appliance if it is in faultless condition. – Never attempt to repair the appliance yourself. If repairs are necessary, contact the Melitta Service Hotline only. ® – Do not make any alterations in or on the appliance, on its components or on the supplied accessories. -
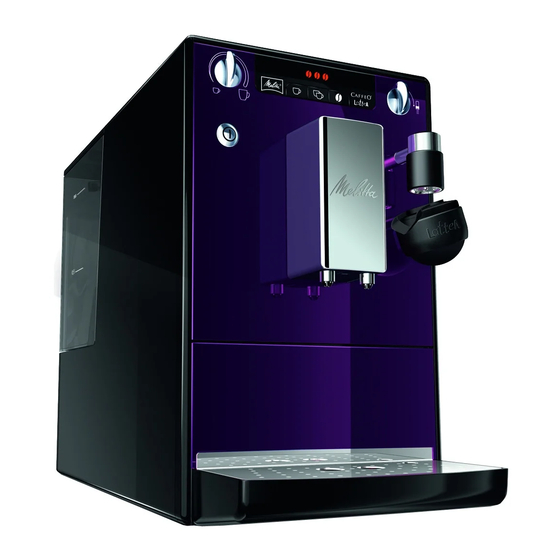
Page 9: Appliance Description
Appliance description Legend for Fig. A Fig. number Explanation Drip tray with cup plate and coffee grounds container (internal) along with float (indicator for full drip tray) Height-adjustable outlet ON /OFF button Coffee quantity regulator Button for one-cup dispensing Button for two-cup dispensing Water tank Bean container Button for coffee strength... -
Page 10: Display
Display Symbol Meaning Display Explanation/prompt Appliance is heating up or coffee Flashing dispensing process is running. Standby The appliance is ready for Illuminated operation. Change the Melitta Claris water ® ® Illuminated Melitta Claris ® ® filter water filter Flashing... -
Page 11: Starting Up
Place the appliance on a stable, level, and dry surface. Make sure that there is a distance of 10 cm to the wall and other objects. • The Melitta CAFFEO LATTEA has two rollers on the back side of the ®... -
Page 12: Connecting
Connecting • Plug the power cable into an appropriate power socket. Warning! Danger of fire and electric shock due to incorrect supply voltage, incorrect or damaged connections and power cord. – Make sure that the supply voltage corresponds to the supply voltage specified on the identification label of the appliance. -
Page 13: Filling The Water Tank
Caution! The appliance may only be vented without the Melitta Claris water filter and ® ®... -
Page 14: Adjusting The Dispensed Quantity
• When water is no longer running out of the outlet and the symbol for the milk shower is illuminated, turn the rotary switch for the milk shower anti-clockwise to close the milk shower. → The appliance is ready for operation. Adjusting the dispensed quantity •... -
Page 15: Switching On And Off
Switching on and off Switching on the appliance Note The appliance performs an automatic rinse every time it is switched on. • Place a vessel below the outlet. • Press the ON/OFF button to switch the appliance on. → The standby symbol is flashing. -
Page 16: Inserting The Melitta ® Claris ® Water Filter
Inserting the Melitta Claris water filter ® ® A Melitta Claris water filter is supplied with the appliance for filtering out limescale ® ® and other contaminants. Please only insert it after starting up the appliance for the first time. If you use the filter, you will have to descale the appliance less frequently and the water hardness will automatically be set to hardness level 1 (see page 58). - Page 17 The Melitta Claris water filter should not remain dry over an extended ® ® period of time. We therefore recommend storing the Melitta Claris water ® ® filter in the refrigerator in a glass of water when the appliance will not be in use for extended periods.
-
Page 18: Preparing Espresso Or Café Crème
Preparing espresso or café crème Preparing one cup of espresso or café crème Prerequisite: The appliance must be ready for operation (see „Switching on and off“ on page 51). • Place a suitable vessel under the outlet. • Press the button for coffee strength to adjust the coffee strength. -
Page 19: Preparing Two Cups Of Espresso Or Café Crème
Preparing two cups of espresso or café crème Prerequisite: The appliance must be ready for operation (see „Switching on and off“ on page 51). Place two suitable vessels beside each other under the outlet. • Press the button for coffee strength to adjust the coffee strength. -
Page 20: Preparing Milk Froth
Preparing milk froth Prerequisite: The appliance must be ready for operation (see „Switching on and off“ on page 51). Place a vessel (e.g. a latte macchiato glass) under the milk canister. • Remove the milk canister and fill it with the milk2shower milk powder. •... -
Page 21: Preparing Hot Water
Preparing hot water Prerequisite: The appliance must be ready for operation (see „Switching on and off“ on page 51). Take off the milk canister and place a tall vessel under the milk shower. • Turn the rotary switch for the milk shower (Fig. A, no. 11) clockwise to open the milk shower. -
Page 22: Function Settings
Use the test strip provided to determine the water hardness in your area. Please comply with the instructions on the test strip packaging. Water hardness is set at 4 in the factory. If you have inserted the Melitta Claris water filter, water hardness 1 ®... -
Page 23: Energy-Saving Mode
• Press the ON/OFF button to confirm the selected water hardness. → All symbols on the display flash briefly as confirmation. The appliance is ready for operation, the standby symbol is illuminated. Note During the adjusting process, if you do not press a button within 60 seconds the appliance automatically reverts to standby mode. -
Page 24: Auto-Off Function
Display Time 5 minutes (factory setting) 15 minutes 30 minutes flashing • Press the ON/OFF button to confirm the selected time. → All symbols in the display flash briefly for confirmation. The appliance is ready for operation, the standby symbol is illuminated. -
Page 25: Brewing Temperature
→ Press the coffee strength button several times to select from four possible times for the timer. Display Time 1 hour (factory setting) 2 hours 4 hours 8 hours flashing • Press the ON/OFF button to confirm the selected time. →... -
Page 26: Resetting The Appliance To The Default Settings
Display Brewing temperature medium (factory setting) high • Press the ON/OFF button to confirm the selected brewing temperature. → All symbols in the display flash briefly as confirmation. The appliance is ready for operation, the standby symbol is illuminated. 10.5 Resetting the appliance to the default settings Prerequisite: The appliance must be ready for operation (see „Switching on and off“... -
Page 27: Grinding Fineness
10.6 Grinding fineness The grinding fineness level was optimally adjusted prior to delivery. Consequently, we recommend that you only readjust grinding fineness after dispensing approximately 1,000 coffees (about 1 year). You can only set the grinding fineness while the mill is running. Thus, adjust grinding fineness directly after coffee dispensing starts. -
Page 28: Care And Maintenance
Care and maintenance 11.1 General cleaning • Clean the outside of the appliance with a soft, damp cloth and ordinary dishwashing liquid. • Empty and clean the drip tray (Fig. A, no. 1) regularly; at the latest, however, when the float projects out of the cup plate. •... -
Page 29: Cleaning The Brewing Unit
11.2 Cleaning the brewing unit Prerequisite: The appliance must be switched off (see „Switching on and off“ on page 51). Note For optimal protection of your appliance, we recommend that you clean the brewing unit under running tap water once a week. •... -
Page 30: Integrated Cleaning Programme
– Only use Melitta cleaning tabs for fully automatic coffee makers. ® These cleaning tabs are specifically designed for the Melitta CAFFEO ® ® LATTEA . The use of other cleaning agents can damage the appliance. - Page 31 6 Press and hold the red button on the handle of the brewing unit (Fig. B, no. 1) and turn the handle clockwise to the stop (approximately 75°). 7 Use the handle to pull the brewing unit out of the appliance. →...
- Page 32 16 Press the button for coffee strength to continue with the integrated cleaning programme. → The integrated cleaning programme continues. This stage lasts approximately 5 minutes. Water flows out of the outlet as well as in the interior of the appliance into the drip tray. Subsequently, the symbol for the drip tray illuminates.
-
Page 33: Integrated Descaling Programme
® LATTEA ® – Never use vinegar or other descaling agents. Run the integrated descaling programme as follows: 1 Before descaling, remove – if in use – the Melitta Claris water filter ® ® from the water tank. 2 Remove the milk canister. - Page 34 7 Add the descaling agent (e.g. Melitta ANTI CALC Espresso Machines ® liquid descaling agent) to the water tank according to the instructions on the packaging. Warning! The descaling agent can cause skin irritations Comply with the safety instructions and the dosing information specified on the descaling agent packaging.
- Page 35 18 Empty the drip tray and then reinsert it. → The standby symbol is illuminated after a brief heat-up phase. The appliance is ready for operation. 19 Reinsert the Melitta Claris water filter into the water tank. ® ®...
-
Page 36: Transport And Disposal
This also protects the appliance against frost damage. Prerequisite: The appliance must be ready for operation (see „Switching on and off“ on page 51). Take the Melitta Claris water filter out of the water tank. ®... - Page 37 The Melitta Claris water filter should not remain dry over an extended period ® ® of time. We therefore recommend storing the Melitta Claris water filter in ® ® the refrigerator in a glass of water when the appliance will not be in use for extended periods.
-
Page 38: Troubleshooting
Troubleshooting Problem Cause Solution Coffee only drips Grinding fineness is too Set the grinding fineness through. fine. coarser. Clean the brewing unit. Run the integrated descaling programme, if necessary. Run the integrated cleaning programme, if necessary. Coffee does not Water tank not filled or Fill the water tank and make flow. - Page 39 ON/ OFF button ; if this does not solve the problem, send in the appliance to be serviced. Please contact the Melitta hotline, if the above mentioned solutions do not help to ® solve the problem: +49 571/ 86 1900.
Need help?
Do you have a question about the CAFFEO LATTEA and is the answer not in the manual?
Questions and answers