Advertisement
Available languages
Available languages
Quick Links
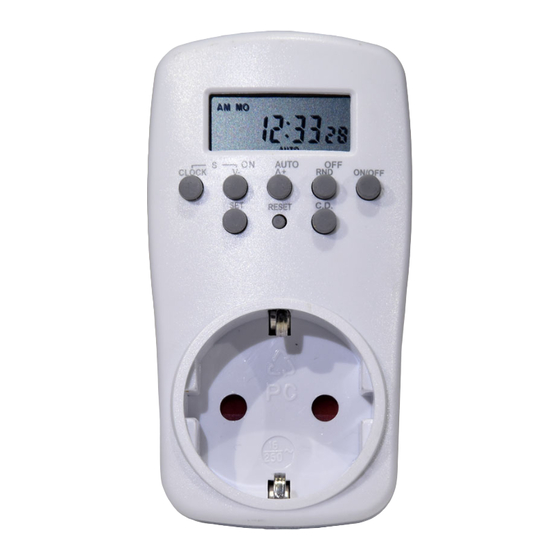
Digital Timer Switch
Art.no 18-2029/18-2175 Model EMT757-UK
36-2901/36-3979
EMT757
Please read the entire instruction manual before use and save it for future reference. We reserve
the right for any errors in text or images and for making any necessary technical changes to this
document. If you should have any questions concerning technical problems please contact our
Customer Services.
1. Product description
•
Digital timer switch with 20 on/off operations.
•
Countdown.
•
Random function (random on and off).
•
LCD display.
•
Safety shutters
Buttons and functions
1.
2.
1
6
3.
2
7
3
4.
8
4
5.
9
5
6.
10
7.
8.
11
9.
10. [ RESET ] – Press one time to
11. Connector for plug.
2. Operation
2.1 Time display
The clock is showing 12 or 24 hour display. To change between 12 and 24 hour display, press
and hold [ CLOCK ] until the time format on the display changes.
•
In 12-hour display, either "AM" or "PM" is shown on the display.
•
In 24-hour display, neither "AM" nor "PM" is shown on the display.
2.2 Setting the time
Note: The timer switch must be in normal (time display) mode in order for time and day settings
to be made. Press [ CLOCK ] to return to normal mode.
1.
Press and hold [ SET ] until the week indicator flashes.
2.
Press [ ▲+ ] to change the day of the week forwards, or [ ▲- ] to change it backwards.
The selected week day is shown on the display.
3.
Push [ SET ] to confirm. The hour setting flashes on the display
4.
Use [ ▲+ ] and [ ▼- ] to set the hours.
5.
Push [ SET ] to confirm. The minute setting flashes on the display.
GREAT BRITAIN • for consumer contact, please visit www.clasohlson.co.uk and click on customer service.
6.
Use [ ▲+ ] and [ ▼- ] to set the minutes.
7.
Press [ CLOCK ] to return to normal mode.
2.3 Setting Summer Time
Press [ CLOCK ] and [ ▼- ] at the same time to switch between Summer Time and standard time.
"S" is shown on the display to indicate Summer Time.
2.4 Setting programmes
1.
Make sure that the display is in normal mode.
2.
Press [ ON/OFF ] to set the timer switch to AUTO ("auto" appears at the bottom of the display).
3.
Press [ ▲+ ] to enter the programming mode ("1ON" appears in the bottom left corner of
the display). "1" indicates programme 1 of 20.
4.
Set the on/off operation for programme 1 (where "ON" is the activation time and "OFF" is
the deactivation time).
a.
Press [ SET ].
b. All the days of the week flash on the display (MO TU WE TH FR SA SU). Press [ SET ]
to confirm that the programme is for every day of the week. The activation days can be
altered as desired*.
c.
The hour setting flashes on the display. Use [ ▲+ ] and [ ▼- ] to set the hour of
activation. Push [ SET ] to confirm.
d. The minute setting flashes on the display. Use [ ▲+ ] and [ ▼- ] to set the minutes.
Push [ SET ] to confirm.
LCD display
e.
Press [ ▲+ ] to programme the deactivation time, "1OFF" appears in the bottom left
[ ▼- ] – Adjusts time, week, and
corner of the display. Set the time in the same way as you did earlier.
program group.
f.
Continue in the same way for all the required on/off operations (up to 20 can
"S" – Press [ CLOCK ] and
be programmed).
[ ▼- ] simultaneously to switch
between Summer Time and
* Use [ ▲+ ] to change the days of the week before confirming by pressing [ SET ]. The following
standard time.
combinations of days can be chosen:
[ CLOCK ] – Press to return to
•
MO TU WE TH FR SA SU (every day of the week)
normal mode (time).
MO → TU → WE → TH → FR → SA → SU (choose one of the days)
•
[ SET ] – Sets time and week day
•
MO WE FR (Monday, Wednesday and Friday)
and also confirms settings.
•
TU TH SA (Tuesday, Thursday and Saturday)
[ ▲+ ] – Adjusts time, week, and
•
SA SU (Saturday and Sunday)
program group.
•
MO TU WE (Monday to Wednesday)
[ RND ] – Randomly activates on
•
TH FR SA (Thursday to Saturday)
and off when the timer switch is
•
MO TU WE TH FR (Monday to Friday)
in AUTO mode.
•
MO TU WE TH FR (Monday to Saturday)
[ ON/OFF ] – Changes function
on the timer switch: ON, AUTO
To delete individual programmes
or OFF.
[ CD ] – Starts or stops
Press [ ▲+ ] and [ ▼- ] to come to the programme which is to be deleted. Then press [ ON/OFF ]
the countdown function when
to delete, the display will show - - : - - when the programme has been deleted. Press [ CLOCK ]
to confirm the deletion.
the timer switch is in AUTO mode.
reset the timer switch to factory
2.5 Display programmed times
settings.
Use [ ▲+ ] and [ ▼- ] to browse the programmed times.
2.6 Countdown function
Set the countdown time
The countdown interval is from 1 second to 99 hours, 59 minutes and 59 seconds.
1.
With the display in normal mode, press [ ▼- ] to enter the programming mode for
the countdown function. "d ON" or "d OFF" will appear on the display. "d" indicates that
the countdown function is activated.
2.
Press [ SET ] until "ON" or "OFF" flashes on the display.
3.
Use [ ▲+ ] and [ ▼- ] to switch between ON or OFF.
ON if the timer switch is e.g. to turn a light on after the countdown.
OFF if the timer switch is e.g. to turn a light off after the countdown.
4.
Push [ SET ] to confirm. The hour display will start to flash.
5.
Use [ ▲+ ] and [ ▼- ] to set the hours.
6.
Push [ SET ] to confirm. The minutes display will begin flashing.
7.
Use [ ▲+ ] and [ ▼- ] to set the minutes.
8.
Push [ SET ] to confirm. The seconds flash.
9.
Use [ ▲+ ] and [ ▼- ] to set the seconds.
10. Push [ SET ] to confirm and then push [ CLOCK ] to return to normal mode.
2.7 Starting the countdown
1.
Set the countdown time according to the instructions above.
2.
Connect the device to the timer switch and connect the timer switch to a wall socket.
3.
Press [ ON/OFF ] to set the timer switch in AUTO mode.
4.
Press [ CD ] to begin the countdown. "d ON" or "d OFF" flashes on the display depending
on what has been programmed.
5.
Push [ CD ] again to start the countdown function.
6.
When the countdown has come to 00:00:00, the controlled device (e.g. lamp) turns on or
off depending on what has been programmed.
2.8 Random on and off
1.
Connect the device to the timer switch and connect the timer switch to a wall socket.
2.
Press [ ON/OFF ] to set the timer switch to AUTO mode.
3.
Push [ RND ], "r OFF" flashes on the display. The voltage is now switched off for
26 to 42 minutes before it comes on again at random. The voltage will then be on for
10 to 26 minutes.
4.
To deactivate the function, press [ RND ] once again. "r OFF" or "r ON" will now disappear
from the display.
Note: The random on/off function does not work continuously:
it only works between the programmed on and off times.
2.9 Turning the switch on and off manually
Push [ ON/OFF ] to manually activate or deactivate the timer switch.
•
ON – The voltage turns on regardless of the setting and the connected device can be used.
•
AUTO – The timer switch operates in accordance with the programmed times.
•
OFF – The voltage turns off and the connected device cannot be used.
3. Safety
•
The timer switch is intended for use indoors and may not be used outdoors!
•
Devices connected to the timer switch must be constructed for the same voltage
specified below.
•
The built-in batteries are fully charged after approx. 2 hours use.
4. Troubleshooting
Display is blank:
Plug the timer switch into a wall socket and press [ RESET ] to reset it.
5. Disposal
Follow local ordinances when disposing of this product.
If you are unsure how to proceed, contact your local authority.
6. Specifications
Mains supply
230 V AC, 50 Hz
Max load
2000 W (8.7 A)
Operating temperature
0–55 °C
Protection class
IP20
Minimum time interval
1 minute
Advertisement

Related Manuals for Clas Ohlson EMT757-UK


Summary of Contents for Clas Ohlson EMT757-UK
-
Page 1: Troubleshooting
Press [ CLOCK ] to return to normal mode. Set the countdown time according to the instructions above. Connect the device to the timer switch and connect the timer switch to a wall socket. Art.no 18-2029/18-2175 Model EMT757-UK 2.3 Setting Summer Time Press [ ON/OFF ] to set the timer switch in AUTO mode. - Page 2 Tryck på [ CLOCK ] för att återgå till normalläge. Anslut apparaten till kopplingsuret och sätt kopplingsuret i ett vägguttag. Art.nr 18-2029/18-2175 Modell EMT757-UK Tryck på [ ON/OFF ] för att sätta kopplingsuret i läge AUTO. 2.3 Sommartidsinställning Tryck på [ CD ] för att starta nedräkningsfunktionen. ”d ON” eller ”d OFF” blinkar i displayen...
- Page 3 Det ønskede apparatet kobles til koblingsuret og koblingsuret til strømnettet. 2.3 Sommertidsinnstilling Art.nr. 18-2029/18-2175 Modell EMT757-UK Trykk på [ ON/OFF ] for å stille koblingsuret i AUTO-modus. Trykk på [ CD ] for å starte nedtellingsfunksjonen. «d ON» eller «d OFF» blinker på skjermen, Trykk på [ CLOCK ] og [ ▼- ] samtidig for å skifte mellom normaltid og sommertid.
- Page 4 Siirry normaalitilaan painamalla [ CLOCK ]-painiketta. Liitä laite ajastimeen ja aseta ajastin pistorasiaan. Tuotenro 18-2029/18-2175 Malli EMT757-UK Aseta ajastin AUTO-tilaan painamalla [ ON/OFF ]. 2.3 Kesäajan asetus Aloita lähtölaskenta painamalla [ CD ]. Näytöllä vilkkuu ”d ON” tai ”d OFF”, riippuen siitä,...
Need help?
Do you have a question about the EMT757-UK and is the answer not in the manual?
Questions and answers