Table of Contents
Advertisement
Quick Links
Advertisement
Table of Contents

Related Manuals for Moffat MDB900


Summary of Contents for Moffat MDB900
-
Page 2: Table Of Contents
General information and tips Environmental information Contents Important safety instructions Product description Controls and their functions Before first use Grill and oven furniture The electronic timer The dual grill Grilling chart The top oven The main oven Oven cooking chart... -
Page 3: Child Safety
• Never place plastic or any other material which may melt in or on the oven. • Always support the grill pan when it is in the withdrawn or partially withdrawn position. -
Page 4: Cleaning And Maintenance
• Stand clear when opening the drop down oven door. Do not allow it to fall open - support it using the door handle, until it is fully open. -
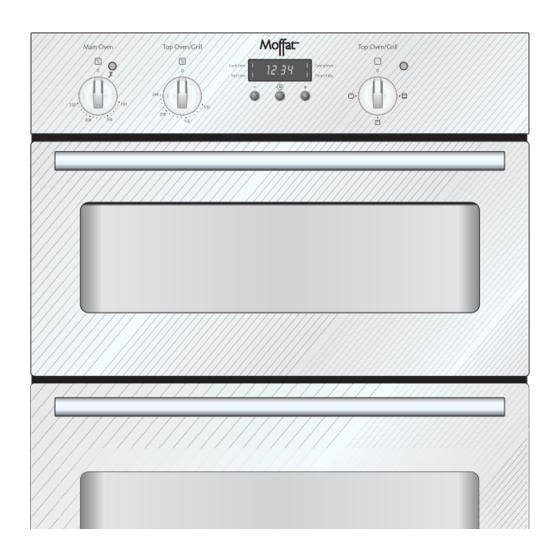
Page 5: Product Description
Product description... -
Page 6: Controls And Their Functions
Controls and their functions... -
Page 7: Preparing To Use Your Appliance
Preparing to use your appliance • Wipe over the base of the oven(s) with a soft cloth using hot soapy water. Wash the furniture before use. • We suggest that you run the oven(s) and grill for 10 –... -
Page 8: Grill And Oven Furniture
Grill and oven furniture • The following items of grill and oven furniture have been supplied with the appliance. If you require replacements of any of the items listed below please contact your local service force centre. 1 grill pan... -
Page 9: The Electronic Timer
0.00 If the appliance is switched off on the wall, or there is a loss of power, the clock will stop and you will not be able to use the main oven. If necessary press the The time indicator... - Page 10 0.00 is reached. Setting the oven timer control Only the main oven can be automatically timed. When using the timer control for the very first time, it is advisable to let it operate while you are at home.
- Page 11 Control button until required stop time is the 'End Time' displayed. indicator neon flashes. Place food in oven. If necessary press the Release the buttons. decrease control until The cook time the correct time indicator neon will be interval is achieved.
- Page 12 Set the main oven control to the required temperature. The oven indicator neon should be off. To set the timer to switch off only Ensure the electricity supply is switched on and that the correct time of day is displayed.
-
Page 13: Automatic Cooking
Automatic cooking It is advisable to leave food in the oven for as short a time as possible before automatic cooking. Always ensure commercially prepared food is well within its use by date and that home prepared food is fresh and of good quality. -
Page 14: The Dual Grill
The grill door must be left open when grilling. Things to note • The oven light will illuminate. To turn off the grill Turn the top oven/grill temperature control knob to the off position. -
Page 15: The Grill Pan And Handle
The grill pan and handle The grill pan has a removable handle. Attach and remove as described below To attach. Place the Slide the handle to the wirework under the left and over the cut out in the pan so central bump on the that the metal plate grill pan. -
Page 16: Grilling Chart
Grilling chart FOOD Bacon Rashers Beef Burgers Chicken Joints Lamb Chops Pork Chops Whole Trout/Mackerel Plaice/Cod Fillets Kebabs Kidneys – Lamb/Pig Liver – Lamb/Pig Sausages Steak – Rare Steak – Medium Steak – Well Done Toasted Sandwiches The times quoted above are given as a guide and should be adjusted to suit personal taste. -
Page 17: The Top Oven
The top oven The top oven is the smaller of the two ovens. It is designed for cooking smaller quantities of food. Place single dishes on the centre of the shelf. The top oven is also ideal for use as warming compartment to warm dishes and keep food hot. -
Page 18: To Fit The Top Oven Shelf
• Do not place baking trays directly on the oven base as it interferes with the oven air circulation and can lead to base burning; use the lower shelf position. •... -
Page 19: To Fit The Main Oven Shelves
For recipes needing high temperatures, e.g. bread, pastries, scones, soufflés etc., best results are achieved if the oven is preheated first. For best results when cooking frozen or cooked chilled ready meals always preheat the oven first. -
Page 20: Things To Note
• The oven fan will operate. • If an automatic programme has been set, the oven fan and light do not come on until cooking begins. Hints and tips • Arrange the shelves in the required positions before switching the oven on. -
Page 21: Oven Cooking Chart
Oven cooking chart The oven temperatures are intended as a guide only. It may be necessary to increase or decrease the temperatures by to suit individual preferences and requirements. Food Biscuits Bread Bread rolls/buns Small / Queen Cakes Sponges Victoria Sandwich... - Page 22 Puddings Note: Shelf positions are counted from the bottom of the oven. Note: Main oven shelf positions are not critical but ensure that they are evenly spaced when more than one is used. * = Shelf on the oven base Main oven Temp °C...
-
Page 23: Roasting Chart
Roasting chart Meat Beef/ Beef boned Mutton/Lamb Pork/Veal/Ham Chicken Turkey/Goose Duck Pheasant Rabbit INTERNAL TEMPERATURES – Rare: 50-60°C; Medium: 60-70°C; Well done: 70-80°C The roasting temperatures and times given in the chart should be adequate for most joints, but slight adjustments may be required to allow for personal requirements and the shape and texture of the meat. -
Page 24: Using Defrost
5 hours. Remove the giblets as soon as possible during the thawing process. Things to note • The oven fan and internal oven light will come on. To turn defrost off Turn the main oven temperature control knob to the off position. -
Page 25: Cleaning Materials
Cleaning inside the ovens • The vitreous enamel coating in the grill/top oven and main oven compartments can be cleaned using normal oven cleaners with care. Ensure that the manufacturers instructions are followed and that all parts... -
Page 26: Cleaning The Top Oven Roof
3. Gently pull the element downwards to allow access to the oven roof. Do not force the element downwards. 4. Clean the top of the oven with cream cleaner and a sponge scourer. If heavily soiled, aerosol oven cleaners may be used following the instructions for cleaning the grill / top oven compartment. -
Page 27: To Clean The Inner Glass Door
• All removable parts, except the grill pan handle can be washed in the dishwasher. • The grill pan, grill pan grid and oven shelves may be cleaned using a soap impregnated steel wool pad. Soaking first in hot soapy... -
Page 28: Replacing An Oven Light Bulb
• Make sure the appliance is cool before replacing the bulb. • Open the oven door and remove the shelves and wirework runners. • Pull the glass bulb cover towards you and then pull it off. If necessary, use a screwdriver to carefully lever off the cover, taking care not to damage the oven cavity. -
Page 29: Troubleshooting
PROBLEM The grill, ovens and timer do not work. The grill and top oven work but the main oven does not. The grill does not work or cuts out after being used for a long period of time. -
Page 30: Technical Details
Technical details Voltage Power consumption Height: Width: Depth: Weight: This appliance complies with: European Council Directive 73/23/EEC. EMC Directive 89/336/EEC. CE Marking Directive 93/68/EEC. Energy Label Directive 2002/40/EC. Environment After installation please dispose of the packaging with due regard for safety and the environment. -
Page 31: Installation Instructions
(Recommended cabinet dimensions). • If your cabinet interior dimension is between 565- 570mm the oven may still be fitted. However, a minor modification to the cabinet will be required to reduce the aperture size down to 560-565 mm, to allow the product to be securely screwed into the cabinet. -
Page 32: Preparing Cabinet For Fitting Of Oven
Having a double pole isolating switch with at least 3mm contact separation in all poles and neutral. c) If you wish to connect an oven and a hob to a cooker point you can by connecting the oven and hob separately to the cooker point. - Page 33 Recommended cabinet dimensions (mm)
-
Page 34: How To Finish Unpacking
Installation instructions continued How to finish unpacking • Place packed appliance next to the space in which it will be installed. • Remove the appliance packing except for bottom tray, which should be left in position until the appliance is ready to be fitted into its cabinet. -
Page 35: Fitting Into The Cabinet
Fitting into the cabinet Ensure that the oven is switched off at the wall before any further work is carried out. • Using a tape measure establish the internal width of the cabinet. - Page 36 Two people will be required to carry out the lifting procedure. Do not attempt to lift this appliance by the handle(s). • Each person should squat either side of the appliance. • Tilt the appliance so that your hands can support the underside of the appliance.
-
Page 37: Customer Care Department
Customer care department For general enquires concerning your Moffat appliance or for further information on Moffat products, please contact our customer care department by letter or telephone at the address below. -
Page 38: Standard Guarantee Conditions
Guarantee conditions Standard guarantee conditions We, Moffat, undertake that if within 12 months of the date of the purchase this Moffat appliance or any part thereof is proved to be defective by reason only of faulty workmanship or materials, we will, at our option repair or replace the same... -
Page 39: European Guarantee
European guarantee This appliance is guaranteed by Electrolux in each of the countries listed below for the period specified in the appliance guarantee or otherwise by law. If you move from one of these countries to another of the countries listed below the appliance guarantee will move with you subject to the following qualifications: - •... - Page 40 Italia +39 (0) 434 558500 Latvija +37 17 84 59 34 Lituania +370 5 27 80 609 Luxembourg +35 2 42 43 13 01 Magyarország +36 1 252 1773 Nederland +31 17 24 68 300 Norge +47 81 5 30 222 Österreich +43 18 66 400 Polska...
- Page 41 Notes...
- Page 42 Notes...
- Page 43 Notes...
- Page 44 www.electrolux.com www.tricity-bendix.co.uk...
Need help?
Do you have a question about the MDB900 and is the answer not in the manual?
Questions and answers