
Related Manuals for RIKA Cult


Summary of Contents for RIKA Cult
-
Page 1: Operating Instructions
This Manual Must Always be Available to the Stove Operator Operating Instructions Rika Cult,Eco,Fox,Tara, Twist, Vitra & Cult Plus & Eco Plus Wood Burning Stove IN1217 Edition 2 February 2012 PART NUMBER SERIAL NUMBER... -
Page 2: Table Of Contents
Contents The Model Range Explained ....................4 Model Identification ......................4 Wood Stoves ........................5 Wood ..........................5 Choice of Logs .........................6 Stove Construction ......................7 Manual Control ........................8 The Grate ........................9 Ash Removal .........................10 First Lighting of the Stove .....................11 Curing ...........................11 Stone Finish ........................11 First Firing ........................11 General Lighting and Operation ...................12 Lighting with the RIKATRONIC Control ................14... - Page 3 IMPORTANT The installation of this appliance must comply with all local regulations, including those referring to national and European Standards before it can be operated. The stove is not suitable for a shared flue. Improper adjustment, alteration, maintenance or the fitting of replacement parts not recommended by the manufacturer can cause injury or property damage.
-
Page 4: The Model Range Explained
This operating manual offers user information for the range of RIKA: CULT, ECO, FOX, TARA,TWIST and VITRA. Also the CULT PLUS and ECO PLUS with the Rikatronic Control. -
Page 5: Wood Stoves
Wood Stoves Gas and oil are consistent fuels and stoves can be designed to obtain the maximum heat from them with the user having to do no more than choose a heat setting. Solid fuels are almost infinitely variable and however well a stove has been designed, its performance will ultimately depend on the way the user operates it. -
Page 6: Choice Of Logs
Choice of Logs Never burn wood that is not dry or wood that has been subject to a manufacturing process, such as chipboard, as these contain resins of uncertain toxicity when burned. For the same reasons, wood that has been painted or treated with a preservative should never be burned. -
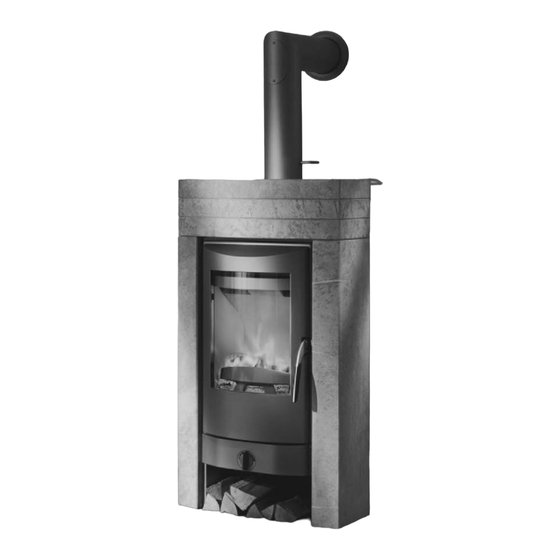
Page 7: Stove Construction
Stove Construction Top or Rear Flue Options Soapstone, Sandstone & Lavastone Options Large Glass Area to Optimise the Visual Effect Fire Bricks of the Fire Enable Higher Combustion Temperatures Cast Iron Used in Door and Patented Many Other Combustion Parts of the Technology Stove for Give Higher... -
Page 8: Manual Control
Manual Control The RLS Air Distribution System ensures that the stove lights and acheives its operating temperatures quickly. To do this there is one simple control situated on the front of the stove below the main fire door. Infinitely variable Infinitely variable control of the primary control of the secondary... -
Page 9: The Grate
The Grate The cast iron grate on which the fire sits can be set in an open and a closed position. The primary air for lighting requires the grate to be set in the open position to allow the air to get to the bed of the fire. To move the grate from one position to another the riddle arm can be moved to either the left or the right dependant upon the model to open or close the holes in the grate. -
Page 10: Ash Removal
Ash Removal Before lighting the stove for the first time ensure that the ash pan is fitted and empty. Removal of ash should only be carried out when the stove is cold! Daily removal of ash is not necessary when burning wood. The ash can be removed from the fire bed by using the riddling arm which ocillates the grate and the ashes fall into the ash pan below. -
Page 11: First Lighting Of The Stove
First Lighting of the Stove When you light the stove for the first few times it should be with small fires increasing in size, as all the materials must be given time to adapt to the effects of heat. The paint on the body of the stove will be fully hardened after the stove has been cured, however the door and the ash pan should be opened very carefully before this as there will otherwise be a risk that the gaskets will stick to the paint. -
Page 12: General Lighting And Operation
General Lighting and Operation The control knob should be turned fully clockwise to allow maximum primary and secondary air flow into the stove. The grate must be moved into its open position to allow the primary under grate air to enter the fire bed. Lightly crumple two tabloid sized pieces of newspaper and lay them in the middle of the grate. - Page 13 Wearing the stove glove place a few logs larger than kindling wood over, but not smothering the kindling. When the previous loading of wood is burning brightly add two larger split logs to bridge the fire. Always avoid putting wood directly onto wood burning with flame, try and leave air space under the wood for the flame to form, because the new, cold log will tend to cool the fire.
-
Page 14: Lighting With The Rikatronic Control
Lighting with the RIKATRONIC Control Insert the mains plug and operate the main switch on the back of the stove. The main switch illuminates “green”. The indicator on the front of the stove illuminates “green” for 10 seconds and then changes to “red”. -
Page 15: Operating With Rikatronic Control
Operating with RIKATRONIC Control As soon as the grate temperature exceeds 50°C, the indictor changes to “green” (if the indicator does not change to “green” within 8 minutes of closing the stoves door, then the heating procedure has failed, i.e. the flame temperature sensor has not reached 50°C in time). -
Page 16: Eco Operation Mode
If the grate doors are opened during operation the indicator changes to “green”. If the temperature increases (wood added) the indicator remains “green” (the stove controls combustion again). If no increase in temperature is detected the indicator reverts to the state before opening of the grate doors, either to “red - flashing” or to “red”. -
Page 17: General Maintenance
General Maintenance For your stove to operate effciently and to prolong the life of the stove, routine maintenance is essential. 1) Cleaning the Glass Properly operated, with the correct fuel, your glass will remain clean. Slight staining may appear when the stove is lit and below its operating temperature. -
Page 18: Soapstone Or Sandstone Cladding
5) Soapstone or Sandstone Cladding If you have a soapstone or sandstone stove, please note that the surface of the stone casing element is somewhat sensitive and is not suitable for accommodating metallic or ceramic pots, cans or containers. In order to ensure the surface maintains its appearance even after years of use, please observe the following cleaning and care information: Use P120 sandpaper to remove any minor impurities on the stone, such as black spots or other signs of use, by applying gentle pressure (in the direction of the grain) until the impurity is no longer visible. -
Page 19: Technical Details
Technical Details CULT Model CULT TARA TWIST VITRA PLUS PLUS Nominal Heat Output EN13240 Minimum Heat Output Loading Rate 1.6 kg/h 1.6 kg/h 2.0 kg/h 2.0 kg/h 2.0 kg/h 2.0 kg/h 2.0 kg/h 1.2 kg/h Efficiency Net 83.2% 83.2% 79.1% 79.1%... - Page 20 Need more info? with over 10,000 pages of technical information, spare parts, product shots, news and 1001 other things, - you will not find a more comprehensive solution to your queries, whatever time of the day. www.euroheat.co.uk Court Farm Business Park, Bishops Frome, Worcestershire WR6 5AY Pre sales: 01885 491112 Technical: 01885 491117...
Need help?
Do you have a question about the Cult and is the answer not in the manual?
Questions and answers