
Related Manuals for Danalogic i-FIT 71

Summary of Contents for Danalogic i-FIT 71
- Page 1 User Guide Behind-the-ear (BTE) models: Danalogic i-FIT 71, 81 and Receiver-in-the-ear (RIE)
-
Page 2: Introduction
Practice and a positive attitude are important in learning to use hearing instruments. Your Danalogic instruments have been adjusted according to your individual hearing loss and needs. Some people adjust quickly to wearing hearing instruments in their ears and hearing new sounds;... - Page 3 Hearing instrument model: Battery size: Tube type: Dome size: (if applicable) (if applicable) Left serial number: Right serial number:...
-
Page 4: Table Of Contents
Contents Introduction . . . . . . . . . . . . . . . . . . . . . . . . . . . . 2 Programme button (optional) . - Page 5 Cleaning receiver tubing and domes . . . . . . . . 27 How to apply domes . . . . . . . . . . . . . . . . . . . . 27 Replacing the wax filter (receiver in-the-ear models) .
-
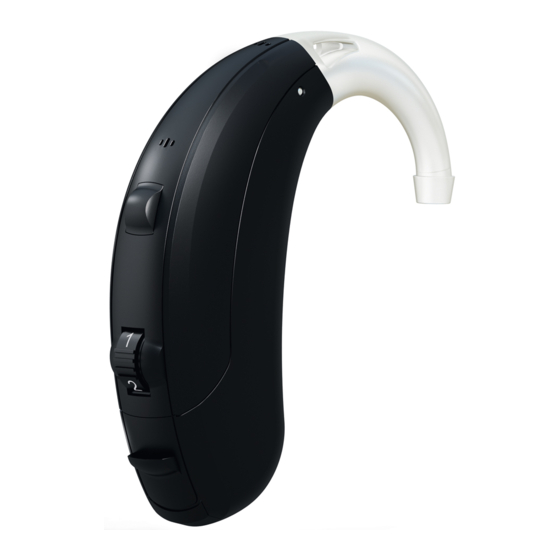
Page 6: Description Of The Hearing Instruments
Description of the Front microphone inlet BTE hearing instruments Back microphone inlet Danalogic i-FIT 71 Volume control (optional) Danalogic i-FIT 81 Direct audio input Left/Right indicator Programme button (Left=Blue/Right=Red) Battery compartment & On/Off switch Battery lock (optional) Sound outlet 10. Model 11. - Page 7 i-FIT...
- Page 8 Danalogic i-FIT RIE 1. Receiver tube 2. Receiver Open Dome 3. Receiver Tulip Dome 4. Receiver Power Dome 5. RIE mould (optional) 6. Sports lock 7. Battery compartment 8. Receiver 9. Programme button 10. Volume Control...
- Page 9 11. Direct audio input 12. Left/right indicator 13. Model and manufacturer...
-
Page 10: Getting Started
Getting started On/Off function 1. When the battery door is closed, the hearing instrument turns on, and the default program will be activ ated. 2. To turn off the hearing instrument, open the battery door. Many individuals can use their fingernail to pull it open. Tip: Whenever the hearing instruments are not in use, remember to turn them off to avoid unnecessary battery consumption. -
Page 11: Inserting/Replacing The Battery
called SmartStart. This function will delay the time in which the hearing instruments turn on by ten seconds after the battery compartment is closed. This reduces the risk that the hearing instruments will whistle while you put them on. With SmartStart, a beep will be heard for each second of the delay period. Inserting/Replacing the battery 1. -
Page 12: Low Battery Indicator
Low battery indicator There is a low battery indicator in your hearing instruments. The hearing instrument will reduce amplification and emit a beep signal if battery power gets too low. This signal will recur every five minutes until the hearing instrument automatically switches off. The low battery indicator can vary slightly, depending on the type of battery used. - Page 13 4. Move the earmould up and down and gently press to ensure it is positioned correctly in the ear. Opening and closing your mouth can ease insertion. 5. Make sure the hearing instrument is seated behind the ear. By experimenting, an easier method may be discovered. With proper insertion, hearing instruments should fit snugly but comfortably.
- Page 14 Insertion (domes) 1. Hold the thin tube where it bends, and gently push the dome into the ear canal. Please ensure that the dome is securely attached to the tubing. Push the dome far enough into the ear canal so that the thin tube lies flush with the head. 2.
- Page 15 Removal (custom earmoulds) 1. Hold a portion of your earmould towards the back of the ear. 2. Pull the earmould outward and simultaneously rotate the earmould forward. 3. Consult your hearing care professional if you have difficulties removing the hearing instrument. Removal (domes/custom earmoulds) 1.
-
Page 16: Operation Of The Hearing Instrument
Operation of the hearing instrument Volume control The volume control will allow the volume of hearing instruments to be increased or decreased. 1. To increase the volume, push the volume control up. 2. To decrease the volume, push the volume control down. When volume is increased or decreased, a beep signal will be heard for each incremental change. -
Page 17: Programme Button (Optional)
Programme button Depending on your experience level with hearing instruments, individual hearing needs, and the type of listening environments you experience, your hearing care professional may activate additional programmes. If additional programmes have been activated, the following list explains how they work. 1. - Page 18 Programme Description of when to use...
-
Page 19: Stand-By Function
Stand-by function Some individuals may find that they would like the hearing instruments muted in certain situations while wearing them. Your hearing care professional can activate a stand-by function in your hearing instruments, which causes them to not process or amplify sound. The stand-by function can be accessed by pressing and holding the programme button for five seconds. - Page 20 Telephone use Finding the optimal position for holding a telephone may require practice for some individuals, and one or more of the following suggestions may be helpful. 1. Hold the telephone as you would normally. 2. Hold the telephone towards the top of the ear (closer to where the microphones are).
-
Page 21: Telecoil (Optional)
Telecoil (optional) If equipped, a telecoil can be activated by your hearing care professional and accessed through one of the additional programmes. A telecoil picks up a magnetic signal and converts it to sound. When using a telecoil programme, the receiver of the telecoil compatible telephone may need to be held closer to the hearing instrument. -
Page 22: Direct Audio Input (Optional)
Direct audio input (optional) Use of direct audio input (DAI), which enables a direct connection of the hearing instruments to items such as television, radio, and remote microphones, may increase speech understanding for some individuals. The sound source is connected to the hearing instruments by a cable or a wireless FM system to the audio boot. - Page 23 2. Once in place, move the boot in the direction of the battery compartment. 3. Gently click the audio boot onto the hearing instrument. Disconnecting audio boots 4. Press and hold the button on the front side of the audio booth. 5.
-
Page 24: Care And Maintenance
Care and maintenance Proper handling 1. Never immerse hearing instruments in water or other liquids, as liquids may cause permanent damage to the hearing instruments. 2. Avoid rough handling of hearing instruments or dropping them on hard surfaces or floors. 3. -
Page 25: Cleaning Earmoulds
In order to avoid damage due to humidity or excessive perspiration, the use of a drying kit is recommended. Some drying kits are electric, and in addition to thoroughly drying out hearing instruments, they help sanitize. Cleaning earmoulds 1. Remove the earmould and attached tubing from the hearing instruments prior to cleaning. -
Page 26: Cleaning Thin Tubes And Domes
Cleaning thin tubes and domes 1. Remove thin tubes from hearing instruments before cleaning by unscrewing them counter clockwise. 2. Wipe down thin tubes and domes with a damp cloth. 3. In order to clear the thin tube of moisture and debris, push the black cleaning rod through the thin tube, beginning at the end opposite the dome. -
Page 27: Cleaning Receiver Tubing And Domes
Cleaning receiver tubing and domes Wipe receiver tubes down with a damp cloth. Do not try to remove the receiver tubing from the hearing instrument. How to apply domes If your hearing care professional instructs you to change the domes yourself, make sure that they are securely fastened to the sound tube before inserting them in your ear. - Page 28 Tulip domes Tulip domes are mounted in a similar manner to standard domes, but a few extra steps are required. Tulip domes consist of two “petals”. It is important to note that the largest petal is the outermost petal. To ensure this: 1.
-
Page 29: Replacing The Wax Filter
Replacing the wax filter (receiver in-the-ear models) RIE models have two types of wax filters that protect against wax and moisture. The first wax guard is built into the domes. The second wax guard is placed directly on top of the receiver. These filters come in blue and red colors to further help identify left from right hearing instruments (left=blue;... - Page 30 Replacing the wax filter (receiver in-the-ear models) continued 3. Gently pull until the used filter is removed. 4. Discard the used filter in the slot located in the HF3 filter kit by pressing it into the center, sliding it to one end of the slot, and pull until the filter is discarded. 5.
-
Page 31: General Precautions
General precautions 1. Do not leave hearing instruments in the sun, near an open fire, or in a hot, parked car. 2. Do not wear hearing instruments while showering, swimming, in heavy rain, or in a moist atmosphere such as a steam bath or sauna. 3. -
Page 32: General Warnings
General warnings 1. Consult a hearing care professional if you discover a foreign object in your ear canal, if you experience skin irritation, or if excessive ear wax accumulates with the use of the hearing instrument. 2. Different types of radiation, from e.g. NMR, MRI, or CT scanners, may damage hearing instruments. It is recommended not to wear hearing instruments during these or other similar procedures. - Page 33 4. Do not allow others to use your hearing instruments. This may cause damage to the hearing instruments or to the hearing of the other individual. 5. Due to choking hazards, hearing instrument usage by children should be supervised at all times. 6.
-
Page 34: Battery Warning Information
Battery warning information 1. Do not put batteries in your mouth, as they can be harmful if swallowed. If swallowed, seek medical help immediately. 2. Keep batteries away from children. -
Page 36: Troubleshooting Guide
Troubleshooting guide SYMPTOM CAUSE No sound • Not turned on • Dead battery • Battery door will not close • Blocked earmould or tube • Blocked wax filter... - Page 37 POSSIBLE REMEDY • Turn on by closing the battery door • Replace battery • Insert battery properly • Clean earmould or tube • Replace wax filter or consult your hearing care professional...
- Page 38 Troubleshooting guide SYMPTOM CAUSE Not loud • Incorrect earmould placement enough • Blocked earmould or dome • Blocked sound outlet filter • Change in hearing sensitivity • Excessive ear wax • Volume set too low...
- Page 39 POSSIBLE REMEDY • Reinsert earmould • Clean earmould, replace dome, replace filter • Change filter or consult your hearing care professional • Consult your hearing care professional • Consult your physician • Increase the volume control if available or consult your hearing care professional...
- Page 40 Troubleshooting guide SYMPTOM CAUSE Excessive • Incorrect earmould placement whistling/feedback • Incorrect dome placement • Excessive ear wax • Feedback control may need adjustment • Earmould tubing worn or damaged • Thin tube connection loose • Hearing instrument settings not optimal...
- Page 41 POSSIBLE REMEDY • Re-insert earmould carefully • Re-insert dome • Consult your hearing care professional • Consult your hearing care professional • Consult your hearing care professional • Change thin tube or consult your hearing care professional • Consult your hearing care professional...
- Page 42 Troubleshooting guide SYMPTOM CAUSE Sound • Weak battery distorted / • Improper earmould or dome fit not clear • Hearing instrument damaged • Hearing instrument settings not optimal If there are any other problems not mentioned in this guide, please contact your hearing care professional.
- Page 43 POSSIBLE REMEDY • Replace battery • Consult your hearing care professional • Consult your hearing care professional • Consult your hearing care professional...
-
Page 44: Technical Data
Technical data Hearing Instrument Model Maximum output (2ccCoupler / IEC 60118-7) Standard tube Danalogic i-FIT 71 126dB SPL (typical) Danalogic i-FIT 81 133dB SPL (typical) Thin tube Danalogic i-FIT 71 open 123dB SPL (typical) - Page 45 Technical data Hearing Instrument Model Maximum output (2ccCoupler / IEC 60118-7) Danalogic i-FIT RIE (LP) 107dB SPL (typical) Danalogic i-FIT RIE (HP) 118dB SPL (typical)
-
Page 46: Warranty And Repairs
Warranty and repairs If your Danalogic hearing instrument malfunctions, it must be repaired by a qualified technician. Do not attempt to open the case of the hearing instrument since this would invalidate the warranty. If your Danalogic hearing instrument requires service, please contact your hearing care professional... - Page 48 1 Landscape Close GN ReSound A/S DK-2750 Ballerup, Denmark Weston Business Park Tel.: +45 45 75 11 11 Weston-on-the-Green Fax: +45 45 75 11 19 Oxon OX25 3SX www.resound.com Tel.: +44 1869 352 800 Fax: +44 1869 343 466 www.danalogic-ifit.com...
Need help?
Do you have a question about the i-FIT 71 and is the answer not in the manual?
Questions and answers
Are these hearing aids bluetooth
What app can I use for these hearing aids
I have Danalogic i-FIT RIE hearing aids but do not know the type of batteries to use can you help please
Danalogic i-FIT 71 hearing aids use Zinc-Air batteries.
This answer is automatically generated