
Related Manuals for Ball FTJMAU-15-01


Summary of Contents for Ball FTJMAU-15-01
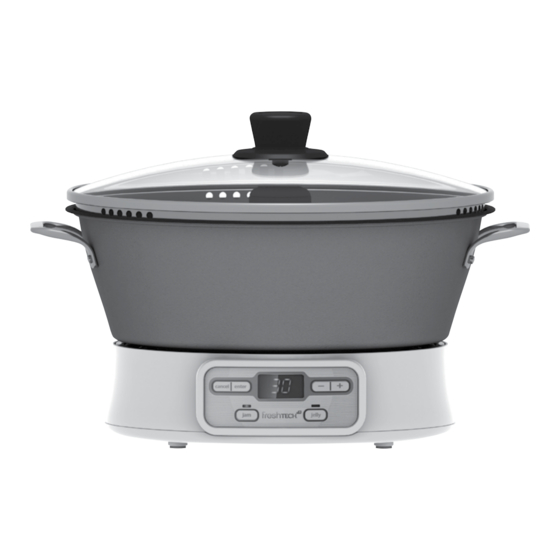
- Page 1 Automatic Jam & Jelly Maker Model FTJMAU-15-01 User Manual / Warranty Information www.freshTECHJamMaker.co.uk...
-
Page 2: Important Safeguards
IMPORTANT SAFEGUARDS Failure to follow these instructions and warnings may cause death, personal injury and/or property damage. Safety precautions should always be followed when using electrical appliances, including the following: READ ALL INSTRUCTIONS, PRODUCT LABELS & WARNINGS BEFORE USE. Do not lift or move unit during operation. Do not leave appliance unattended. -
Page 3: Introduction
29. Do not pour liquids into the Pot without the Stirrer securely in place. See Recipe Book for details. 30. Do not dry heat the Pot. 31. Do not touch the heater located on the Base as it becomes very hot. 32. -
Page 4: Table Of Contents
TABLE OF CONTENTS Important Safeguards ....... . 2 Introduction ........3 Parts Diagram . -
Page 5: Parts Diagram
PARTS DIAGRAM 1. Glass Lid 4. Base 5. Control Panel 2. Stirrer 4a. Heating Surface 6. Removable Cord 3. Pot... -
Page 6: Control Panel Diagram
CONTROL PANEL DIAGRAM jelly a. Cancel button c. Jam button e. Increase / Decrease Time b. Enter button d. Jelly button f. LED Display GLASS LID ASSEMBLY a. Screw b. Large Stainless Steel Washer c. Silicone Washer d. Glass Lid e. -
Page 7: Using Your Jam & Jelly Maker
Using pectin also makes the process of preparing homemade jams and jellies easier because less cooking is required to achieve the proper set. We recommend Ball ®... -
Page 8: Preparing For Use
PREPARING FOR USE Parts Needed: • Base • Removable Cord • • Glass Lid* *Glass Lid not required for the • Stirrer Rosemary Balsamic Jelly recipe. ASSEMBLING THE UNIT FOR JAM & JELLY MAKING For best results, the unit must be placed on a level cooking surface. A. -
Page 9: Making Jams And Jellies
HOW TO MAKE JAM The following steps are general directions for jam making – please refer to the Recipe Book for a variety of recipes. Recipes have been created specific to this machine, the size of the pot and the nature of the ingredients. Other recipes are not guaranteed to work with this appliance. - Page 10 J. If necessary, skim foam from top of jam and preserve, following the steps on Preserving Instructions in the Recipe Book. Never attempt to pour jam from the Pot into another container – always use a non-metal spoon or ladle (such as wood, bamboo, plastic or silicone) to remove the jam from the Pot.
- Page 11 G. At the end of the cooking process, the Jam & Jelly Maker will beep again to indicate cancel the process is complete. After the beep, press the button and unplug the power cord to turn off the unit. H. Remove the Stirrer, taking care not to touch any metal parts or glass surfaces. Set aside either in the sink or on an oven-safe plate, as the metal rod inside the Stirrer will be hot.
-
Page 12: Helpful Hints
HELPFUL HINTS Here are a few simple tips to help you get the most of your new Jam & Jelly Maker: If a mistake is made in programming or if you need to stop the entire jelly cancel process, pressing the button allows you to clear the recipe program and to restart from 00. -
Page 13: Cleaning The Appliance
CLEANING YOUR JAM & JELLY MAKER AFTER USE Note: It is recommended that you clean the appliance in between uses. WARNING! As with any cooking appliance, metal parts – and even some plastic parts – can become extremely hot to the touch. Always let the appliance cool completely –... -
Page 14: Service And Maintenance
SERVICE AND MAINTENANCE Replacement Parts Replaceable parts for the freshTECH Jam and Jelly Maker include: Glass Lid, knob assembly, Stirrer, Pot, power cord, Recipe Book, and user manual/warranty information. Please have the freshTECH Jam and Jelly Maker model number and date of purchase available when you call for a replacement part. - Page 15 Jarden Home Brands disclaims all other warranties, conditions or representations, express, implied, statutory or otherwise. Jarden Home Brands shall not be liable for any damages of any kind resulting from the purchase, use or misuse of, or inability to use the product including incidental, special, consequential or similar damages or loss of profits, or for any breach of contract, fundamental or otherwise, or for any claim brought against purchaser by any other party.
- Page 16 ©2015 Hearthmark, LLC doing business as Jarden Home Brands. All rights reserved. Distributed by:Mapa Spontex UK Limited, Berkeley Business Park, Wainwright Road, Worcester, WR4 9ZS, UK and Ball are trademarks of Ball Corporation, used under license. ® Visit us online at www.freshTECHJamMaker.co.uk for more exciting ideas and delicious recipes!
Need help?
Do you have a question about the FTJMAU-15-01 and is the answer not in the manual?
Questions and answers