Table of Contents
Advertisement
Available languages
Available languages
Advertisement
Chapters
Table of Contents

Related Manuals for Honeywell RCT8102A Series


Summary of Contents for Honeywell RCT8102A Series
- Page 1 Operating Manual RCT8102A Series Programmable Thermostat 69-2636ES-03...
- Page 2 NOTE: Remove battery holder; model number is on the battery holder. Need Help? For assistance with this product please visit http://yourhome.honeywell.com 1-800-468-1502 or call Honeywell Customer Care toll-free at Read and save these instructions. ® U.S. Registered Trademark. Copyright © 2013 Honeywell International Inc. All rights reserved.
-
Page 3: Table Of Contents
RCT8102A Series About your new thermostat Table of contents About your new thermostat Appendices Thermostat features ........2 Battery installation ........18 Programming at a glance ......3 Customer assistance ........ 19 Quick reference to controls ......4 In case of difficulty ........20 Quick reference to display ...... -
Page 4: About Your New Thermostat
Operating Manual About your new thermostat Congratulations on the purchase of your new Honeywell thermostat. It has been designed to give you many years of reliable service and easy-to-use, push-button climate control. Features • Easy-to-follow menu programming. • One-touch temp control overrides program schedule at any time. • Large, clear, backlit display is easy to read — even in the dark. • Displays both room temperature and temperature setting. -
Page 5: Programming At A Glance
RCT8102A Series This thermostat is ready to go! Your new thermostat is pre-programmed and ready to go. All you have to do is set the time and day. Then check the settings below and change if needed: Set time and day (required for proper operation) ......See page 6 Select fan setting (Auto/On): Preset to Auto ......To change, see page 7... -
Page 6: Quick Reference To Controls
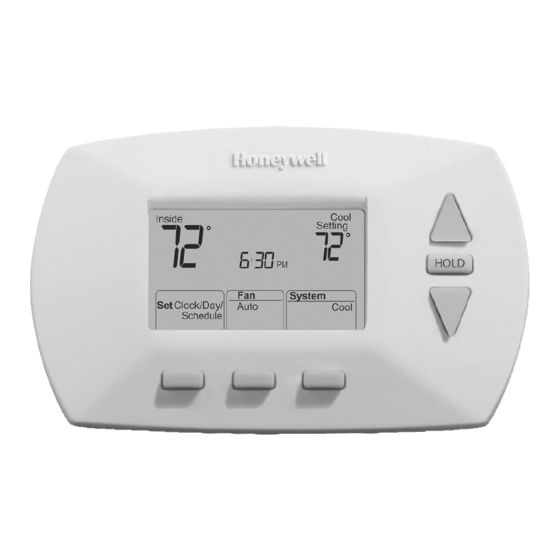
Operating Manual Quick reference to controls Digital display (see page 5). Battery holder (see page 18). Temperature buttons Press to adjust temperature settings (see pages 11-13). Hold button Press to override programmed M28401 temperature control (see page 12). Function buttons Press to select the function displayed just above each button. -
Page 7: Quick Reference To Display
RCT8102A Series Quick reference to display screen Low battery warning Current inside temperature Current time/day (see page 18) (see page 6) Smart Response ® Temperature setting Heat Replace Battery Inside technology in effect (see pages 11-13) Setting (see page 17) -
Page 8: Programming & Operation Set Time And Day
Operating Manual Set the time and day 1. Press the SET CLOCK/DAY/SCHEDULE Press SET CLOCK/DAY/SCHEDULE, then adjust time button, then press to set 4 : 30 the clock time. System 2. Press the SET DAY button, then Set Clock/Day/ Auto Heat press to select the day of... -
Page 9: Select Fan Setting (Auto/On)
RCT8102A Series Select the fan setting Press the FAN button to select Auto or On. System Set Clock/Day/ Auto Heat In “Auto” mode (the most commonly used Schedule setting), the fan runs only when the heating or cooling system is on. If set to “On,” the M28405 fan runs continuously. System Set Clock/Day/ Heat Schedule M28406 69-2636ES—03... -
Page 10: Select System Setting (Heat/Cool)
Operating Manual Select the system setting Press the SYSTEM button to select Heat, Cool System Set Clock/Day/ Auto Heat or Off. Schedule • Heat: Thermostat controls only the heating system. • Cool: Thermostat controls only the cooling M28407 system. System • Off: Heating and cooling systems are off. -
Page 11: Using Program Schedules
RCT8102A Series Save money by setting program schedules It’s easy to program your system for maximum energy savings. You can program four time periods each day, with different settings for weekdays, Saturday and Sunday. Set to the time you awaken and the temperature you want... - Page 12 Operating Manual Energy-saving settings for maximum cost savings This thermostat is pre-set with energy-saving program settings. We recommend these settings, since they can reduce your heating/cooling expenses. (See next page to adjust times and temperatures of each time period.) Heat Cool Heat Cool...
-
Page 13: To Adjust Program Schedules
RCT8102A Series To adjust program schedules 1. Press SET CLOCK/DAY/SCHEDULE, then SET System SCHEDULE. Set Clock/Day/ Auto Heat Schedule 2. Press to set your weekday Wake time (Mon–Fri), then press NEXT. 3. Press to set the temperature for this time period, then press NEXT. -
Page 14: Program Schedule Overrides
Operating Manual Program schedule override (temporary) Press to temporarily adjust temperature. Press to immediately adjust Heat Temporary Inside Setting the temperature. This will temporarily override the temperature setting for the 6 : 30 current time period. The new temperature will be maintained only until the next programmed time Run Schedule System... -
Page 15: Program Schedule Override (Permanent)
RCT8102A Series Program schedule override (permanent) Press to permanently adjust temperature. Press HOLD to permanently adjust Heat Inside the temperature. This will override Setting Hold the temperature settings for all time 6 : 30 periods. The “Hold” feature turns off the pro- gram schedule and allows you to... -
Page 16: Auto Changeover
Operating Manual Auto Changeover Use this feature in climates where both air conditioning and heating are used on the same day. When the system mode is in Auto, the thermostat automatically selects heating or cooling depending on the indoor temperature. While in the Auto mode, if a schedule override takes place (temporarily or permanently) the thermostat will automatically adjust the cooling and heating settings to maintain a 3-degree separation between the cool and heat settings. - Page 17 RCT8102A Series Auto Changeover If the cool temperature is lowered to where it gets close to the heat setting, an arrow next to heat will show the thermostat is lowering the heat setting down to maintain a 3-degree separation. Temporary...
-
Page 18: Built-In Compressor Protection
Operating Manual Built-in compressor protection This feature helps prevent damage to the com- Cool Inside Setting pressor in your air conditioning or heat pump system. 6 : 30 Damage can occur if the compressor is re-started too soon after shutdown. This feature Cool On System forces the compressor to wait a few minutes Set Clock/Day/ Auto Cool... -
Page 19: Smart Response Technology
RCT8102A Series Smart Response Technology ® This feature Smart Response Technology: ® Cool Inside Setting allows the thermostat to “learn” how long the furnace and air conditioner take to reach 6 : 38 programmed temperature settings, so the temperature is reached at the time you set. -
Page 20: Appendices Battery Installation
Operating Manual About your new thermostat Battery replacement Press down and pull to remove. Install fresh batteries immediately when the REPLACE BATTERY warning begins flashing. The warning flashes about two months before the bat- Replace Battery teries are depleted. Even if the warning does not appear, you should replace batteries once a year, or before leaving home for more than a month. -
Page 21: Customer Assistance
Model number Date code ing. xxxxxxx xxxxxxx Accessories/replacement parts To order, please call Honeywell Customer Care toll- free at 1-800-468-1502. Battery holder ...... Part No. 50007072-001 Cover plate assembly* ..Part No. 50002883-001 M28416 *Use to cover marks left by old thermostats. -
Page 22: In Case Of Difficulty
Operating Manual In case of difficulty If you have difficulty with your thermostat, please try the following suggestions. Most problems can be corrected quickly and easily. Display is blank • Make sure fresh AA alkaline batteries are correctly installed (see page 18). Temperature Make sure heating and cooling temperatures are set to acceptable ranges: settings do not • Heat: 40° to 90°F (4.5° to 32°C). - Page 23 RCT8102A Series In case of difficulty Heating or cooling • Press SYSTEM button to set system to Heat. Make sure the temperature is system does not set higher than the Inside temperature. respond • Press SYSTEM button to set system to Cool. Make sure the temperature is set lower than the Inside temperature.
-
Page 24: Limited Warranty
This warranty does not cover removal or reinstallation costs. This warranty shall not apply if it is shown by Honeywell that the defect or malfunction was caused by damage which occurred while the product was in the pos- session of a consumer. - Page 25 RCT8102A Series 1-year limited warranty THIS WARRANTY IS THE ONLY EXPRESS WARRANTY HONEYWELL MAKES ON THIS PRODUCT. THE DURATION OF ANY IMPLIED WARRANTIES, INCLUDING THE WARRANTIES OF MERCHANTABILITY AND FITNESS FOR A PARTICULAR PURPOSE, IS HEREBY LIMITED TO THE ONE-YEAR DURATION OF THIS WARRANTY. Some states do not allow limitations on how long an implied warranty lasts, so the above limitation may not apply to you. This warranty gives you specific legal rights, and you may have other rights which vary from state to state.
- Page 26 Automation and Control Solutions Honeywell International Inc. 1985 Douglas Drive North Golden Valley, MN 55422 ® U.S. Registered Trademark. © 2013 Honeywell International Inc. 69-2636ES—03 M.S. Rev. 11-13 Printed in U.S.A.
- Page 27 Manual de funcionamiento Serie RCT8102A Termostato programable 69-2636ES-03...
- Page 28 NOTA: Retire el soporte de la batería; el número de modelo está en el soporte de la batería. ¿Necesita asistencia? Para obtener asistencia relacionada con este producto, visite http://yourhome.honeywell.com o comuníquese con el número gratuito de servicio de atención al cliente de Honeywell, llamando al 1-800-468-1502 Lea y guarde estas instrucciones. ® Marca registrada de los EE. UU.
- Page 29 Serie RCT8102A Acerca de su nuevo termostato Índice Acerca de su nuevo termostato Apéndices Características del termostato ...... 2 Instalación de la batería ......18 Programación rápida ........3 Ayuda al cliente........... 19 Rápida referencia de los controles ....4 En caso de inconvenientes ......
-
Page 30: Acerca De Su Nuevo Termostato
Manual de funcionamiento Acerca de su nuevo termostato Acerca de su nuevo termostato Felicitaciones por la compra del nuevo termostato Honeywell. El termostato ha sido dise- ñado para brindarle muchos años de funcionamiento confiable y para brindarle un control climático fácil de usar y con sólo apretar un botón. Características • Programación con menú fácil de seguir. -
Page 31: Programación Rápida
Serie RCT8102A ¡Este termostato está listo para funcionar! Su nuevo termostato está preprogramado y listo para funcionar. Todo lo que tiene que hacer es configurar el día y la hora. Luego, revise las configuraciones de abajo y cámbielas si es necesario: Configure la hora y el día (necesario para un mejor funcionamiento) ................ -
Page 32: Rápida Referencia De Los Controles
Manual de funcionamiento Rápida referencia de los controles Pantalla digital (vea la página 5). Soporte de la batería (vea la página 18). Botones de la temperatura Presiónelos para ajustar las configuraciones de temperatura (vea las páginas 11 a 13). Botón “Hold” Presiónelo para anular el control M28401 de temperatura programada... -
Page 33: Rápida Referencia De La Pantalla
Serie RCT8102A Rápida referencia de la pantalla Hora y día actuales Temperatura interior actual Aviso de batería baja (vea la página 6) (vea la página 18) Tecnología Smart Configuración Response en funciona- ® de temperatura miento (ver página 17) (vea las páginas 11 a 13) Heat Replace Battery Inside... -
Page 34: Configure La Hora Y El Día
Manual de funcionamiento Configure la hora y el día 1. Presione el botón “SET CLOCK/DAY/ Presione “SET CLOCK/DAY/SCHEDULE”, luego ajuste la hora SCHEDULE”, luego, presione para configurar la hora del reloj. 4 : 30 2. Presione el botón “SET DAY” System (configuración del día), luego, Set Clock/Day/... -
Page 35: Seleccione La Configuración Del Ventilador ("Auto/On" [Automático/Encendido])
Serie RCT8102A Seleccione la configuración del ventilador Presione el botón “FAN” para seleccionar System Set Clock/Day/ Auto Heat “Auto” o “On”. Schedule En el modo “Auto”, la configuración usada comúnmente, el ventilador funciona M28405 solamente cuando la calefacción o el sistema de enfriamiento están encendidos. System Si se fija en “On”, el ventilador funciona sin Set Clock/Day/ Heat... -
Page 36: Seleccione La Configuración Del Sistema ("Heat/Cool" [Calor/Frío])
Manual de funcionamiento Seleccione la configuración del sistema Presione el botón “SYSTEM” para seleccionar System “Heat”, “Cool” o “Off”. Set Clock/Day/ Auto Heat Schedule • “Heat”: El termostato controla solamente el sistema de calefacción. • “Cool”: El termostato controla solamente M28407 el sistema de enfriamiento. System • “Off”: Los sistemas de calefacción Set Clock/Day/ Auto Cool... -
Page 37: Use Los Cronogramas Del Programa
Serie RCT8102A Ahorre dinero configurando los cronogramas del programa Es fácil programar su sistema que permite un ahorro máximo de energía. Usted puede programar cuatro períodos de tiempo por día, con diferentes configuraciones para los días de semana, sábado y domingo. Programe la hora en que se despierta y la temperatura que quiere “WAKE” durante la mañana, hasta que usted se va de su casa. - Page 38 Manual de funcionamiento Configuraciones de ahorro de energía para máximo ahorro de costos Este termostato viene predeterminado con configuraciones para un programa de ahorro de energía. Recomendamos estas configuraciones debido a que reducen los gastos de calefacción y enfriamiento. Vea la siguiente página para ajustar las horas y las temperaturas de cada período de tiempo. “Cool” “Heat” (de lunes a viernes) (de lunes a viernes) “Heat” (sábado y domingo) “Cool”...
- Page 39 Serie RCT8102A Para ajustar los cronogramas del programa 1. Presione “SET CLOCK/DAY/SCHEDULE” y luego “SET System SCHEDULE”. Set Clock/Day/ Auto Heat Schedule 2. Presione para configurar la hora en que se despierta los días de la semana (de lunes a viernes), luego presione “NEXT”.
-
Page 40: Programe La Anulación Del Cronograma
Manual de funcionamiento Programe la anulación del cronograma (temporario) Presione para ajustar temporariamente la temperatura. Presione para ajustar la temperatura Heat Temporary Inside en forma inmediata. Esto anulará temporariamente la Setting configuración de la temperatura para el período de tiempo actual. 6 : 30 La nueva temperatura se mantendrá solamente hasta que comience el próximo período programado (vea la página 10). - Page 41 Serie RCT8102A Programe la anulación del cronograma (permanente) Presione para ajustar permanentemente la temperatura. Presione “HOLD” para ajustar Heat Inside permanentemente la temperatura. Setting Hold Esto anulará las configuraciones de la temperatura para todos los 6 : 30 períodos de tiempo. La función “Hold” apaga el cronograma Run Schedule System del programa y le permite ajustar el Auto...
-
Page 42: Conversión Automática
Manual de funcionamiento Acerca de su nuevo termostato Conversión automática Utilice esta característica en climas donde se utilicen tanto el aire acondicionado como la calefacción durante el mismo día. Cuando el sistema está configurado en Auto (automático), el termostato elige automáticamente cuándo calentar o enfriar, dependiendo de la temperatura interior. - Page 43 Serie RCT8102A Acerca de su nuevo termostato Conversión automática Si la temperatura fría desciende a donde queda cercana a la configuración de calefac- ción, una flecha al lado del calor mostrará que el termostato está bajando la configura- ción de calor para mantener una separación de 3 grados. Temporary Heat Inside...
-
Page 44: Protección Del Compresor Incorporado
Manual de funcionamiento Protección del compresor incorporado Esta función ayuda a prevenir el daño del compresor Cool Inside Setting en su acondicionador de aire o en su sistema de bomba de calor. 6 : 30 El compresor puede dañarse si se vuelve a iniciar inmediatamente después de ser apagado. Esta Cool On característica hace que el compresor demore unos System minutos antes de volver a iniciarse. Set Clock/Day/ Auto Cool... -
Page 45: Tecnología Smart Response
Serie RCT8102A Tecnología Smart Response ® Tecnología Smart Response : Permite que el ® Cool Inside Setting termostato “aprenda” cuánto tiempo les lleva a la estufa y al acondicionador de aire alcanzar la 6 : 38 temperatura programada, de modo que se alcance la temperatura a la hora fijada. Por ejemplo, fije la hora de levantarse a las 6 AM y la temperatura a 70°. -
Page 46: Instalación De La Batería
Manual de funcionamiento Acerca de su nuevo termostato Reemplazo de la batería Presione el soporte y tire de él para quitar. Instale las baterías nuevas inmediatamente cuando la advertencia “REPLACE BATTERY” (reemplazo de baterías) comience a titilar. La advertencia titilará durante alrededor de dos meses antes de que se Replace Battery consuman las baterías. -
Page 47: Ayuda Al Cliente
Código de la fecha Accesorios y piezas de repuesto Para hacer el pedido, comuníquese con el número xxxxxxx xxxxxxx gratuito de Atención al cliente de Honeywell 1-800-468-1502. Soporte de la batería ....N.º de pieza 50007072-001 Ensamblado de la placa de cubierta* ......N.º de pieza 50002883-001 * Úselo para cubrir las marcas que dejan los termostatos viejos. -
Page 48: En Caso De Inconvenientes
Manual de funcionamiento Acerca de su nuevo termostato En caso de inconvenientes Si tiene dificultades con el termostato, intente seguir las sugerencias que se indican a continuación. La mayoría de los problemas pueden corregirse rápida y fácilmente. La pantalla • Asegúrese de que las baterías AA alcalinas estén instaladas correctamente (vea la página 18). - Page 49 Serie RCT8102A Acerca de su nuevo termostato En caso de inconvenientes El sistema Presione el botón “SYSTEM” para configurar el sistema en “Heat”. • de calefacción Asegúrese de que la temperatura sea más alta que la temperatura interna. o enfriamiento Presione el botón “SYSTEM” para configurar el sistema en “Cool”. •...
-
Page 50: Garantía Limitada
Si el producto tiene defectos, (i) devuélvalo, con la factura de venta u otra prueba de compra fechada, al lugar donde lo compró; o (ii) comuníquese con el Centro de atención al cliente de Honeywell al 1-800-468-1502. Atención al cliente decidirá si se debe devolver el producto a la siguiente dirección: Devolución de mercaderías de Honeywell, Dock 4 MN10- 3860, 1885 Douglas Dr. N., Golden Valley, MN 55422, o si se le puede enviar un producto en reemplazo. - Page 51 Serie RCT8102A Garantía limitada de 1 año O IMPLICÍTAS, O DE OTRAS FALLAS DE ESTE PRODUCTO. Algunos estados no permiten la exclusión o limitación del daño incidental o indirecto, entonces, esta limitación puede no resultar aplicable a su caso. LA PRESENTE GARANTÍA ES LA ÚNICA GARANTÍA EXPRESA QUE HONEYWELL PROPORCIONA RESPECTO DE ESTE PRODUCTO. LA DURACIÓN DE LAS GARANTÍAS IMPLÍCITAS, INCLUÍDAS LAS GARANTÍAS DE COMERCIABILIDAD Y APTITUD PARA UN OBJETIVO PARTICULAR, ESTÁ LIMITADA A LA DURACIÓN DE UN AÑO DE LA PRESENTE GARANTÍA. Algunos estados no permiten las limitaciones sobre la duración del período de una garantía implícita, entonces la limitación anterior puede no resultar aplicable a su caso.
- Page 52 Automatización y control desenlace Honeywell International Inc. 1985 Douglas Drive North Golden Valley, MN 55422 ® Marca registrada de los EE. UU. © 2013 Honeywell International Inc. 69-2636ES—03 M.S. Rev. 11-13 Impreso en EE. UU.