
Related Manuals for Sony CA4000


Summary of Contents for Sony CA4000
- Page 1 CAMERA SYSTEM ADAPTOR CA4000 CAMERA POWER BOOST KIT SKC-PB40 OPERATION MANUAL [English] 1st Edition (Revised 1)
-
Page 2: Table Of Contents
Appendix ..............45 Precautions ..............45 Error Messages..............45 PMW-F55 Warning and Error Messages .......46 F65 Warning and Error Messages .........46 Using a USB Flash Drive......... 47 Specifications ............47 CA4000 ................47 Optional Accessories/Related Equipment ......48 SKC-PB40..............48 Dimensions ..............49 Table of Contents... -
Page 3: Overview
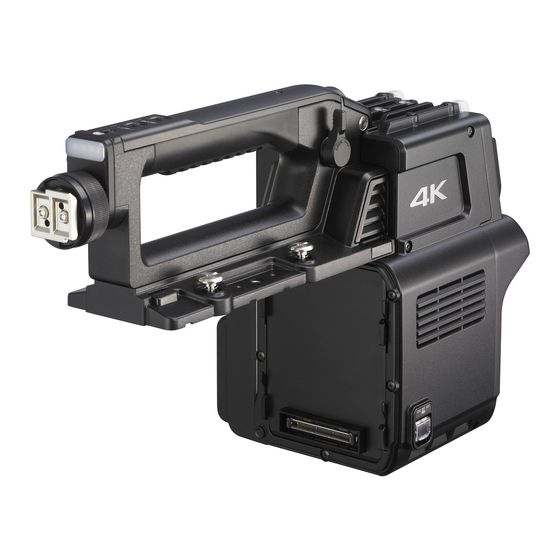
2500 Camera Control Unit for the system camera interface. combination with the matrix color compensation and knee A PMW-F55 or F65 with attached CA4000 can be connected saturation functions. to a BPU4000, which performs 4K video signal processing and... - Page 4 SKC-PB40 Camera Power Boost Kit center marker in the viewfinder. Also, there are indicators Attaches to a CA4000 to add a DC power supply output when along the top and bottom of the viewfinder, such as a tally operating with connection to a CCU.
-
Page 5: System Configuration
Note Production of some of the peripherals and related devices shown in the figures may have been discontinued. For advice on choosing devices, please contact your Sony dealer or a Sony sales representative. Standard system connection example Connection example with HDCU2000/2500 via a BPU4000 for operation as system cameras. - Page 6 Connection example with BPU4000 (without HDCU2000/2500) for operation as a camera extension unit. Viewfinder HDVF-EL75 DVF-L700 4K Video 2K Video Viewfinder Monitor Monitor DVF-EL100 DVF-L350 CA4000 CCA-5 Optical fiber cable BPU4000 Baseband Processor Unit Lens RCP-1000 series PMW-F55 Remote Control Panel Sync signal input...
- Page 7 Connection example with F65 for operation as a system camera. 4K Video 2K Video Monitor Monitor HDVF-EL75 DVF-L700 Viewfinder DVF-EL100 Viewfinder SKC-4065+CA4000 +SKC-PB40 BPU4000 Baseband Processor Unit Lens Optical fiber cable USB flash drive Sync signal input CAC-6 Return Video Digital Motion Picture...
-
Page 8: Name And Function Of Parts
f Handle slide button Releases the handle while this button is pressed, allowing the Name and Function of handle to slide when adjusting the position of the handle. Parts g Camera mounting screws Attaches the unit to the camera. h Microphone holder shoe Top Panel Attaches to a microphone holder. - Page 9 f USB connector (for USB flash drives) d Line selector switch Connects to a USB flash drive for saving/loading configuration Selects the intercom line. data files. PROD: Producer line. ENG: Engineer line. For details, see “Using a USB Flash Drive” (page 47). e INCOM (intercom) knob g PROMPTER1 connector (BNC type) Adjusts the intercom audio volume.
- Page 10 Displays the return video 1 signal in the viewfinder while this b AUDIO IN (audio input) connector (XLR 3-pin) button is pressed. Inputs an audio signal. PMW-F55 input and CA4000 input sources are available, h RET (return video) and 2/3/4 (return video 2/3/4 selectable in the menu. selector) switch...
- Page 11 3.7 A maximum current). Note Note To supply +12 V power, contact a Sony sales representative The total maximum output power for all three systems is or Sony service representative. 135 W. The maximum output power is limited by the length of the optical camera cable, temperature, and other factors.
-
Page 12: Connection And Setup
Press and hold the handle flip-up lock release button, Connection and Setup and raise the handle of the unit. Attaching to a Video Camera This section describes the attachment of a PMW-F55 as an example. For details about attaching an F65, refer to the SKC-4065 Operation Guide. -
Page 13: Attaching A Viewfinder
Lower the handle, and secure the unit to the video Loosen the lock ring of the viewfinder shoe, align with camera using the camera mounting screws. the slot of the viewfinder, then attach the viewfinder by sliding it horizontally. Viewfinder shoe Tighten the lock ring after determining the left and right position of the viewfinder, then connect the viewfinder cable to the VF-A or VF-B connector of the... - Page 14 Peal off the seal. Release the buckle, wrap the belt around the cable, then lock the buckle again. Seal Attach the cable clamp belt to the unit using the two supplied +B3×8 screws. Screws (+B3×8) Optoelectrical cable Adjust the length by pulling down on the end of the belt.
-
Page 15: Adjusting The Handle Position
Adjusting the Handle Position Adjustments and Turn the handle position lock lever counterclockwise Settings for Shooting to release the handle. Adjusting the Black Balance and White Balance In order to maintain high picture quality, it is necessary to set the black balance and white balance appropriately for the conditions. -
Page 16: Setting The Focus Assist Functions
Turn the menu control knob to move the cursor to <VF Note DETAIL> and push the knob. With artificial lighting, particularly fluorescent lights and The <VF DETAIL> page appears. mercury vapor lamps, the brightness may appear to be constant, but in fact the intensity of the red, green, and blue <VF DETAIL>... -
Page 17: Setting The Dynamic Focus Function
Displaying the focus assist indicators To use the area marker Set AREA MARKER to ON to display a marker for the The focus assist indicator function extracts the irregularities of focus detection area in the viewfinder. a subject and converts the integral value to a level indicator for You can set the size and position of the detection area display in the viewfinder. -
Page 18: Setting The Camera Outputs
Turn the menu control knob to move the cursor to the Setting the Camera item to set and push the knob. To use dynamic focus Outputs When DYNAMIC FOCUS is set to “ON” on <VF DETAIL> page, markers are displayed in response to the luminance signal and color signal in the area where 4K resolution video signal can be obtained. -
Page 19: Viewfinder Screen Status Display
Outputting the same image as that in the Viewfinder Screen Status viewfinder In HD-SDI mode, you can obtain a signal that includes the Display information (in response to the VF MARKER, CHARACTER, VF DETAIL, ZEBRA and other settings) displayed in the viewfinder. -
Page 20: Menu Operations
i Shutter indicator Displays the shutter status. Nothing is displayed if the shutter Menu Operations is set to OFF. j F-stop value indicator Displays the lens f-stop value (iris value). You can make various camera settings using the menu displayed in the viewfinder. k Configuration/adjustment progress message area The following controls are used to operate the menu. -
Page 21: Menu Settings
Menu Description Arrows are displayed to indicate the direction for USER This menu includes often-used menu pages scrolling if the page is scrollable. selected from among the OPERATION, PAINT, MAINTENANCE, FILE, and DIAGNOSIS menus. CONTENTS You can edit the factory default menu structure (page 22) using the USER MENU CUSTOMIZE 01.<VF DISPLAY>... -
Page 22: Editing The User Menu
To cancel a changed setting Editing the USER Menu Set the STATUS/CANCEL switch to CANCEL before pushing the menu control knob to restore the original You can select desired pages and items from the setting. OPERATION, PAINT, MAINTENANCE, FILE, and To suspend menu changes DIAGNOSIS menus and register them in the USER menu. - Page 23 To add items to a page Add the items. 1 Turn the menu control knob until the page that has the Select USER MENU CUSTOMIZE on the TOP MENU desired items appears, then push the knob. screen (see page 20). If this is the first time the USER MENU CUSTOMIZE 2 Turn the menu control knob to move the , cursor to menu has been displayed, the CONTENTS page appears.
- Page 24 To delete a page Note You cannot insert a blank line on a page if 10 items have On the EDIT PAGE screen of the USER MENU already been registered. CUSTOMIZE menu, move the , cursor to the page to be deleted and push the menu control knob.
-
Page 25: Menu List
Menu List This section shows the menus displayed in the viewfinder in Legend tables. CCU: HDCU2000 or HDCU2500 Camera Control Unit • For pages that have been registered in the USER menu at Settings: Factory default settings shown underlined. the factory, the USER menu page numbers are indicated in ENTER to execute: Execute by pushing the menu control knob. -
Page 26: Paint Menu
PAINT menu VF-B SETUP RESOLUTION CONTRAST SW STATUS FLARE BRIGHTNESS GAMMA PEAKING BLK GAM SWITCH ASSIGN1 ASSIGNABLE KNEE 11 (U10) WHT CLIP SWITCH ASSIGN2 LENS VTR S/S DETAIL 12 (U11) HANDLE SW1 LVL DEP HANDLE SW2 SKIN DTL ZOOM SPEED MATRIX RETURN RET1 SEL... -
Page 27: Maintenance Menu
MAINTENANCE menu HD DETAIL DETAIL LEVEL AUTO SETUP AUTO BLACK LIMITER M AUTO WHITE LIMITER WHT AUTO WHITE SHADING LIMITER BLK AUTO BLACK SHADING CRISP TEST LEVEL DEPEND WHITE SHADING V SAW H/V RATIO V PARA FREQ H SAW H PARA SKIN DETAIL SKIN DTL WHITE... -
Page 28: File Menu
FILE menu TRUNK REMOTE SELECT READ (USB t CAM) OPERATOR FILE GENLOCK REFERENCE WRITE (CAM t USB) GENLOCK PRESET STATUS STORE PRESET FILE FORMAT FILE ID PHASE CAM CODE DATE SCENE FILE AUDIO INPUT SEL AUDIO IN F55 AUDIO SET1 INPUT MIC CH1 REF MIC CH2 REF... -
Page 29: Operation Menu
CAM INFO MODEL STATUS POWER CONNECT INTERNAL ND CAM AUDIO SW INFO AUDIO CH1 AUDIO CH2 CH1 MIC +48V CH2 MIC +48V CA4000 CAM t CSA F65 STATUS CSA t CAM OPERATION Menu OPERATION Page name Item Settings Description Page No. - Page 30 OPERATION Page name Item Settings Description Page No. <‘!’ IND> ON, OFF [IND]: ‘!’ display (see page 20) on/off 02 (U06) [NORMAL]: Specifies the conditions for which the ‘!’ 1, 2, 3, 4, 5 (combinations display is not shown, even if [IND] is ON. (By supported) specifying standard items, you can receive ON, OFF...
- Page 31 OPERATION Page name Item Settings Description Page No. <DYNAMIC FOCUS> DYNAMIC FOCUS ON, OFF, (OFF) HD 4-times/6-times frame rate mode, (OFF) is 05 (U03) selected. FREQUENCY EXTRA-LOW, LOW, MIDDLE, HIGH CRISP 0% to 99%, 6% LEVEL LOW, MID, HIGH, VERY HIGH PEAK COLOR OFF, RED, BLUE, GREEN, BROWN, PURPLE, YELLOW...
- Page 32 OPERATION Page name Item Settings Description Page No. <VF OUT> VF-A OUT COLOR, Y, R, G, B 09 (U01) VF-B OUT COLOR, MONO RET MIX VF ON, OFF MIX DIRECTION MAIN, RET MIX VF MODE Y-MIX, WIRE(W), WIRE(B) MIX VF LEVEL 0 to 80% CHARACTER LEVEL 0 to 5, 5...
- Page 33 OPERATION Page name Item Settings Description Page No. <HEADSET MIC> INTERCOM MIC DYNAMIC, CARBON, MANUAL 14 (U12) LEVEL –60 dB, –50 dB, –40 dB, –30 dB, Settings in ( ): When DYNAMIC or CARBON is –20 dB, (–60 dB), (–50 dB), selected (cannot be modified) (–40 dB), (–30 dB), (–20 dB) –6, 0, 6 dB...
-
Page 34: Paint Menu
PAINT Menu PAINT Page name Item Settings Description Page No. <SW STATUS> FLARE ON, OFF GAMMA ON, OFF BLK GAM ON, OFF KNEE ON, OFF WHT CLIP ON, OFF DETAIL ON, OFF LVL DEP ON, OFF SKIN DTL ON, OFF MATRIX ON, OFF <VIDEO LEVEL>... - Page 35 PAINT Page name Item Settings Description Page No. <SATURATION> SATURATION –99 to +99, 0 ON, OFF LOW KEY SAT –99 to +99, 0 RANGE LOW, L.MID, H.MID, HIGH ON, OFF TEST OFF, SAW, 3STEP, 10STEP <KNEE> K POINT R/G/B/M: –99 to +99, 0 R, G, B, and M (master) values can be independently set.
- Page 36 PAINT Page name Item Settings Description Page No. <HD DETAIL> DETAIL ON, OFF LEVEL –99 to +99, 0 Absolute value is displayed in ABS mode LIMITER M –99 to +99, 0 LIMITER WHT –99 to +99, 0 Absolute value is displayed in ABS mode LIMITER BLK –99 to +99, 0 Absolute value is displayed in ABS mode...
- Page 37 PAINT Page name Item Settings Description Page No. <MULTI MATRIX> PHASE 0, 23, 45, 68, 90, 113, 135, 158, Select the axis (angle) for which to adjust the 180, 203, 225, 248, 270, 293, multimatrix correction function, and set HUE and SAT. 315, 338 (HUE and SAT can be adjusted independently for 16 axes.)
-
Page 38: Maintenance Menu
PAINT Page name Item Settings Description Page No. <SCENE FILE> Stores and reads scene files (paint data): To store a file in internal memory, specify the number after executing STORE. To read a file, specify the file number only. STORE ENTER to execute STANDARD ENTER to execute... - Page 39 MAINTENANCE Page name Item Settings Description Page No. <AUTO IRIS> AUTO IRIS ON, OFF, (ON), (OFF) Settings in ( ): When a remote control unit/panel or CCU is not connected, when CHU MODE is set to F65 and LENS AUX is OFF, and in 4-times/6-times frame rate modes (cannot be modified).
- Page 40 MAINTENANCE Page name Item Settings Description Page No. <PROMPTER2 OUT> OUTPUT PROMPTER2, SD-SYNC, Note M09 (U14) HD-SYNC, VF, VBS VBS output is not supported when the format is 23.98P or 24P. VBS-OUT Displayed when OUTPUT is VBS. CHARACTER ON, OFF GAIN –99 to +99, 0 CHROMA...
- Page 41 MAINTENANCE Page name Item Settings Description Page No. <F55 AUDIO SET2> LEVEL Set to AUTO to automatically adjust the recording level. CH1 SELECT AUTO, MANUAL Enabled only when CHU MODE is set to F55. CH2 SELECT AUTO, MANUAL CH1 LEVEL –99 to +99, ±0 Adjusts the recording level when SELECT for the corresponding channel is set to MANUAL.
-
Page 42: File Menu
FILE Menu Six types of files can be used for easy adjustments of the camera; Operator, Reference, Scene, User gamma, Lens, and Custom matrix files. You can store the items set with the OPERATION menu and customized USER menu in the Operator file. For details about the specific items included in these files, refer to the Maintenance Manual. - Page 43 FILE Page name Item Settings Description Page No. <USER GAMMA> READ (USBtCAM) ENTER to execute Reads the user gamma file from a USB flash drive. PRESET ENTER to execute Loads the user gamma file data stored in internal memory. FILE ID 16 characters (max.) Enters a comment in the user gamma file to save to a USB flash drive.
-
Page 44: Diagnosis Menu
D03 (U16) Vx.xx UPDATER Vx.xx Vx.xx PROP Vx.xx Vx.xx Vx.xx <SERIAL No.> MODEL CA4000 xxxxxxx OPTION Displays option functions if any option is installed. <CAM INFO> MODEL PMW-F55, F65 Displays the connected camera setting. STATUS OK, NG Displays the camera status. -
Page 45: Appendix
MODE match the connected camera head. • Places with strong vibration PLEASE UPDATE BPU The BPU4000 and CA4000 software • Near strong magnetic fields SOFTWARE versions do not match. • In places where it receives much direct sunlight, or near... -
Page 46: Pmw-F55 Warning And Error Messages
PMW-F55 Warning and Error Messages F65 Warning and Error Messages If a problem occurs on the PMW-F55, the following warning If a problem occurs on the F65, the following warning and error and error messages may be displayed in the viewfinder. messages may be displayed in the viewfinder. -
Page 47: Using A Usb Flash Drive
You can connect a USB flash drive to the USB connector to CA4000 save and load data files. General The following Sony USB flash drives are recommended. Power requirement 240 V AC, 1.7 A (max.) 180 V DC, 1.0 A (max.) •... -
Page 48: Skc-Pb40
EXPIRATION OF THE WARRANTY, OR FOR ANY DVF-L700 (7-type, color) OTHER REASON WHATSOEVER. Microphone Holder CAC-12 • SONY WILL NOT BE LIABLE FOR CLAIMS OF ANY KIND MADE BY USERS OF THIS UNIT OR MADE BY THIRD Return Video Selector CAC-6 PARTIES. -
Page 49: Dimensions
Dimensions Units: mm (inches) 147 (5 350 (13 108 (4 Specifications... - Page 50 The material contained in this manual consists of information that is the property of Sony Corporation and is intended solely for use by the purchasers of the equipment described in this manual. Sony Corporation expressly prohibits the duplication of any...
- Page 51 Sony Corporation CA4000 (JN/SY/CE) 4-479-641-12 (1) © 2013...